


GeneK
-
Posts
129 -
Joined
-
Last visited
-
Days Won
34
Content Type
Profiles
Forums
Events
Downloads
Everything posted by GeneK
-
Mike, Can you give a link to Rob's site, please? Gene K
-
Dave, It's not intuitive, but there are a couple of different ways to join endpoints, including this on compound paths. Gene
-
Unfortunately, despite Kevin's efforts, this very useful forum hasn't gotten much visibility. Understandable, in a sense, since the number of cutting machine users is still relatively small. Also, many of the folks who do drop by to view and/or download seem to be hit and run, without so much as even "indicating" any appreciation or providing any feedback ... most of the time. Thanks for being a Prime Mover here. 👍 Gene K
-
Nice, Tom. Roundels are tricky, but looks like you did a great job, despite your "wonky" description. I assume you had challenges aligning the masks for the different colors? If so, I found that using see-through parchment paper under most of the transfer tape to initially align the circles helps greatly. Gene K Did you mean to have two different letter "L"s? The horizontal portions are different lengths.
-
There are some good recommendations in this thread for the Silhouette Portrait, so ... if considering buying the excellent little Portrait 3, this $149 price (including shipping) from Walmart is a nice bargain. May be available in the store at your location. No indication how long this price is in effect. For the adventurous, there are currently some less expensive, supposedly new in-box Portrait 3s available on ebay, for example this one for $129 including shipping, but ... it's ebay. Gene K
-
Michael, Like Mozart, I like and use Silhouette Studio "directly" to scale, manually trace, and draw scanned decals. The trace feature included with Studio also works nicely, but is not as precise as manually tracing. Instead of suffering "access to a Cricut", you may want to consider this great deal at Walmart - a Silhouette Portrait 3 for only $150, including free shipping.👍 Gene K
-
A new response to an old post, but may be useful for new readers. https://www.dafont.com/blockschrift-fur-flugzeuge.font for that particular one. Google search for "WWI aircraft fonts" yields good hits, for example these German serial numbers : https://www.rcgroups.com/forums/showpost.php?p=47386987&postcount=5 Further, if you use this link with a photo of the font you are looking for, it usually gives good results. Gene K
-
Doesn't work that way (in my Designer edition) unless the shapes are grouped before saving. Of course the best way is to use layers as Wrongway_Joe suggested above. Gene K
-
Chart has moved to here: https://www.silhouetteamerica.com/software/chart Gene K
-
Here's an updated link to the Software Comparison Chart denders posted a couple of years ago. For starters, the most important/useful features in Designer versus the free basic version are: PNG autotrace; and the ability to import vector files (as pdf and svg) to have the program automatically generate cut lines (vice using the program's much less precise trace feature). As one progresses to the point of doing manual vector drawing (or tracing), the additional features of the Designer version will come in handy. My recommendation is to invest in the Designer version from the get go. Gene K
-
I have a comment ... fantastic explanations!, thanks I appreciate that your post took a lot of effort, not to mention the beautiful model "work". Gene K
-
-
The Business edition is way more than an average hobbyist "needs". HOWEVER, the upgrade from the basic to the STUDIO edition is worth it if for no other reason that you can drop vector files like svg, pdf, and png into the program, and cut lines are automatically generated -- no need for tracing, removing extraneous nodes, etc. This page shows the feature comparison among the three editions, and this page shows pricing ... well worth it to get the Designer edition as Mozart suggested. Gene K
-
snigel79, If you can hack Fusion 360, you should certainly be able to work your way through Studio!!! Fusion is harder on people (like me) coming from more intuitive Windows based programs, than it is for folks (like you) going the other direction. Most everything in Fusion has it's own way of having to do simple things like moving bodies or sketches. SO I can appreciate your frustrations coming from the unique Fusion environment. However, I don't think anyone can give you the personalized hand holding that you seem to be looking for. Just takes grinding in front of the computer with Studio and YouTube (which has some excellent starter videos, in my opinion). And you clearly have a terrific command of English, so there's lots available to read ... but there is no Fairy Godmother with a Studio wand to tap you on the head. As for your not being able to easily see what you are drawing, go over to the Line Style Panel on the right of the screen (fourth from the top) where you can pick the color and thickness of your lines (that thickness does not effect the cut). Learn how to do that and later when you start cutting, you can select different actions by color - in the example below, cut the blue lines only though the vinyl, cut the green lines all the way through the carrier backing material, and sketch the red and black lines. As was pointed out by Mozart, I also recommend highly that you invest in the Designer edition, if for no other reason than you can then open/drag in vector art (like vector PDF, SVG and others), and Designer will instantly generate cut lines without the need to trace either manually or with the Trace Panel. I think you'll eventually find that drawing in Studio easier than Fusion since there's no struggling with constraints, for example. Of course, there's nothing that matches the precision of CAD. Hope you stay with it! Gene K EDIT: I just realized that you originally posted over a year ago, so all above is probably passé for you now ... right?
-
Beautiful production. Thanks. Gene K
-
A timeless "tutorial". Thanks. Gene K
-
That was a nice journey for me -- thanks, Mike. Gene K
-
Nice tips, Woody - thanks. As an aside, I've used the Silhouette Studio Print And Cut feature - print on decal paper, then use the cutter to cut the decals. Many tutorials on YouTube for both Silhouette as well as Cricut. If the cuttter is properly tuned/aligned, the film cuts can be made very close to the decals' images. Gene K
-
I use Oramask 810* (note NOT Oracal, the company). Like denders, I get mine here where you can get it in individual pieces and/or rolls. If you buy a roll. yes, you can load it into the Cameo 4's built in adjustable-width holder. Not sure why you'd want to do that since the masks most of us use in modelling wouldn't be large enough to require a roll. Much easier, as danders suggested, to cut a piece off a roll and mount it on a cutting mat. I use two cut settings: one to only cut the patterns through the vinyl; and the other to cut an outline around the masks all the way through the backing. That process gives me an easy to handle piece, for example, to use with transfer tape. The Oramask price, I think, is reasonable, but haven't compared it to other masking material - works for me. Gene K *Oramask comes in versions - 810 is the most flexible, whereas 811 and 813 are better for flat surfaces.
-
Hoops, Do you have a handy reference for the placement of the plates? Thanks, Gene K
-
How did it go with correcting the A and E, Greg?
-
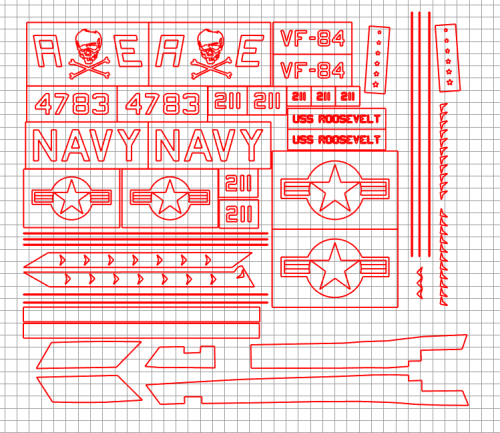 Thanks - nice job tracing the Academy sheet. 👍 I changed the colors of your bounding boxes to green so that I could cut that color through my mask material (Oramask 810). Will make it easier to handle the smaller individual masks. Gene K
 -
Nevermind. Gene K
-
1/72 Hasegawa F-104 Canopy and Wheel Masks, .svg Format
GeneK replied to Hoops's topic in Canopy Masks
Thanks hoops. I cut some masks this morning and the fit was spot on! Next week I'll use those as a base for some Has TF-104 masks. Have you made any masks for the Revell F-104? Gene K -
Belly Strap for 1_32 Tamiya Phantom for Posting.studio3
GeneK commented on GeneK's file in Non-Mask Cutting Files
 Hello, Woodie. Sorry I didn't see your PM earlier. Unfortunately not much action on that forum to check on. As I mentioned in my file description, I use .010" plastic for the 1/32 straps. With the Cameo 4 Autoblade, my settings are Depth 10, Force 33, Passes 2, Speed 1, Track Enhancing On, and Line Segment Overcut off. Of course your setting will depend on how "new" your blade is (my current blade is well used), and you may also have to adjust for the hardness of plastic you'll be using. My .010" stock is fairly stiff. Those straps are tailored for the Tamiya kit, so likely will not work for other brand models or scales ... "ask me how I know". 🤔 Gene

