
All Activity
- Yesterday
-
Welcome aboard, Duncan! Kev
-
Hello Folks, my name is Duncan Black and I have recently bought a Cricut Explore 3 as a retirement gift to myself. I am a keen aircraft modeller and airbrush painter with plenty of experience of using commercially purchased paint masks but have always wanted to be able to create my own. Unfortunately I am a luddite when it comes to drawing software so I guess I have quite a learning curve ahead of me. To start I will be happy to reproduce basic markings like RAF roundels, US 'Stars and Bars' and WW2 Luftwaffe markings and the various code numbers and letters. I use a lot of canopy masks so that's another application I will be having a go at in the future. For now I will start by learning how to produce basic files and load them into Cricut Design Space. My first project will probably be RAF Interwar roundels for a 1/48 Hawker Hart kit I am currently building. I have EazyDraw for Mac already installed on my computer so may as well try that out. Expect lots of stupid beginners questions in the near future lol. Duncan B
- 1 reply
-
- 1
-

-
 BlackMike Models joined the community
 - Last week
-
 I had no idea those Arma files existed - thanks for the link, Milo! I'd be looking to scale them up to 1/32, but I do have a Hasegawa 1/48 Hurricane in the stash... Kev
- 1 reply
-
- 1
-
-
 Hello everyone, there are now quite a lot of 3d printing accessories on the net. The Arma Hobby stuff looks very nice. Many things could maybe also be adapted quite easily to other aircraft types in a freeware CAD like Fusion360. I am also amazed at these display bases that some people offer for download very cheap:. https://www.armahobby.com/category/3d-files https://cults3d.com/en/3d-model/art/wwii-us-aircraft-carrier-diorama-and-display-base-1-48-scale-200mm https://cults3d.com/en/3d-model/art/nimitz-class-aircraft-carrier-diorama-and-display-base-1-48-scale-300mm Who has already gained experience with this and can report on slicer settings for such small parts etc.? I would be happy to bring this topic to life here! Very Best Regards Frederick alias Milo
- 1 reply
-
- 1
-
-
 PoochA10 joined the community
 -
 erindup joined the community
 -
 Turkey9186 joined the community
 -
 Nico joined the community
 -
 kiddjar joined the community
 - Earlier
-
 Shtiv joined the community
 -
 Dr P joined the community
 -
 Scott4526 joined the community
 -
 Hans joined the community
 -
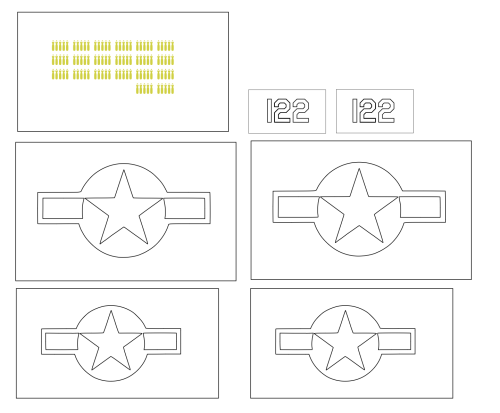
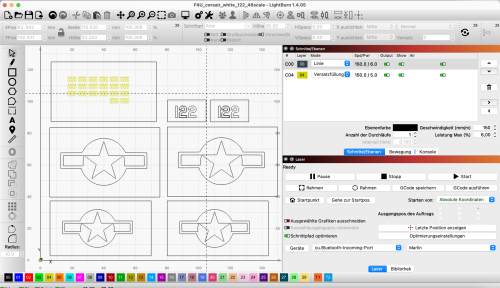
View File 1_48_F4U_Corsair_white_122.svg 1_48_F4U_Corsair_white_122.svg not sure if the bomb markings are realisable for non-laser cutters, as the laser removes the "filling" of the bombs. For better handling, the overall size is slightly larger than the decal. (abou 2,5 mm higher than the decal) photos of the result will follow Submitter MiloMinder Submitted 07/14/2024 Category Specific Aircraft
-
Version 1.0.0
4 downloads
1_48_F4U_Corsair_white_122.svg not sure if the bomb markings are realisable for non-laser cutters, as the laser removes the "filling" of the bombs. For better handling, the overall size is slightly larger than the decal. (abou 2,5 mm higher than the decal) photos of the result will follow -
View File F4U_corsair_white_122_48scale.lbrn2 F4U_corsair_white_122_48scale.lbrn2 not sure if the bomb markings are realisable for non-laser cutters, as the laser removes the "filling" of the bombs. For better handling, the overall size is slightly larger than the decal. (abou 2,5 mm higher than the decal) photos of the result will follow Submitter MiloMinder Submitted 07/14/2024 Category Specific Aircraft
-
Version 1.0.0
1 download
F4U_corsair_white_122_48scale.lbrn2 not sure if the bomb markings are realisable for non-laser cutters, as the laser removes the "filling" of the bombs. For better handling, the overall size is slightly larger than the decal. (abou 2,5 mm higher than the decal) photos of the result will follow -
-
View File 1_48_JU52_BAE_G-AHOF.svg 1_48_JU52_BAE_G-AHOF.svg Submitter MiloMinder Submitted 07/14/2024 Category Aircraft - Civil
-
Version 1.0.0
1 download
1_48_JU52_BAE_G-AHOF.svg -
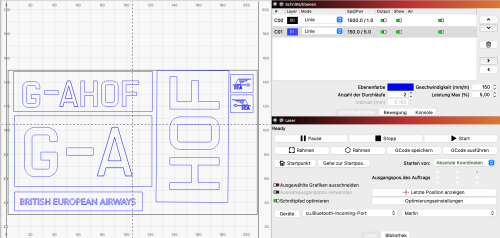
View File 1_48_BAE_JU52.lbrn2 1_48_BAE_JU52.lbrn2 Submitter MiloMinder Submitted 07/14/2024 Category Aircraft - Civil
-
Version 1.0.0
0 downloads
1_48_BAE_JU52.lbrn2 -
Hello Carl, it’s great to see you here, especially as a Silhouette owner! Please feel free to share some of your work and any tips that you may have. The more the merrier! Max
-
Welcome aboard, Carl! Kev
-
Hi all, Heard about this site on the latest episode of On The Bench, as l own a Silhouette I figured I would join the fun. Cheers, Carl
-

Fujimi 1/72 F-86 slats inner structure
cpoud117 replied to cpoud117's topic in Non-Mask Applications
Looking good! You're going to have a full assembly line of 1/72 sabres before you know it. The hard part is going to be to choose the schemes 🙂 -
As well as others in 1/72 like the Sword Furies and the Special Hobby F-86H, F-86K , and F-86L ... for starters. Would be great if, after ClearProp issues their 1/72 F-86A, they make the wing sprues available as overtrees (just dreaming ). Not likely to happen, so ... Gene K
-

Slat slot fix for HobbyCraft/Academy 1/72 F-86
GeneK replied to GeneK's topic in Non-Mask Applications
Thanks. HobbyCraft "based" their kits on the Fujimi Sabre, to the point they carried over some of Fujimi 's negatives, like the square speed brakes ... but they left off some of Fujimi's positives, like the latch engravings on the gun access panels. Overall the HC kits are up there with the best current 1/72 Sabre kits, and they make (made) the only Sabre 6 wings (extended 6-3 wing with slats)! Speaking of slats - they were virtually the same on all Sabres. 👍 Gene K -
Slat slot fix for HobbyCraft/Academy 1/72 F-86
cpoud117 replied to GeneK's topic in Non-Mask Applications
Nicely done! I don't have any of the Academy/Hobbycraft in my stash but these look like a solid improvement over the original kit part. Thank you. -
Slat slot fix for HobbyCraft/Academy 1/72 F-86
GeneK replied to GeneK's topic in Non-Mask Applications
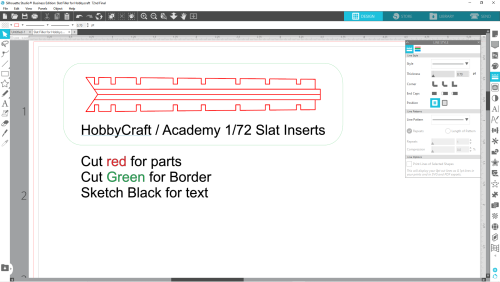
Under-Slat Insert for HobbyCraft/Academy 1/72 F-86 slatted Sabre kits (to model slats extended). Inspired by cpoud117’s recent post for an under-slat insert for the 1/72 Fujimi Sabre, I worked up the same for the HobbyCraft/Academy slatted Sabre kits (slot spacing is not the same). The bigger difference between the kits is that the Fujimi wings have the slats molded closed (and must therefore be cut out to extend them), while HobbyCraft includes separate slats, and has slat “wells” molded into the top wing. Unfortunately those deep wells are totally out of scale since the wing area under the slats should be faired smoothly into the top of the wing. This Silhouette Studio file facilitates filling the wells. The file merely includes two pieces for each wing -- a long strip that is laid inside the slat well, and a piece that sits on top of that strip to allow the piece to attach flush with the top of the wing … as shown below. The left wing has the strip attached, and the right wing has the under-slat piece glued over that strip … and then glued to the bottom wing ... ready for detail sanding. The photo below is for reference - shows the smooth fairing into the top of the wing, and also the correct position of the extended slats. Notes: 1. File was created in Silhouette Studio and cut from .010 plastic using Silhouette Portrait 4. a. My cut settings are Depth 10, Force 33, passes 2, and speed 3. Yours may vary depending on machine, age of blades, and hardness of the plastic (among other things). b. Before cutting, use painters tape around the plastic material on the mat to ensure the plastic stays in place as cutting is taking place – the blade does a lot of horizontal pushing and pulling while cutting through the plastic. 2. Tamiya Extra Thin Cement (Quick Setting (!)) will perfectly weld the pieces to the wing, but if an even smoother fit is needed, the insert’s edge can be slightly beveled where it meets the top of the wing. 3. All HobbyCraft/Academy kits have a common sprue that includes slats, so the hard wing kits are a good source for spares (as for use with the Fujimi kit). 4. For those new to Silhouette Studio, I’ll post a short video in the Tutorials forum that shows how I traced the pieces for cutting using Studio tools like Subtract, Mirror and Align vice simply using point-to-point trace (less precise). I'll also address cut settings and use of Line Segment Overcut, Track enhancing, and Intelligent Path Technology to make cleaner cuts. I’ll also post this file as an SVG for use in cutters other than Silhouette ... or to print and manually cut. Gene K -
Sorry - Failed Edit. Please go to Downloads to see file info. Gene K
-
Version 1.0.0
1 download
Plastic Inserts to eliminate "slat slot step" by fairing the area under the slats smoothly into the wing top surface. -
Fujimi 1/72 F-86 slats inner structure
cpoud117 replied to cpoud117's topic in Non-Mask Applications
Hi @GeneK I'm looking forward to seeing what your design. I had a shape for the arms but it was too flimsy with 0.2mm styrene. I'm gonna find some 0.3mm at some point which I can use for such task. The Hasegawa F-86D is also in need of a slat solution. -
Cpoud, I'm working up a wing insert that may provide a base onto which the slats can be mounted. Should be more than adequate for this scale since it's hard to see the arms under the slats. Will post later today. Inspired by you, I also worked up an insert for the 1/72 HobbyCraft kits. Those kits include slats as well as the "brackets" to hold them. Will also post today. Gene K


