


GeneK
SMPM_Members
-
Joined
-
Last visited
Everything posted by GeneK
-
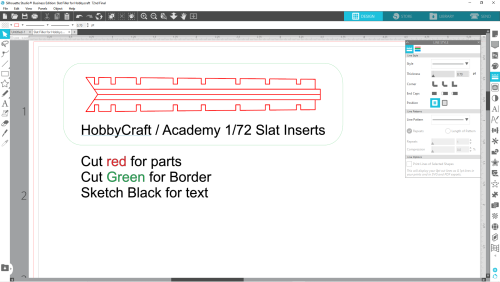
Line Segment Overcut is very useful, but be careful that you do not inadvertently clip off very small parts in tight places. Gene K
-
 Tailored for Hasegawa early F-4E, G, and S kits. Using the straps on other kits like FineMolds or Fujimi will require alteration since panel lines differ. Screenshot shows the cut settings for .005" plastic. To use -- assemble reinforcements to strap using Tamiya Extra Thin Quick Setting Cement - used VERY sparingly. Attach to wing by positioning top "ears" and carefully tack top of strap into place. Then adjust arms into position and affix. The rivets are color coded to allow cutting or eliminating via cutting by color option. Gene K
 -
View File Belly Strap for 1/72 Hasegawa F-4 E/G/S Kits Tailored for Hasegawa early F-4E, G, and S kits. Using the straps on other kits like FineMolds or Fujimi will require alteration since panel lines differ. Screenshot shows the cut settings for .005" plastic. To use -- assemble reinforcements to strap using Tamiya Extra Thin Quick Setting Cement - used VERY sparingly. Attach to wing by positioning top "ears" and carefully tack top of strap into place. Then adjust arms into position and affix. The rivets are color coded to allow cutting or eliminating via cutting by color option. Gene K Submitter GeneK Submitted 05/15/2025 Category Non-Mask Cutting Files
-
Thanks. Nicely done. Gene K
-
 Excellent presentation, Harry, thanks. Gene K
 -
How did it finally go last year, Paolo? Gene K
-
Is there a template "key" that shows what goes where (I don't have a 1/32 kit -- is your mask based on Hasegawa, Revell, Trumpeter, or ... ?. I can get instructions from Scalemates). Would downsize to 1/48 and 1/72. Thanks, Gene K
-
How is your 3D printing going, Frederick? Gene K
-
Beautiful work! Thanks. Gene K
-
Worked beautifully - thanks Craig. Gene K
-
I order my Oramask from here in the US: https://craftcuttersupply.com/products/oramask-810-stencil-vinyl?variant=8220444131373 There are many options (sheets, rolls, sizes) at good prices, and they ship to Canada. In the past there was a discussion on another site about 810 losing stick and shrinking after a long time in storage, so the recommendation was to order in small batches. I personally haven't had a problem storing a roll inside the house for several years. Gene K
-
I'm sure Mike will give you the best "tutorial", but for others who may have the same quandary (or who are looking for shortcuts): 1. Convert 1:1 measurements into your desired units, for example inches or mm. https://www.calculator.net/conversion-calculator.html 2. Divide by your desired scale, for example 72 or 48. 3. If you change your mind on the scale, you can start again, or https://www.scalemodelersworld.com/online-scale-converter-tool.html Gene K
-
Thanks. Nice job on the masks ... and on the model!! Gene K
-
Thanks DBB. Although I don't have the subject kit, I appreciate looking at other's fine work. Thanks. For what it's worth -- as concerns removing supports, I just upgraded to the Mars 5 Ultra, and using it with Anycubic ABS-Like (Pro 2 ) resin , I've had an "astounding" (by my previous experience) zero print failures. That resin has a flexibility that is most forgiving when removing supports, which on delicate items I remove after curing. Using fine supports on pieces like 1/72 boarding ladders, lets me easily remove the supports with just a little finger pressure. Nub cleanup is minimal. I like Lychee Pro to arrange supports since it's easy to mix medium with fine supports on delicate parts. Gene K
-
As well as others in 1/72 like the Sword Furies and the Special Hobby F-86H, F-86K , and F-86L ... for starters. Would be great if, after ClearProp issues their 1/72 F-86A, they make the wing sprues available as overtrees (just dreaming ). Not likely to happen, so ... Gene K
-
Thanks. HobbyCraft "based" their kits on the Fujimi Sabre, to the point they carried over some of Fujimi 's negatives, like the square speed brakes ... but they left off some of Fujimi's positives, like the latch engravings on the gun access panels. Overall the HC kits are up there with the best current 1/72 Sabre kits, and they make (made) the only Sabre 6 wings (6-3 wing with slats)! Speaking of slats - they were virtually the same on all Sabres. 👍 Gene K
-
Under-Slat Insert for HobbyCraft/Academy 1/72 F-86 slatted Sabre kits (to model slats extended). Inspired by cpoud117’s recent post for an under-slat insert for the 1/72 Fujimi Sabre, I worked up the same for the HobbyCraft/Academy slatted Sabre kits (slot spacing is not the same). The bigger difference between the kits is that the Fujimi wings have the slats molded closed (and must therefore be cut out to extend them), while HobbyCraft includes separate slats, and has slat “wells” molded into the top wing. Unfortunately those deep wells are totally out of scale since the wing area under the slats should be faired smoothly into the top of the wing. This Silhouette Studio file facilitates filling the wells. The file merely includes two pieces for each wing -- a long strip that is laid inside the slat well, and a piece that sits on top of that strip to allow the piece to attach flush with the top of the wing … as shown below. The left wing has the strip attached, and the right wing has the under-slat piece glued over that strip … and then glued to the bottom wing ... ready for detail sanding. The photo below is for reference - shows the smooth fairing into the top of the wing, and also the correct position of the extended slats. Notes: 1. File was created in Silhouette Studio and cut from .010 plastic using Silhouette Portrait 4. a. My cut settings are Depth 10, Force 33, passes 2, and speed 3. Yours may vary depending on machine, age of blades, and hardness of the plastic (among other things). b. Before cutting, use painters tape around the plastic material on the mat to ensure the plastic stays in place as cutting is taking place – the blade does a lot of horizontal pushing and pulling while cutting through the plastic. 2. Tamiya Extra Thin Cement (Quick Setting (!)) will perfectly weld the pieces to the wing, but if an even smoother fit is needed, the insert’s edge can be slightly beveled where it meets the top of the wing. 3. All HobbyCraft/Academy kits have a common sprue that includes slats, so the hard wing kits are a good source for spares (as for use with the Fujimi kit). 4. For those new to Silhouette Studio, I’ll post a short video in the Tutorials forum that shows how I traced the pieces for cutting using Studio tools like Subtract, Mirror and Align vice simply using point-to-point trace (less precise). I'll also address cut settings and use of Line Segment Overcut, Track enhancing, and Intelligent Path Technology to make cleaner cuts. I’ll also post this file as an SVG for use in cutters other than Silhouette ... or to print and manually cut. Gene K
-
Sorry - Failed Edit. Please go to Downloads to see file info. Gene K
-
 Plastic Inserts to eliminate "slat slot step" by fairing the area under the slats smoothly into the wing top surface.
 -
Cpoud, I'm working up a wing insert that may provide a base onto which the slats can be mounted. Should be more than adequate for this scale since it's hard to see the arms under the slats. Will post later today. Inspired by you, I also worked up an insert for the 1/72 HobbyCraft kits. Those kits include slats as well as the "brackets" to hold them. Will also post today. Gene K
-
Thanks, Kev. Also good discussion about the ClearProp kiit here at Britmodeller, and here at Aircraft Resource Center. Thankfully the renowned Sabre expert Duncan Curtis (Sabrejet) is heavily involved with ClearProp ... as well as with LSP, Britmodeller, and Aircraft Resource Center! Gene K
-
Here's a good discussion, for starters. From reading and watching other reviews, I get that the Siser is "more precise" (not really defined), less automated, and more expensive. Silhouette is more established, but company support is abysmal (in my experience) ... have not read anything yet about Siser in that regard. I'm with Mozart in that the Silhouette line does what I want/need for modeling. In that regard, I like the evolving Studio software, and the Portrait 4 is a step up from previous models. I've had Cameos up to the Cameo 4 (and have a Curio), but the bottom of the line Portrait 4 suits me perfectly. As to the added "precision" of the Siser, it would likely be of no benefit to me since masking REALLY fine details as numbers and letters is so challenging, especially with all those tiny floating "innards". Decals work a treat here. Looking forward to your decision Craig ... and to your cutting experience. Gene K
-
Thanks. I've been away from Sabre kits for years, but I've done many a Sabre wing like that, but always used putty to fair in the slat "well" even with the top wing surface. Your system makes much more sense, and using the cutter makes it practical and repeatable. Now I need to work up some slats for 3D printing!! Gene K EDIT: Thankfully we'll be getting a super accurate 1/72 F-86A, complete with slats, near the end of this year from Clear Prop. The kit is based on their soon to be released 1/48 kit
-
Outstanding, thanks. Will be useful to me since a have a "stash" of those Fujimi kits in the stash. Can you post some pics of the wing's bottom and top without the slats in place, lease? Gene K
-
Agreed 👍, but my point was that Arma could easily provide a vector pdf to save us cutters a little effort. I do manual tracing within the Silhouette Studio program ... the Studio auto trace feature is getting better, but not precise enough for items like canopy masks. Gene K

