
GeneK
SMPM_Members
-
Joined
-
Last visited
Everything posted by GeneK
-
That laser engraver itself is reasonably priced, but appears you'd need some pricy extras like enclosure, air purifier/exhaust, and such, doubling that price? For example: Creality CR-Laser Falcon 10W Laser Engraver Advanced Kit. I also (unfortunately) have no laser experience, but have considered a laser cutter (many times) in the past. My conclusion/feeling is that the much simpler to set up and operate Silhouette Portrait 4 does all that I need .. but for tiny stencils, decals are my choice. I'm looking forward to your laser experience!! Gene K DISREGARD - I just saw that you had bought the laser cutter.
-
Great job, Henry. I don't have the kit, but downloaded your file to admire the tracing and labelling. 👍 Gene K
-
The Studio Trace tool results in many (!) points to edit since it plots a control point for every niggle, nook, and nuance in the fuzzy bitmap image being traced. You can reduce the number of points using the Simplify function (when you get further into the program), but you'll start losing the precision required for masks. Much better to invest the effort (as you started with YouTube) to learn manual vector tracing and point editing in Studio. You could use another program like Inkscape to produce vector drawings ... then you could import the resulting svg files into Studio (not Basic) as ready-to-cut. However, instead of learning more than one program, I suggest exploring/learning Studio. Like anything, takes practice mastering Bézier curves, but the payoff for creating mask is absolutely well worth it!! Check out Tutorials, Canopy Masks, and Q&A posts here! Gene K P.S. Similar to what you are doing with 1/48 ZM Phantom mask, I did for Tamiya 1/48 F-4B, as well as the Hasegawa and FineMolds1/72 kits ... as posted in the Canopy Mask section on this site.👍
-
I'm late coming to this thread -- glad you found a solution after so much frustration. SO just for info: I have had nearly all models of the Silhouette cutters up to 4, and had great cuts ... until the 4. Problem with that machine was the same as yours. Sent the first one back, and the replacement had the same issue. In frustration I ordered an inexpensive Portrait 4 ... and was (and am) pleased as punch. All to say I wouldn't discount that your machine may have hardware tracking problems, including distortions depending on where on the page the cut is. As @Timbacat pointed out - lots of things churning inside the machine to make "simple" cuts as circles. Gene K
-
Has 1/72 Seamless SVG for use in non-Silhouette cutters or Manual Tracing
-
Has 1/72 Seamless Intake SVG Has 1/72 Seamless SVG for use in non-Silhouette cutters or Manual Tracing File Information Submitter GeneK Submitted 03/12/2026 Category Non-Mask Cutting Files View File
-
 To remedy the 1/72 Hasegawa Phantom intake challenge. File is for cutting .010 plastic using Silhouette Studio. Draft Instructional video on Youtube. Seamless Intakes for Hasegawa 1/72 F-4 Phantom. SVG file posted separately for non-silhouette machines or manual cutting. The circles are to make blanking engine faces at the end of the intakes if a resin/3D/plastic face is not available. Gene K
-
Seamless Intakes for Hasegawa 1/72 F-4 Phantoms To remedy the 1/72 Hasegawa Phantom intake challenge. File is for cutting .010 plastic using Silhouette Studio. Draft Instructional video on Youtube. Seamless Intakes for Hasegawa 1/72 F-4 Phantom. SVG file posted separately for non-silhouette machines or manual cutting. The circles are to make blanking engine faces at the end of the intakes if a resin/3D/plastic face is not available. Gene K File Information Submitter GeneK Submitted 03/12/2026 Category Non-Mask Cutting Files View File
-
West, What software are you using to scan, and in what format is the scanned file? Gene K
-
I did masks for the Hasegawa TF, but can't find the files ... but at any rate, those wouldn't fit the Revell kit. When the F-104 bug bites again, I'll do another set. Unfortunately the Hasegawa TF kit is hard to find these days. As an aside, Jared also has some great F-104 3D files here. Gene K
-
Looks pretty good so far. The Studio Trace function is good, but if you learn point editing, you can then refine/simplify Studio traces ... and ultimately do manual tracing (which some of us consider more precise than Studio tracing). Looks like you used a font that does not match the decal. In that regard, there are many cut-ready Studio files for fonts and insignia available on this site as well as on the Net -- for example, here is USAF Amarillo font. So ... there are many good Studio tutorials on the web (esp YouTube), but you could start on this site in the Tutorials section. Well worth a visit as you climb up the Studio Learning Curve. Gene K
-
Here's the link to the current bargain priced Portrait 4 -- still $129 including shipping. I've owned the range of SIlhouette machines, and the Portrait 4 does all I need as concerns my scale model hobbies. Only wish it had more cutting force since I use it to cut thin plastic ... up to .015", but takes multiple passes. Gene K.
-
Belly Strap for 1/72 FineMolds F-4 E/G/S Kits For the new FineMolds 1/72 F-4E late ... and F-4G and S if released. Silhouette file is color coded, so chose colors to be cut (with/without rivets). I use .005" plastic with settings: force 33, passes 1, and depth 6. My choice of adhesive is Tamiya Extra Thin Quick Set used very sparingly. Tack center, then position and tack end of each leg. I will post svg file for use in other brand cutters or for manual tracing. Gene K File Information Submitter GeneK Submitted 09/16/2025 Category Non-Mask Cutting Files View File

-
For the new FineMolds 1/72 F-4E late ... and F-4G and S if released. Silhouette file is color coded, so chose colors to be cut (with/without rivets). I use .005" plastic with settings: force 33, passes 1, and depth 6. My choice of adhesive is Tamiya Extra Thin Quick Set used very sparingly. Tack center, then position and tack end of each leg. I will post svg file for use in other brand cutters or for manual tracing. Gene K
-
Thanks, Harry. Interesting site. Gene K
-
-
Very "fancy" scheme ... almost gaudy. https://www.deviantart.com/sr71abcd/art/Hawker-Hunter-Mrs-D-263953951 There's a great 1/32 build on LSP where the builder made star masks - you could contact him and ask him if he'd share the patterns. Considering for whom you are making the model, I would think he'd be proud to contribute. BTW, he mentions that the small stars tested the limits of his cutter - will be very challenging at 1/48! Large Scale PlanesHawker Hunter - Masquerading as Miss Demeanour - Finished...Oh I’ve spent too long painting shades of gray. So you know this one won't be like the other Hunters that have come before me I showed this pic of Miss Demeanour to my son last year and he ended up... Failing that, here's a paper model that could ease some of the mask designing: 1/48-Hawker Hunter Mk.58A, UK registry G-PSST, "Miss Demeanor" - Paper Model - EcardModels Good luck! Gene K
-
Kev, Use MS Edge browser, and when coming across ANY foreign language, merely right click and press Translate to English. Some other browsers have a similar capability, but Edge has been the best for me in terms of translation accuracy and maintaining the translation between web pages/posts. Gene K
-
To make placing the Transfer Tape/Mask more accurate, peel it from its backing and place (roll) it onto see-through wax paper. Fold back a corner of the wax paper to expose some sticky tapa and maneuver the assembly into position. Then press down the exposed edge of the tape/mask, and carefully peel off the wax paper backing as you lay the Tape/Mask into position. Peel off the Transfer Tape and voila. Gene K
-
Tack a small piece of tape (like Scotch or Tamiya) on a top corner of the tape and peel back from the backing material. For higher tack tape, also place tape on the bottom corner to pull apart. to the degree wanted. I fold back a corner of the backing material to facilitate positioning the tape before removing the remainder of the backing. Great response, as always, @Mozart . Gene K
-
Line Segment Overcut is very useful, but be careful that you do not inadvertently clip off very small parts in tight places. Gene K
-
 Tailored for Hasegawa early F-4E, G, and S kits. Using the straps on other kits like FineMolds or Fujimi will require alteration since panel lines differ. Screenshot shows the cut settings for .005" plastic. To use -- assemble reinforcements to strap using Tamiya Extra Thin Quick Setting Cement - used VERY sparingly. Attach to wing by positioning top "ears" and carefully tack top of strap into place. Then adjust arms into position and affix. The rivets are color coded to allow cutting or eliminating via cutting by color option. Gene K
-
View File Belly Strap for 1/72 Hasegawa F-4 E/G/S Kits Tailored for Hasegawa early F-4E, G, and S kits. Using the straps on other kits like FineMolds or Fujimi will require alteration since panel lines differ. Screenshot shows the cut settings for .005" plastic. To use -- assemble reinforcements to strap using Tamiya Extra Thin Quick Setting Cement - used VERY sparingly. Attach to wing by positioning top "ears" and carefully tack top of strap into place. Then adjust arms into position and affix. The rivets are color coded to allow cutting or eliminating via cutting by color option. Gene K Submitter GeneK Submitted 05/15/2025 Category Non-Mask Cutting Files
-
Thanks. Nicely done. Gene K
-
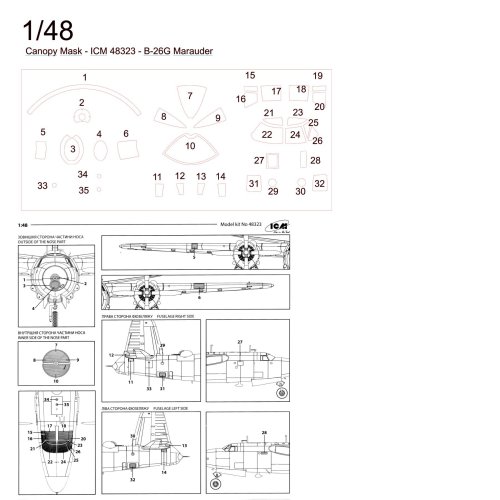 Excellent presentation, Harry, thanks. Gene K