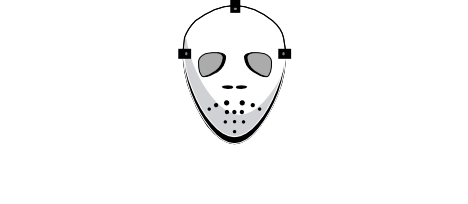
Posted April 22, 20223 yr Over on LSP I'm doing a Dragon Bf110G-4, the extract in the link shows a less-than-successful attempt at doing the Hakenkreuze on the fins, and thanks to Quang and his expertise, the easier way....also shown below for a quick ref.: Hope it helps, it's certainly the best way that I've "found" of doing these tricky symbols. Max
April 22, 20223 yr Thanks, Max. In the first photo, the first mask appears to have some sort of thin border around it. I can't quite work out what I'm seeing. Kev
April 23, 20223 yr Author Yes, regretfully I didn’t take a picture of the “empty” mask with the black background sprayed in it, so both of the fins in the first photo are actually at the next stage of the smaller Hakenkreuze positioned inside the “empty” mask ready for the white over spray. Hope that’s all clear but if not I’ll do a further picture of explanation! Edited April 23, 20223 yr by Mozart
April 23, 20223 yr 7 hours ago, Mozart said: Yes, regretfully I didn’t take a picture of the “empty” mask with the black background sprayed in it, so bith of the fins in the first photo are actually at the next stage of the smaller Hakenkreuze positioned inside the “empty” mask ready for the white over spray. Hope that’s all clear but if not I’ll do a further picture of explanation! Thanks, Max. I get it now! Kev
June 10, 20223 yr It might help to use a transferfilm and have the black and the white areas as seperate masks. By that I mean you create a mask that is actually two masks, one for the black and one for the white but both are transfered concurrently from the backingsheet to the substrate by means of a vinyl transferfilm to maintain alignment. After the black portion has been painted that mask is placed again aligning it with the "white" mask and the "white" mask is then removed, and so on. Either that or make sure that you make the masking stickers identical in size (outside dimension) smaller than the tailfins etc so that you can use one with the larger swastika to paint the white and then use the outer perimiters of this "background" mask as registration marks to place the "foreground" mask right on top of it. Thereby working your way from the outside in, if that makes sense. As an example, painting a RAF chochard (from out-side in blue, white and red); start with a square that has a large hole cut in its center for the blue, then an equal size square with a hole for the white etc. All you need to do is make sure each square is precisely aligned on top of the previous square. You actually only need to keep the very first one in place for the subsequent squares/colours. This gets more complex if you insist on painting lighter colours first as a dogmatic rule. Then again, I have been proven wrong on these kind of things many times, often by myself putting the ideas to the test. I might have to build more models so that I can try out more of my ideas.
June 13, 20223 yr Hello What do you use as a transfer film, there are plenty on Amazon but I don't know which one to choose that works well with Oramask? Michel
June 13, 20223 yr I just use plain old Tamiya tape, but I've only needed to use it a couple of times. Kev
June 18, 20223 yr Turns out at least "Goldmask" is too malleable to use in the way that I suggested in a previous post. It is also too flexible and sticky, low tack enough, but super-sticky as well somehow. And the machine made the circles less than perfect in that material. Have to try cutting at lower speed to see if the precision increases. It may be very good for things like canopy-masks or entire camouflage-patterns but for chochards, crosses and the likes; not so much as far as I can tell so far. And aligning the second mask with the first one turned out to be much easier said than done, mostly because of the properties of the material, it curls up as soon as it's lifted from the backing, sticks to pretty much everything it comes in contact with and is then promptly distorted... Might even get distorted getting it off the backing material. Does the oracal stuff come in rolls that fit the silhouette cameo 4? Or do I have to cut it up into peices to fit the machine? How does it compare cost-wise to artools maskingmaterials?
June 19, 20223 yr 18 hours ago, snigel79 said: Does the oracal stuff come in rolls that fit the silhouette cameo 4? Or do I have to cut it up into peices to fit the machine? How does it compare cost-wise to artools maskingmaterials? I bought my Oramask in a large roll, and it definitely needs to be cut up for the Portrait 2 that I have. I'm not familiar enough with the Cameo to answer your question definitively, however, but I suspect the roll I have would be too large for that, too. Kev
June 19, 20223 yr I've been using Artool Ultra Mask. I think it works well and I've been buying it in a 9.5" wide roll. That should work in the Cameo if you're wanting to use it by the roll. I've been preferring to cut pieces and using the sticky mat, that way it's less likely to move around. I have some Oracal 810, purchased from Oramask® 810 Stencil Vinyl – CraftCutterSupply.com I bought the Ultramask from Artool Ultra Mask Professional Masking Film (midwestairbrush.com) Dave
August 2, 20222 yr On 6/18/2022 at 10:06 AM, snigel79 said: Does the oracal stuff come in rolls that fit the silhouette cameo 4? Or do I have to cut it up into peices to fit the machine? How does it compare cost-wise to artools maskingmaterials? I use Oramask 810* (note NOT Oracal, the company). Like denders, I get mine here where you can get it in individual pieces and/or rolls. If you buy a roll. yes, you can load it into the Cameo 4's built in adjustable-width holder. Not sure why you'd want to do that since the masks most of us use in modelling wouldn't be large enough to require a roll. Much easier, as danders suggested, to cut a piece off a roll and mount it on a cutting mat. I use two cut settings: one to only cut the patterns through the vinyl; and the other to cut an outline around the masks all the way through the backing. That process gives me an easy to handle piece, for example, to use with transfer tape. The Oramask price, I think, is reasonable, but haven't compared it to other masking material - works for me. Gene K *Oramask comes in versions - 810 is the most flexible, whereas 811 and 813 are better for flat surfaces.


Join the conversation
You can post now and register later. If you have an account, sign in now to post with your account.
Note: Your post will require moderator approval before it will be visible.