


MikeC
SMPM_Members
-
Joined
-
Last visited
Everything posted by MikeC
-
 Hi, and welcome. I spent 9 years at the other end of Hampshire to you, in Gosport.
 -
Hi and I look forward to seeing your P-39, I have a soft spot for that strange bird.
-
Hello Guy, good to see another LSP-er here.
-
Thanks Max, downloaded. You never know, I may do an early example.
-
Thanks Max, downloaded. Are you contemplating adding an early windscreen at some stage? Curiosity only, I've not identified a subject for mine yet, and it's unlikely to have a sloping screen.
-
Hi, and welcome aboard.
-
Hi Vitor, welcome aboard
-
Hi Guy, good to see you here. Quite a few folks here from LSP you'll recognise.
-
View File TM-Windscreen-324872.studio3 I've been working on a pair of ICM Tiger Moths, and in common with many ICM kits, there is a mask template in the instructions which was easily used to produce these masks. I thought that as we have recent kits of this from Airfix in both 1/48 and 1/72, I'd include these by downscaling the 1/32 masks as detailed in a note on the file. There is also a separate set of drawings off the cutting area: these are there as an indicator of which mask is which, they correspond to the ICM instructions, thus they are not guaranteed to be the same size as the final masks on the cutting area. I am in the process of masking up the ICM windscreens, and the fit is OK so far. I have not yet tried the smaller masks on a kit. I have a pair of 48th examples in the stash, and will update the file if necessary when I've built them. If you try the smaller-scale masks, please PM me with any feedback, particularly if the sizes are significantly incorrect. Thank you. Submitter MikeC Submitted 10/23/2022 Category Canopy Masks
-
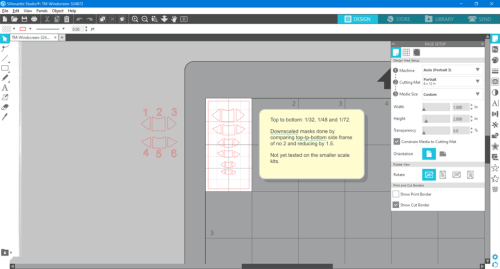 I've been working on a pair of ICM Tiger Moths, and in common with many ICM kits, there is a mask template in the instructions which was easily used to produce these masks. I thought that as we have recent kits of this from Airfix in both 1/48 and 1/72, I'd include these by downscaling the 1/32 masks as detailed in a note on the file. There is also a separate set of drawings off the cutting area: these are there as an indicator of which mask is which, they correspond to the ICM instructions, thus they are not guaranteed to be the same size as the final masks on the cutting area. I am in the process of masking up the ICM windscreens, and the fit is OK so far. I have not yet tried the smaller masks on a kit. I have a pair of 48th examples in the stash, and will update the file if necessary when I've built them. If you try the smaller-scale masks, please PM me with any feedback, particularly if the sizes are significantly incorrect. Thank you.
 -
Hi Brian, good to see other modelling genres represented.
-
Welcome aboard from someone who used to live just down the coast in Hampshire. As for supplies, I find Graphtec Craft Store give excellent service: I bought my Silhouette 3 from them, and have put in another order for a lo-tack cutting mat and other stuff since.
-
Ca qu'il a dit.
-
All ok here thanks Kev.
-
Thank you Gene, I appreciate that.
-
Hi there, welcome aboard.
-
I think that given your KLP Publishing activities and work on LSP, you're doing as much as you reasonably can on here, and we thank you for it.
-
I have to say that pretty much sums up my thoughts too. It would be a shame if the site were to go, but we can't expect Kev to carry on paying out of his own pocket, and are there enough members willing and able to donate to be viable? A hard question, perhaps. I would like to say thank you, Kev, for your work to date in setting up and running this site.
-
-
I have this problem too, so following this thread. I do have a work-around though. Print out what you want in MS Word, scan in at 1200 dpi as a jpg, then import into Studio and trace.
-
Hello there, and I agree with Kev^^^ - see how it goes and consider the upgrade if and when you feel the need.
-
Thanks Max, I have absolutely no doubt it will be. 👍👍👍
-
Agreed: been there, done that. This checked nose looks fine to me.
-
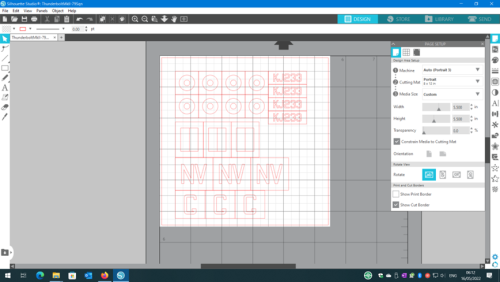 KJ233/NV:G of 79 Sqn in Burma, seen at 2:55 in this short film: https://www.iwm.org.uk/collections/item/object/1060025281 Date? The latter part of 1944-1945, I can't be more precise than that at the moment. Includes spares of all markings.
 -
View File ThunderboltMkII-79Sqn.studio3 KJ233/NV:G of 79 Sqn RAF in Burma, seen at 2:55 in this short film: https://www.iwm.org.uk/collections/item/object/1060025281 Date? The latter part of 1944-1945, I can't be more precise than that at the moment. Sized for Hasegawa 1:32 kit. Includes spares of all markings. Submitter MikeC Submitted 05/16/2022 Category Specific Aircraft

