

Mozart
-
Posts
319 -
Joined
-
Last visited
-
Days Won
137
Content Type
Profiles
Forums
Events
Downloads
Everything posted by Mozart
-
Welcome Rick, you’re certainly taking a big plunge back into the modelling world! Always interested to see anything that you produce, the more the better. Max
-
I can’t see myself buying anything new with added “tricks and gizmos” unless my trusty Cameo 2, now nearing its tenth year of service, goes irreparably wrong….perish the thought!
-
I understand completely your problem Kev, had the same issue with swastikas with narrow white outlines in the past which is why I went for the two mask solution.
-
What size are these letters Kev? 3mm is just about the threshold I reckon for successful stencils with Silhouette. I agree with Gene, I’d do them as two separate masks. Sounds like you’ve increased your blade depth rather than reducing it, I’d go with Wuger’s settings but with a Force of 6. Max
-
Glad you found us John, you won’t regret buying a cutting machine, it opens up so many possibilities. Max
-

Greetings from Grand Haven, Michigan, United States
Mozart replied to Mdriesenga's topic in Introductions
Welcome! The skill thing may be true, but we’ve all started from the same baseline…..nothing! It’s great fun and very rewarding learning though…..and fortunately that never ends. -
Thank you! I hope you enjoy your time here and continue to find it useful.
-
I've prepared a mask for my Hunter and uploaded it and, as promised, kept details of each stage which I'll write up as a form of tutorial over the next few days. Max
-
Version 1.0.0
1 download
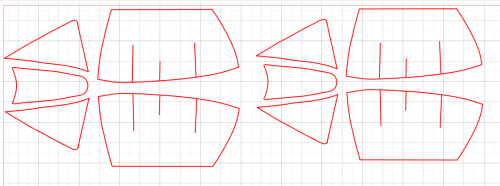
Canopy masks, inside and out for the Hawker Hunter. The masks were produced specifically for the Echelon Vac form kit, comparisons with the Revell Hunter show that the latter canopy is slightly wider than the Echelon so if used, these masks may need a bit of tweaking. -
View File Hawker Hunter F5 canopy Canopy masks, inside and out for the Hawker Hunter. The masks were produced specifically for the Echelon Vac form kit, comparisons with the Revell Hunter show that the latter canopy is slightly wider than the Echelon so if used, these masks may need a bit of tweaking. Submitter Mozart Submitted 08/26/2023 Category Canopy Masks
-
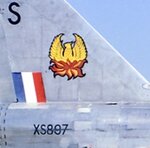
Hello Boom. I have done several, they are not easy but are worthwhile when done. The method depends on the type of canopy; if it’s fairly flat then careful measuring, drawing out on the computer and test fitting (usually several times) is the way. This was the case with the Avro Anson: But if it’s a domed or curved “bubble” type of canopy I have firstly put kabuki-type masking tape over it, traced the edges with a pencil to get the line of the curves then taken the masking tape off and laid it out flat. Then I’ve scanned it into the computer and drawn the edges as previously, as on the Hawker Hunter T7: I hope this helps. It could be that others have different and perhaps better methods but this one works for me. Max PS I’m going to be doing a mask for a Hunter canopy very shortly so I’ll record every step as a tutorial, conveniently it involves both methods described above:
-
Sorry I can’t help in this discussion, my Cameo 2 is old school so the blade is set manually……sometimes less is more methinks! Hope you get it sorted soon Mdb. Keep us posted please.
-
Welcome mdb, getting your settings right is important so ask if your problems continue. Max
-
Morning Scan and welcome.
-
Bonjour Benoit et bienvenu!
-
"Is it possible to use one mask, apply to the model, then weed while it's on the model and replace the little bits of mask?" Yes, absolutely it is. Like all things it takes practice but it's what I do with all of mine, even complex masks like this: What is important for all masking processes is to think carefully about the order of painting and masking so that you have the minimum of mask removal and replacement. With the serial number for instance it was not necessary to replace the numbers, a simple piece of tape over the whole thing was used as can be seen in the middle picture. Max
-
Hello Lime, Just out of interest, what scale are we talking about here? All of mine are 1/32 and in that scale I’d do what you have suggested, overall white first, replace the entire mask and weed out the pieces that need to be black. I presume the “slits” are the narrow “L” shaped pieces in each corner? If so, spray black first of all then replace the mask (I assume you’re using a piece of transfer mask to do this precisely) then you can weed out the broader “L” pieces that need to be white. Hope this helps Max
-
I’m old and retired too, so welcome to both clubs! I hope you find what you need here, are you a Silhouette/Cricut user? Max
-
This is from the WiP Gene, cut with my ancient but trusty Cameo 2:
-
It’s a god result by Rob given how small and intricate the masks and font style were, plus the fact that he’s applied them to what appears to be a rough uneven surface…..not the kindest surface for getting a good seal and sharp edge. In this situation I always spray at right angles to the mask and gradually build up paint layers with several light passes. Your feedback and thanks are much appreciated Rob, sadly it doesn’t always happen! 🙁
-
Gene, all’s well thanks, I’ve offered to do Rob’s masks. This is what Rob wanted: It’s a sign for a blacksmith’s (smederij) shop, the owner being named Klinkhamer! The larger letters are 4.5mm tall, the smaller ones 2.5mm. In this font it’s pushing the capabilities of the Silhouette for a clean usable cut but Rob can try. Max
-
Welcome Jake, I hope you find the site useful. The first step of course to making your own masks is to buy a machine such as a Silhouette Cameo or Portrait. Max
-
Thanks for that answer Gene! I must admit I have never seen the need for a print but it’s a useful tool for those that do. I’m going to investigate though whether my old Cameo 2 has the same facility.
-
Hello Plinio! Your modelling adventures are about to be made even more exciting with your new Cameo! All sorts of possibilities open up for you, and I hope the tips on this website are useful. Regards Max
-
Transparent masking material, how clear and how shiny?
Mozart replied to geedubelyer's topic in Q & A
I’ve just had a thought Guy, though I haven’t tried it. Though I use Oramask, which isn’t clear, for my masks, I use a clear transfer piece cut from Cricut masking material which of course is self adhesive. This can be cut like any masking material and could well be your answer. I think I’ve said this to you before; if you want me to try this for your Spitfire just let me know the dimensions of each dial. Max
