

Mozart
-
Posts
319 -
Joined
-
Last visited
-
Days Won
137
Content Type
Profiles
Forums
Events
Downloads
Everything posted by Mozart
-
See new section "cutting plastic"
-
Thanks Brian, I tried to write it from my point of view when I was a beginner, I hope to works for people in that position!
-
Bit of a grand name for it Kev, but I hope it's helpful as a starting point for new users. It still forms the basis for all that I do with my cutter. I thought I might add a screen shot of the main tools that I've been referring to, without getting too technical - cos I get lost very quickly with techie-lingo!
-
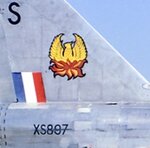
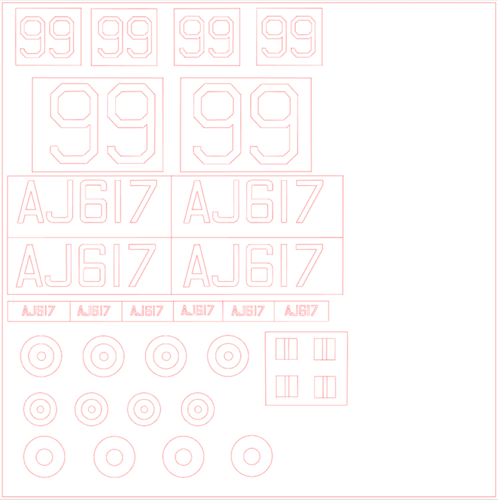
So these are the masks that I drew for the Lightning, all in 1/32 scale. Firstly it's worth saying that I draw everything with the page really enlarged so that the positions, points and edges of my lines are as precise as possible. You can reduce the page size to check every now and again. My starting point was the sheet of markings provided with the kit, I measured the diameters of each part of the largest roundels then selected the circle tool from the left hand selection box - it doesn't actually draw circles per se though. The latest update to the software includes a centring cross to everything you draw, it's so useful for alignment purposes. See below for the main tools in this article: I drew the inner circle, noting the distances shown on the x and y axes as I drew it, making sure they were the same! I changed to the "edit" or "move" tool at the top of the left hand selection and dragged the circle so it was centred on a grid. Then I copied it and pasted another circle, dragged it out to the required size and centred it over the first one. I then repeated this operation for the largest circle. To group these three, press and hold "Cmd" + Shift then click on the "Group" icon on the top bar. The roundel should now move as a whole design. To do the smaller roundels it's simply a matter of copying the first one then scaling down to the required size. For the nose art I was lucky that the roundel was the same size as the underwing one. The original transfer sheet had a chequer design which again I measured; 6mm squares. I reset the grid settings* to that size which helped with line length. Once I'd drawn the first 24mm horizontal I copied and pasted two more, then dragged and spaced 6mm apart vertically, lined up on the first one. Next was a 12mm vertical, again copied and pasted three times then dragged to position which gave me the main longer chequerboard design. Again, group this as a unit. One little complication is that the edge next to the roundel has a slight curve on it to "fit with" the curve of the roundel, though spaced from it. To achieve this I moved the correct roundel into approximately the right place, then copied and enlarged another roundel so that part of its circumference looked right over the "mating" edge of the chequers. Then I used the eraser tool to get rid of the rest of the large circle and cleaned up the other edges. Note, if you erase any part of a grouped design, it automatically ungroups the whole lot, so you have to go over it all and re-group. *Note: you can select "Snap to grid" but I haven't found this at all useful, I prefer the control I get with "freehand" drawing. Once this was done I copied the chequer, went up to "Object" on the top menu bar, selected "mirror" + "horizontal" so I had both sides. One of course was too long so I ungrouped this, reduced the size of the horizontals (either with the eraser or by grabbing the handles and moving) and cut out (Cmd + X) the unwanted verticals. That just left the fin flash colours, a couple of words of caution in this little bit! To get the angle right so the flash aligned with the front edge of the fin, I scanned a drawing from the instructions and saved it to my photos. With the Designer edition (but not the basic one) you can then simply drag the picture onto your drawing screen; it effectively "sits" on top off what you've already drawn. You'll undoubtedly need to reduce it to a workable size and then before you can draw "on top of it", ie trace it, you go to the top bar where, next to the Ungroup icon (see above) are some more little juxtaposed squares. Click on the one that has Alt text saying "Send to the back", this brings your drawing to the front so you can draw lines over the picture! Clever stuff!! 😃 I drew a line about a third of the length of the front edge of the fin, then a horizontal about the width of the three stripes, all approximate because I have no set dimensions so it's Mk 1 eyeball stuff. I copied the horizontal line and dragged it to the bottom, then copied the sloping first line thrice and spaced them according. Click on all and group. As before, once you've got one, copy, go to "Object - mirror - horizontal" done! Word of warning through bitter experience! DO NOT HIT THE "Save" BUTTON ON YOUR DRAWING WHILST THE PICTURE IS UNDERNEATH IT! If you do, you will have saved the whole lot together and I don't think you can "unstick" it? So do your design, move the picture well out of the way, then hit Save. And that was that really. Just about as basic as you can get, but it works.
-
ICM's excellent 1/32 scale Gladiator I shown in 56 squadron colours. K8000 was definitely a 56 Squadron aeroplane, whether it had the famous red and white chequers has yet to be proven! All markings including the firebird on the tail fin designed and cut using the Cameo. The firebird was the limit of the cameo's capabilities I think and was tidied up afterwards with a fine brush.
-

Version 1.0.0
26 downloads
Masks for ICM's 1/32 Gladiator as flown by 56 Squadron (possibly with chequerboard or not!) -
Gloster Gladiator 56 Squadron View File Masks for ICM's 1/32 Gladiator as flown by 56 Squadron (possibly with chequerboard or not!) Submitter Mozart Submitted 07/26/2020 Category Specific Aircraft
-
Silver Wings 1/32 scale Stieglitz, home-produced masks to replicate the trainer flown by Peter Spoden: Max
- 1 reply
-
- 4
-

-
KH North American T-6 1/32 scale finished as Harvard III. All markings, canopy masks and walkways via Silhouette Cameo 2 + Designer edition software. The (inner) middle canopy section was also cut with the cameo from ten thou plastic card. Max
-
One of the skills, perhaps considerations might be a more accurate word that I’ve learned over the years that I’ve been using my cutter, is how to efficiently draw the designs. My favourite “buttons” on the top tool bar are “copy” (Ctrl +C), “paste” (Ctrl +V), “Object” - the drop down menu enables a mirror or flip function, and “Group/Ungroup” (Ctrl+Shift) which enables you to select drawn lines/shapes and group them as one entity. Being familiar with these few keys gives you the ability to be able to draw shapes quickly and accurately and to make the best use of the design software. I am by no means whatsoever claiming to be an expert with these things, more a functional user using what I have found works for me and if I can pass on a few of these tips then I’ll be happy! I love the challenge of having a new set of masks to draw then planning how to go about it. I spent an hour or so yesterday drawing some masks for my Lightning so I’ll add to this thread a little later with some pointers about how I did them. Watch this space......😀 Max
-
NA Harvard IIa S Rhodesia 1943/4 View File A couple of examples of numbers, serials and roundels found on RAF Harvard IIs at the Service Flying Training Schools in S Rhodesia. Submitter Mozart Submitted 07/26/2020 Category Specific Aircraft
-
Version 1.0.0
9 downloads
A couple of examples of numbers, serials and roundels found on RAF Harvard IIs at the Service Flying Training Schools in S Rhodesia. -
Silhouette is the market leader and I believe offers the most flexibility and range. Another popular brand is Cricut; I have no personal experience with these but users on the Facebook group about mask cutting give the impression that they are not as well suited to the tasks that we as modellers require. Max
-
Good to see you here Mike, everything that Brian has said is 100% true!
-
That works Kev, I had wondered about that too! Well done Brian. 😄 Max
-
Something I've I've always had to research is the way in which national marking evolve, the roundel and German crosses for instance. I know Thomas has uploaded some very useful masks for different categories of roundels, and very useful they are too but it would be good to cross reference this to photographs for positions, dates, dimensions and critically colours linked if possible to the range offered by companies such as MRP, Tamiya, Vallejo etc. I'm struggling at the moment to tie down a good Cold War colour range for my Echelon Lightning for instance.
-
What are the differences or advantages of Artool over Oramask 810 (my usual choice) Mal?
-
I’m a Silhouette Cameo 2 + Designer Edition user. I draw all of my masks just using the inbuilt software so I haven’t explored any other types yet. I love the potential that cutting my own masks gives me to be able to build the individual aircraft that I so often need, allied to the fact that I’m useless at applying decals! Looking forward to seeing your new venture develop Kev, good on you! Max
- 1 reply
-
- 3
-

