
Leaderboard


Popular Content
Showing content with the highest reputation on 09/20/2021 in all areas
-
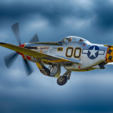
The following may seem off-topic and a bit of a long story, but please bear with me. However, for the more sensitive mask-users among us please note that it contains several references to "the 'D' Word" More years ago than I care to remember, in the late 1960s, my local model shop where I grew up carried a small stock of aftermarket decals: most of them were aimed at the flying model fraternity, but there were a few sheets that suited 1/72 model aeroplanes. I soon discovered the joys of going off-piste and doing a subject not in the box - or more usually the Airfix bag. A bit later I discovered Modeldecals, sold by Modeltoys in Portsmouth. Much later I found myself moving to Portsmouth for work, and Modeltoys was my local hobby shop. Aftermarket decal heaven! Fast forward many years, and I was occasionally venturing into the box subjects if I fancied said subject, but generally I still liked to know that I had made a model that was a bit different. The drawback was, of course, that anyone else who had bought the same aftermarket sheet may have picked the same subject. So coming up to date, having got into making my own masks, it feels good to know that I can make what is likely to be a truly unique model. For me that is a small part of enjoying my hobby (although I dread to think what it says to a psychologist about my ego). Whilst I do not claim a fully comprehensive knowledge of every decal sheet ever released, I was pretty sure that "The Comet" had never been done in a decal sheet. So I designed and cut my masks, as seen above, and then, recently, I stumbled across THIS! https://www.eduard.com/out/media/D32013.pdf Yes, it has "The Comet" on it! This has given me a dilemma. To abandon this subject and find another truly unique one: perhaps "Duchess of Manhattan" from the 361st, my reserve subject. It does not tick the box of a lesser-known fighter group, but in all other respects is interesting, and I don't know of any decals for it. The other option is to carry on and not waste the work I've done so far. So that's where I am at the moment. It's interesting that Eduard's interpretation has the name and artwork on both sides of the nose. I don't have or know of any photos of the starboard side nose. Looking at the design of the wording and the artwork, it just looks wrong to me to have the art going "backwards" on the aeroplane. But the "THE" seems designed to accommodate the comet artwork, so putting it in front on the starboard side would also seem not quite right. So my interpretation was, and still is, to put the nose art on the port side only. But I think I'll stick with "The Comet". After all, the Eduard sheet also has a couple of 20th FG birds, a Blue-Nosed Bodney resident and "Lou IV", so I suspect "The Comet" will be the least popular. In any case, I will know I did it with masks. At the moment I'm still working on the cockpit interior, so another post here may be some time. But until I do, thanks for staying with me and reading my ramblings.2 points
-
I'm doing a Revell P-51D-5 as part of a Group Build over on the Large Scale Planes forum https://forum.largescaleplanes.com/index.php?/topic/90601-p-51d-5na/ I specifically picked a subject, and a reserve, that I considered I would be able to do with masks. My first choice is 44-13471, 6N*J, "The Comet" of the 505th FS, 339th FG, assigned to Capt Evan M. "Johnny" Johnson. This has a name, a nose art I felt I could draw in the Silhouette software, red/white nose checks, and best of all (for me) full D-Day stripes. I don't intend to repeat on here all I've posted there, but thought I could expand the masking-specific bits here for anyone who's interested. My reserve is for the event that I fail to manage the nose checks, and has just a name: 44-13708, B7*I, "Duchess of Manhattan" of the 374th FS, 361st FG, Bottisham. I have a certain fondness for Bottisham, I may even have to invest in a second kit and do that one! So without further ado, here we go.1 point
-
Hello, Here the Tarangus 1/72 SAAB JA37 Viggen, using my paint-masks. I used a Silhouette Portrait for the canopy, wheels and landing gear wheels. The splinter cammo was made using Maestro Models masking set. Painted using MRP paints.1 point
-
My recently completed 1/48 Hasegawa Typhone Mk Ib with Montex Masks. Only decal was the pilots kill board. First time using masks successfully. The issue I see for me it transferring and getting the right things to stick. Did a little test before with Stars/Bars and that was entertaining. Maybe I'll just stick to Japanese aircraft! 🤣1 point
-
With you 100% there Mike in every respect. I think you have made the right decision in continuing with “THE Comet” and also that the nose art is only on the port side. I have the same dilemma with my Fury, I wanted to do a unique one that nobody else will have modelled and even contemplated changing K8267 to K8261, one of the other Furies in the vic, but why bother; as you allude to, it’s only my own ego that is being satisfied! Onwards and upwards my friend! Max1 point
-
Here are a few recent completions using my Cameo4. Eduard's rebox of Hasegwa 1/72 B-26. All marking done on Cameo except for nose art. Eduard's 1/48th P-51D as June Nite.1 point
-
I originally built this model some time in the early '90s, after just getting back into the hobby from a long layoff. In 2007, I decided to rebuild it rather than toss it out, and can actually present before and after photos! Here it is as originally built and painted, prior to being disassembled for the rebuild (apologies for the crappy photo): And after several months' work, which featured lots of scratchbuilding and a complete rescribe, here's the renovated result: Needless to say, all the markings, save for the tail number and a few stencils, were painted on using hand-cut masks (this was long before consumer-level craft cutters had become commonplace). Still one of my most enjoyable builds! Kev1 point
-
The idea behind this was to create something for the Spruce goose. What if Howard Hughes had finally got his beloved "Hercules" into service, maybe in time for Korea? Why not? https://u.cubeupload.com/SAEvans/HK13.jpg This was my very first use of the Silhouette 3 for creating a full set of markings. So basically I needed something fairly simple, not too intricate for me to get to grips with using the programme and the machine. I practised on a number of types of vynil and transfer tapes...lessons learned for future projects of a more daring nature.1 point
-
So let's start with the nose art. It's really all done by eyeball estimation, base on the datum that the panel it will sit on is about 0.22" high. I started with the name, "The Comet". "Comet" was started using the text tool again, with a font called "Stencil Gothic BE" which comes with Windows 10. This is not exactly the same, in that the "T" is solid in the font, and needs a cutout. So with apologies to those for whom this is old hat (this software is still a journey of discovery for me): a word created in the text tool can be ungrouped to edit individual letters. So it was a simple matter to magnify the "T", use the eraser tool to make the cut-out, extend the lines on the horizontal and vertical bars to make each a complete rectangle, then group them to make the letter. Then I made sure the letters were the same size, aligned and grouped them. "The" started off in the text tool in Arial font. After ungrouping, the H and E were reduced to about half the height, then the fun began. Using the point edit tool on each letter in turn, I got them to about the right shape; then drew three straight lines to check the alignment and adjusted accordingly. To ensure the lines were parallel I simply drew the first one, then used the duplicate function. Then it was simply a case of drawing two small circles, size and group everything up, draw a box round it all, et voila: I tend to group in stages: so as we saw, the letter of "The" were grouped, as were those for "COMET" Then the dots at each end were grouped; then add "THE"; finally, group that plus the box. Next, the comet itself.1 point
-
To start with, a confession: I'll be using some small decals for the six kill markings, as I'm not that confident about cutting things that small. The lettering and numbering was simple enough: I produced them in the text tool using a font called USAAC Code, which a fellow IPMS branch member pointed me at. The serials are 8" high, and the codes 24". (Incidentally, I make no apology for using Imperial units - I can use SI units equally well, but the original was measured in Imperial units, and I'm modelling it in a scale based on said units, so it makes life a lot easier. I'll include metric conversions if there's a popular demand.) The national markings will be done using dashotgun's file from this forum, and the invasion stripes will be masked the old-fashioned way with Tamiya tape. What I intend to deal with here are the nose art and the checks.1 point
-
HI everyone, I joined this forum a long time ago, but it kinda fell by the wayside due to too much time spent on Farcebook. Here are some of my completed models which I painted while using masks cut by my silhouette portrait. WNW Fokker D.VII. Roden Albatros D.I Hasegawa Bf 109F4 PCM TA 152C And finally this 1976 vintage Revell Bf 109G6 that has been modified by a few Trumpeter parts. Thank you for looking!1 point
-
these are monex masks or hand cut sorry for the link for some reason won't let my paste them into the insert image tool1 point
-
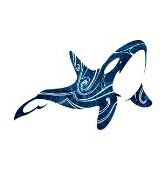
I knocked this one out for a bit of fun in-between more indepth projects. Knife blade for scale. I later painted in the details on the dragon by hand. Just a bit of fun to practice some airbrushing! Denzil1 point
-
KH North American T-6 1/32 scale finished as Harvard III. All markings, canopy masks and walkways via Silhouette Cameo 2 + Designer edition software. The (inner) middle canopy section was also cut with the cameo from ten thou plastic card. Max1 point
-
Created masks for the airbase and commander codes ("SP" and "52FW") to replace the included decals. Everything else is decal. Things that worked well: scanning the original decals and using them to align replacement text in Inkscape. Also scanned the painting/decal guide from the kit, scaled it to fit, and cut the mask to align with edges of the stab and panels. Love that the color matches the body color perfectly, unlike the original decal, for example the "AF91-352" bit. Things I need to work on. I must have laid the paint on too thick, as I ended up with fairly obvious ridges. I either need to use less paint or figure out how to feather it into the layer below. I also made some simple masks for wheels, the formation lights below the stab atop the fuselage, and the air-refueling door. Loved being able to quickly and accurately create these with the Silhouette. Overall, pretty happy with how this kit turned out, and looking forward to being more creative with masks in the future.1 point
-
Thanks, Max. As it happens, I'm completely hopeless with vector drawing, so I guess we each go with our strengths! Here's the finished build: Kev1 point
-
Hallo to all! Here one of my last work.... canopy/wheels masks and numbers realized by Silhoutte Portrait. Hope you enjoy... ciao! Valerio. MB.326-115 by Valerio, su Flickr MB.326-116 by Valerio, su Flickr MB.326-130 by Valerio, su Flickr MB.326 end-7 by Valerio, su Flickr MB.326 end-4 by Valerio, su Flickr MB.326 end-20 by Valerio, su Flickr 11998908_442586189260246_7379382820028146589_n by Valerio, su Flickr1 point
-
Nothing average about those! Kev1 point
-
First attempt at using my new Portrait 2. National markings and numbers were painted using the masks, the heart nose art is a decal and the wolf's head is a mix of masks, decal and brush paint. I used the Zotz sheet, scanned in the parts I needed, edited them and cut on the machine...1 point


.jpg.c5cb30f08408b2d1a8772e75071e8091.thumb.jpg.b269d3f88cea21c3dc4bc025ac115108.jpg)

