

denders
SMPM_Members
-
Joined
-
Last visited
Everything posted by denders
-
 Open the Layers Panel. The layer that contains the image should have two 'squares' on the left. Obviously the Eye changes display of the layer. The 'square' with nothing in it is the Lock. Try that.
 -
Hi Gassman I have a Cameo 4 but in retrospect, I think a Portrait 3 would have been a better choice because it does everything I've needed to do at a more economical price. The Cameo 4 is larger (there are 3 different sizes too, big, bigger, biggest) and I've not used the full width yet. There's a second 'device' slot for another cutter or a pen, which I haven't used. If all you think you'll ever do with it is cut masks for models I think the Portrait is a good choice. One of the reasons I didn't go with a Cricut is the fact that all your files are stored in the 'cloud'. I guess that makes me a dinosaur, I prefer to have control over my 'stuff'. Dave
-
The tape, usually white, placed on early F4U Corsairs to stop fuel leaks.
-
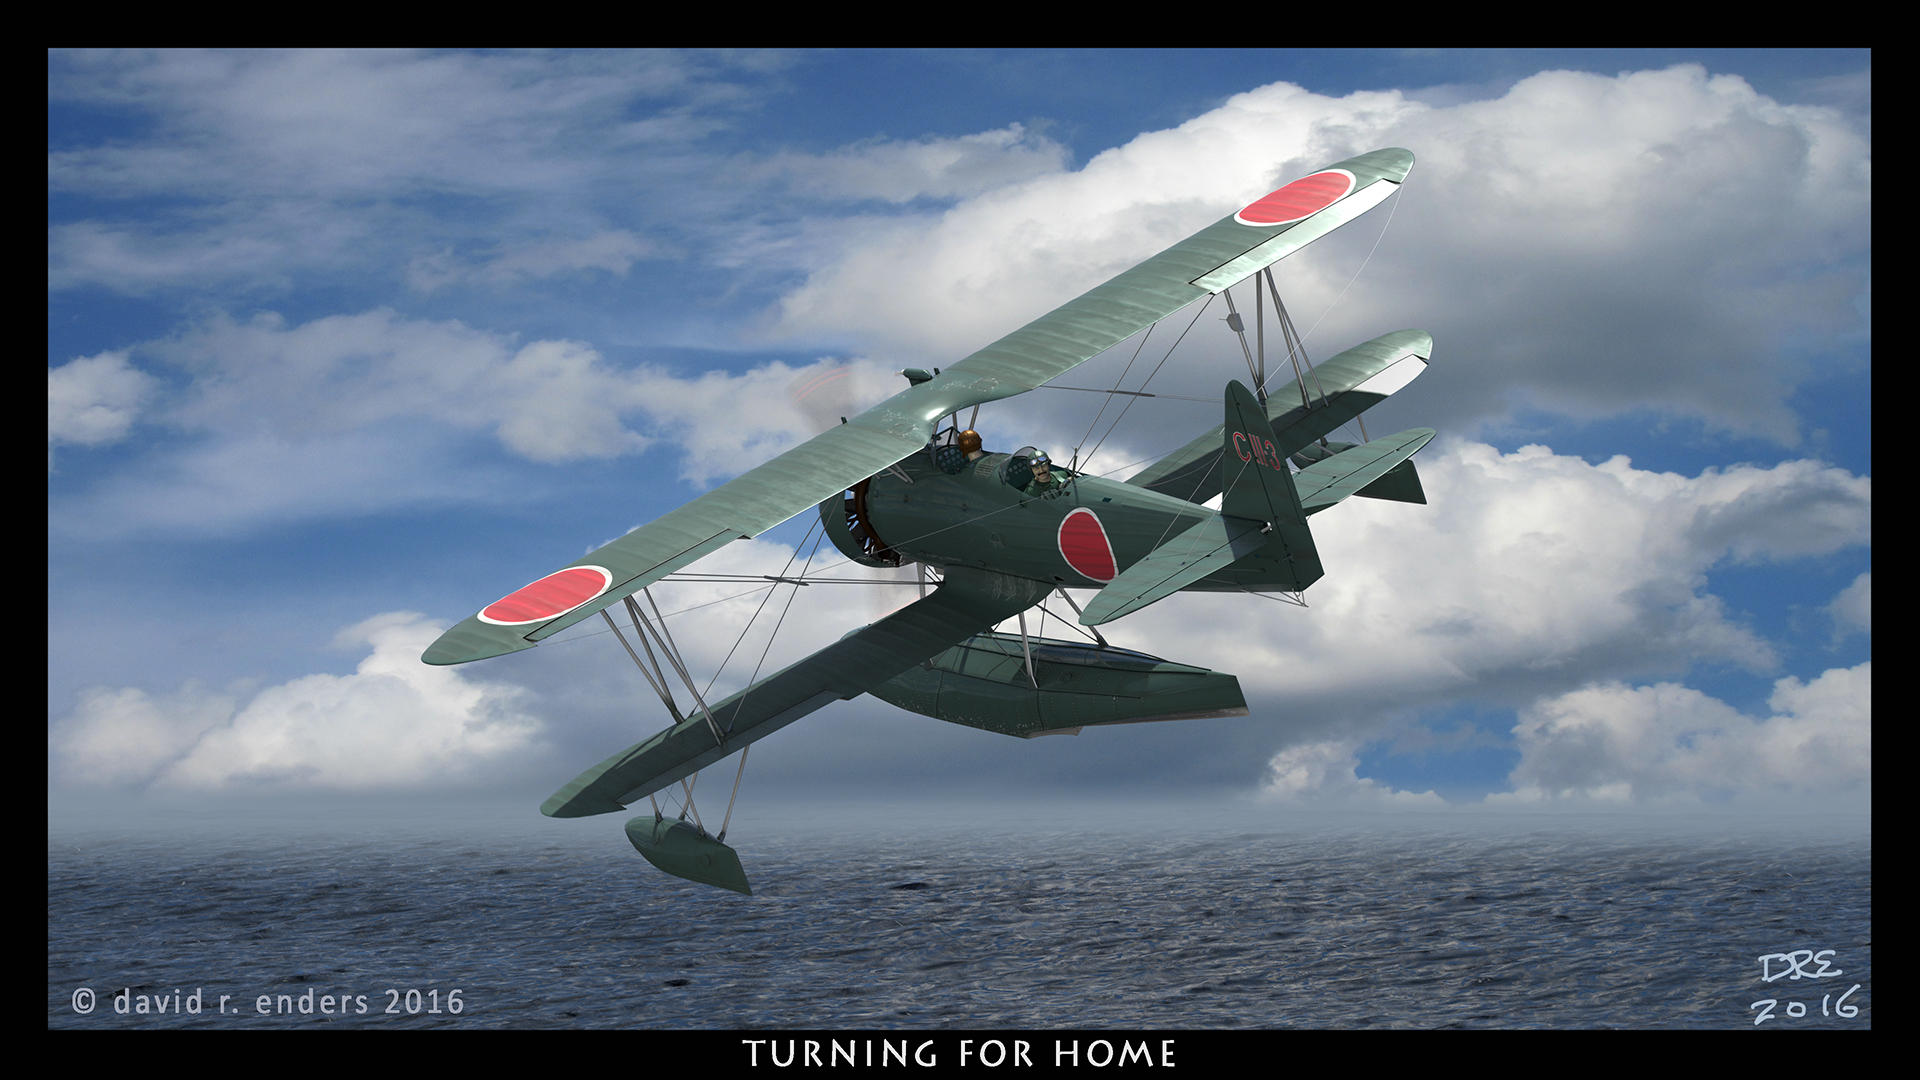
I thought I'd drop this in here. It's how I separated the markings masks for my Hellcat project. All the markings on the Hellcat are painted. F6F-3 Hellcat [Trumpeter] - Works in Progress - Large Scale Planes The 00 masks were made using the typeface USN Stencil, AmarilloUSAF, or USAF Code. The reference photos seemed to be closer to AmarilloUSAF and sized appropriately. The stripe on the tail was Tamiya tape. And of course, the national markings were masks created in Silhouette Studio. I also created canopy masks. There aren't any decals on the hellcat model. I used AutoCAD to create these masks, exported a dxf file which was imported with Silhouette Studio. I'm familiar with AutoCAD and have an older copy that is installed on my notebook computer from before I retired. I've been slowly trying to work out how to create these types of things in Studio. I figure that at some point the notebook computer will die or at some point AutoCAD will stop working. Or I'll have to find other software to create the masks. So anyway, the first picture is what I cut for the national markings. I then sprayed white and black paint for the markings. There is a set of 00 under the horizontal tail surfaces that is black. I then installed the mask pieces for the base colors using frisket paper to hold the pieces together while I placed them. Then of course, came the blue paint. I placed the mask to protect the blue and sprayed white paint over the blue in the areas where the red paint would be. And painted the red. Then the overall mask piece to protect the markings. And of course, after all the painting was done and masks removed. I preferred to start with the white to limit the paint thickness. Dave
-
Thanks, Woody. Actually, none of the above. My brain was spinning and that idea came out, not really sure why. 🤪
-
Yup, I came to the same conclusion. For whatever reason I had the thought that it might help the edges not tearing. 🙄 The markings were first and it occurred to me that I would have to clear the markings after removing the masks if I cleared first. I had to do some touch-up on the underside color, so perhaps the masks will come off tomorrow. Thanks!
-
I'm debating whether I want to put a clearcoat on before removing masks. Any comments?
-
The aircraft serial number was done with a mask from my cameo 4. They're a little smaller than 3/16". The aircraft numbers (6Q-R) were also done with a mask. It's one of my first attempts so it's a little heavy on the paint. I should have painted white, then yellow, and then the green but I had originally intended on using all decals. The A-20 was started at least 10 years ago and became an experiment. I imagine that some experimentation with speed and force settings on the Cameo might result in a little better cuts.
-
Last Christmas I was given a PixScan mat. I kinda thought to myself, "what does this do for me, I can scan and import already." But, after reading up on how it works, I've used it once, so far, while scanning something and the scan came into Studio correctly scaled. Not like a regular jpg file that needs scaling after import. Dave
-
Really interesting. Thanks!
-
Welcome! IIRC, Cricut requires you to work on line and save your files on line, not your computer. There were some rumblings a couple months ago about Cricut starting to require a subscription to do that too. I recall seeing something about Cricut backing off that to some to some degree. You should probably check into that before you purchase. Silhouette software does not require that. I have a Cameo 4 and save all my files on my computer. Dave
-
I had a look at the video, that's kinda confusing. I wonder why it isn't like the cameo.
-
Congratulations Mike, first cut! Onward! Dave
-
Mike, I downloaded your file and loaded it up. First thing, the blade depth is set to 1. The 'silvery' looking digit is the automatic setting. You said above that you've tried blade depths up to 5. My apologies, but to make sure, you are setting the depth in the software, right? I'm guilty of doing similar things. This is from a comment I made to a cutting question over at LSP. Well, Oramask 810 is listed as 3 mil thickness. I don't know if that is just the material and does or does not include the adhesive. Somewhere I thought I read that the Auto Blade total adjustment 0 to 10 is a total of 1 mm. Therefore, setting 1 is for 0.1 mm. 0.1mm is just under 4 mil. So, theoretically it should cut. But as recommended by Max the depth should be setting 2. I've been using a depth setting of 2 and it cuts the material but it doesn't cut through the backing. HTH. So, the depth setting really needs to be a minimum of 2. From Max's question whether you can turn off the automatic depth setting. "Action" has two selections, "Auto (cut)" as shown and "Cut". I haven't tried it, but I wonder if you manually set the auto blade to a depth of 2 and set the Action to just Cut. If I make those selections, the software doesn't throw up any errors. But note, I haven't pressed the Send button to actually send it to the cutter. Dave
-
Max, with the Auto Blade in a Cameo 4, and I'm assuming same in the Portrait 3, the first thing after 'Sending', the machine does an automatic reset depth to 0 and then clicks the blade up and down the necessary number of times to set the desired depth. Also, perhaps you should check on machine firmware if you haven't already. Silhouette America - Firmware Updates There is a ratchet blade (it's black) which goes in the black holder. Silhouette America - Blade - SILH-BLADE-3-3T I wonder how it would work. There is a black holder that came with the Cameo 4. Do holders for other blades come with the Portrait 3? Not that that is an excuse for it not working correctly in the first place. Dave
-
Silly question first because I did it. Have you latched the blade into the holder? I didn't initially realize that that little 'handle' moved and is how you latch the blade in. I just pushed the blade down, it was a snug fit, so I thought that was all that was necessary. I have a Cameo 4, BTW. What are your settings? I've been using the Artool Ultramask and my settings for that are Depth-2, Force-6, Speed-5, Passes-1.
-
Mike, I have 2 of the 5 or 6' extension cables along with the printer cable on mine. It loops back around things out of the way. The direct path from the computer to the cutter would be right across my chair. 🤣
-
It's about 6'. I'm using it with a desktop that doesn't have Bluetooth on the motherboard so it's a dongle plugged into the front of the case. Another thing, it will only work with being connected to one PC at a time. If you have multiple PCs, only one computer's Windows can be connected. I realize I don't know your situation, but having it upstairs seems to make a lot of trips up and down. For what I've used it for, it doesn't take long for it to cut and I usually prefer to make sure it starts out ok. This from the Support reply email. HTH Your Bluetooth connection can only be established with no other connections to the machine. This means we need to first, ensure your USB cable is not plugged in to your machine or computer. Second, please go to your Bluetooth Device menu on your computer and ensure the Silhouette machine is not paired. If that isn't successful, then please verify your computer meets the minimum requirement for Bluetooth compatibility, Bluetooth 4.0 support, by visiting http://www.bluetoothandusb3.com/how-to-confirm-bluetooth-version-of-computer Follow these steps to locate the LMP version currently on your computer. To operate the Silhouette machine via Bluetooth connection, the LMP should be 6.0 or above. This will indicate a Bluetooth 4.0 support. Dave
-
Mike, I have a Cameo 4. Connections are USB and Bluetooth. I had a struggle getting a connection with Bluetooth, even sending an email to Support. After a reply from Support and going through everything again, I finally got it to connect and be recognized. At a later time it didn't seem to want to connect so I have given up on Bluetooth and I'm using USB with an extension cable. With USB it works great, no connection issues. IIRC, USB is necessary if the firmware has to be updated. Dave
-
I guess it needs to be mentioned on other modeling groups. For me, LSP is the only modeling group that I'm actively participating on.
-
Yeah, I've noticed that there isn't much 'action'. I've also noticed that some folks over at LSP who have been pointed here, still post over there on the subject. I usually check it several time a day. Dave
-
Hi Bax, I have a 4. I've not really used it a lot yet, but so far I haven't had any problems. I chose Silhouette because I didn't like the idea of everything being in the "cloud" either. The photo is a 1/48 A-20. The aircraft codes and S/N were cut with the 4. The national markings are decals. I'm slowly working my way there. I also used it to cut the masks for the pilot's canopy (not visible in the photo.) I'm slowly getting around to weathering the A-20. I've also used it for canopy masks for a 1/32 T-2 and I'm working on marking masks for a 1/28 Camel. I've not done anything in 1/72. I've only cut things using the mat and auto blade that came with it. Dave
-
I saw something pop up this afternoon that said Cricut has relented for existing customers, or something like that. But I got the idea that new customers will be limited to 20 projects per month or have to subscribe.
-
Well, one thing that pointed me toward a Cameo was the fact that the Cricut software is online only. I didn't test the software but I have the impression that project storage is online also. On Cricut's servers? It sounds like they are going to limit storage space to 20 projects per month for those folks who do not subscribe.
-
So, I took it from your OP, you were looking for font files? Have a look at FREE AIRCRAFT FONTS - Download - Army, Navy, Air Force, Aircraft Typefaces (tripod.com)

