
Everything posted by Mozart
-
 Any further progress Mike?
 -
I think it's A4 Mike, not A5? Max
-
Whatever the outcome, this has developed into a fascinating thread! And the file cuts perfectly well:
-
I’ll try later Mike. You could do the reverse and download one from here that is proven to work and try! Max
-
Thanks for the explanation Dave, maybe a case of “a trick too far”!? Is there an option to turn the Autoblade off, if it’s that clever? Max
-
Are you actually taking the blade out of its holder and setting its depth manually Mike? I don’t understand how it can be reverting to zero, that’s not physically possible on mine.
-
I’m sorry to read of your initial problems Mike, I agree that making sure the blade is latched in place is the thing to check, because you seem to have covered all the other points well. Let us know how things progress! Max
-
Remarkable examples of what can be done using home-produced masks, well done Gaz. 👌
-
I haven't bought any decals for the past 8 years (I rarely if ever model what's in the box) so my investment in my Cameo was a good one in my opinion - gives me so much freedom and control of what I model. Max
-
It’s always worth reading and sharing places where you get good, reliable and prompt service Mike, so I think it’s a worthwhile idea. Any thoughts Kev? Max
-
I think you’ll get more satisfaction using it that way Mike, I can envisage quite a lot of frustration trying the Bluetooth way on different levels. Mine sits alongside my PC and is “permanently” connected but not used that often. Max
-
Mine’s a Cameo 2 Mike, I bought it I think 8 years ago and it does everything that I need. I had a problem with it last year but found it was the power supply that was faulty, easily rectified. My advice would be to definitely go for the Cameo 4. My wife makes greetings cards and she also uses it for her crafting activities.
-
Mine’s an older model Mike so USB is the only mode but I believe some of the newer ones also use Bluetooth. I’m really surprised that it’s not mentioned in any of the blurb or ads though. Kev I think has a Cameo 4 so he’ll doubtless chip in with some info about his. What’s on your shortlist? Max PS, just found this: The Silhouette Cameo 4 Digital Cutting Tool features cutting edge technology, operating three times faster than the Cameo 3. The ultimate DIY machine for creative craft projects, this can be used to cut over 100 materials, including paper, cardstock, vinyl, and fabric up to 12 inches wide.The Cameo 4 model has an increased cutting force of up to 5kg, and offers Bluetooth wireless connectivity with increased range. This is also compatible with PixScan technology.
-
Yes, good in Dorset too!! 😁 Max
-
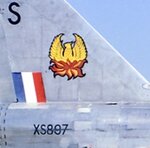
Hello bushande. The sizes that you are talking about are absolutely right on the limit with what is possible for I think any cutting machine, 3 to 4mm is the smallest that I’ve cut in 7 years of using my Silhouette machine. It can cope slightly better with more square letters and numbers like “T”, “E”, “1”, “4”, “7” etc but any number involving a curve or “centres” cause problems, with "B" and “8” possibly being the most demanding and “S” being challenging. I always cut multiples of these small areas so that I can pick the best. This is a Spitfire that I did some years ago when I was fairly new to masking making, the letters are 3 to 4mm high. You can judge for yourself which work better than others, and experience has shown me how to improve some of the less than satisfactory parts here. Hope this helps a little. Max
-
All OK in sunny Oxford but I’ll check later if it’s reached as far as Dorset! Max
-
Agreed! Hope you find the masks posted so far useful, and good luck with your adventures with your Silhouette. Max
-
I’ve been concerned too Kev about the lack of activity on the site. The problem as I see it is that, once basic tutorials have been posted, the site then simply becomes a library of masking schemes. That’s no bad thing at all, it will clearly encourage and attract visitors but will it promote much in the way of dialogue or interaction? There’s no easy answer, but I agree with Dave that questions often asked on LSP would be better asked, or directed here. Perhaps a more prominent “plug” on LSP would be in order? Max
-
Agreed, no doubt you'll be a very valuable member of the masking forum, welcome Mathieu. 👌
-
Hmmm, intriguing post Bax! I don’t own a 4, simply a 3 which as I’ve said before does everything that I ask of it, and very effectively. I’ll be as interested as you though to read what people have to say about their experiences with their 4, can it really be such a retrograde step as owners have stated in your post, it seems very unlikely. Let’s hope you get some answers from experienced users. Max
-
What's a fender?
-
I’ve had my Silhouette since 2014, I needed the “professional” upgrade to get features which it now appears are standard on new models. I don’t know what the SW upgrade comprises so I’m sorry but I can’t comment. Max
-
You're making the right decision getting a mask-cutting machine, glad to see you here. Max
-
Good to see you here Pascal. Hopefully some of the tutorials here will help you get started with your Silhouette but ask if you have any problems. No guarantees for answers but we’ll do our best!
-
Like that very much Steve, especially the finish you’ve achieved. Brilliant! Max