


MikeC
-
Joined
-
Last visited
Posts posted by MikeC
-
-
-
-
 1
1
-
-
TM-Windscreen-324872.studio3
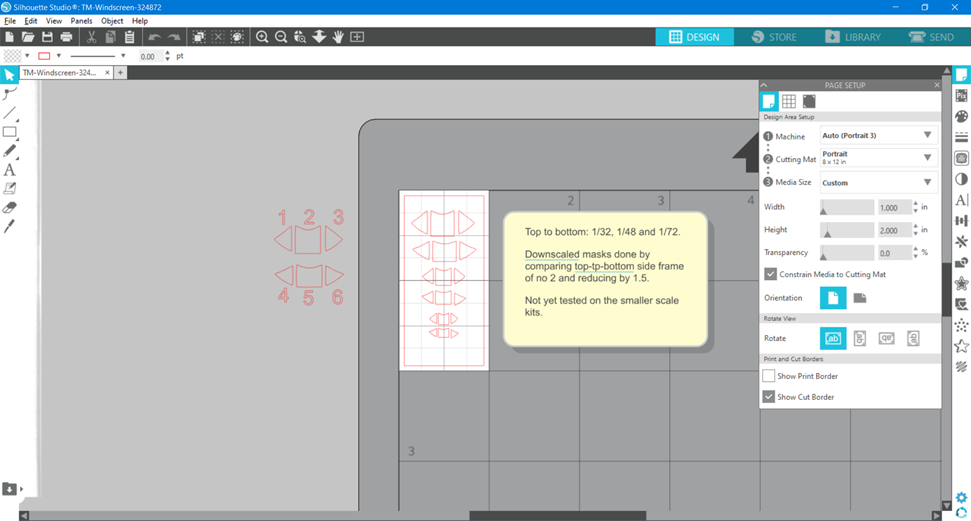
I've been working on a pair of ICM Tiger Moths, and in common with many ICM kits, there is a mask template in the instructions which was easily used to produce these masks. I thought that as we have recent kits of this from Airfix in both 1/48 and 1/72, I'd include these by downscaling the 1/32 masks as detailed in a note on the file. There is also a separate set of drawings off the cutting area: these are there as an indicator of which mask is which, they correspond to the ICM instructions, thus they are not guaranteed to be the same size as the final masks on the cutting area.
I am in the process of masking up the ICM windscreens, and the fit is OK so far. I have not yet tried the smaller masks on a kit. I have a pair of 48th examples in the stash, and will update the file if necessary when I've built them. If you try the smaller-scale masks, please PM me with any feedback, particularly if the sizes are significantly incorrect.
Thank you.
-
Submitter
-
Submitted10/23/2022
-
Category
-
 1
1
-
-
-
Welcome aboard from someone who used to live just down the coast in Hampshire. As for supplies, I find Graphtec Craft Store give excellent service: I bought my Silhouette 3 from them, and have put in another order for a lo-tack cutting mat and other stuff since.
-
-
23 hours ago, Kevin Futter said:
Another software update, and another test to make sure everything still works!
Kev
All ok here thanks Kev.
-
1
-
-
-
-
4 hours ago, Kevin Futter said:
The first thing I need to change is to lead from the front and become more active here myself!
I think that given your KLP Publishing activities and work on LSP, you're doing as much as you reasonably can on here, and we thank you for it.
-
3
-
-
On 7/13/2022 at 7:51 AM, Mozart said:
Given the amount of “traffic” and interest shown in this site Kev, despite efforts to promote it on other forums, I have to question whether it’s worth continuing? I’m happy to throw a few pennies in the hat, but is it really money well spent?
Max
I have to say that pretty much sums up my thoughts too. It would be a shame if the site were to go, but we can't expect Kev to carry on paying out of his own pocket, and are there enough members willing and able to donate to be viable? A hard question, perhaps. I would like to say thank you, Kev, for your work to date in setting up and running this site.
-
3
-
-
-
Edited by MikeC
I have this problem too, so following this thread.
I do have a work-around though. Print out what you want in MS Word, scan in at 1200 dpi as a jpg, then import into Studio and trace.
-
1
-
-
Hello there, and I agree with Kev^^^ - see how it goes and consider the upgrade if and when you feel the need.
-
1
-
-
-
1
-
-
4 hours ago, Mozart said:
Ah chequers, don’t you love’em! You’ve made a good start Kev but in my experience “touch ups” are almost inevitable in some areas.
Agreed: been there, done that. This checked nose looks fine to me.
-
2
-
-
Posted ·
Edited by MikeC
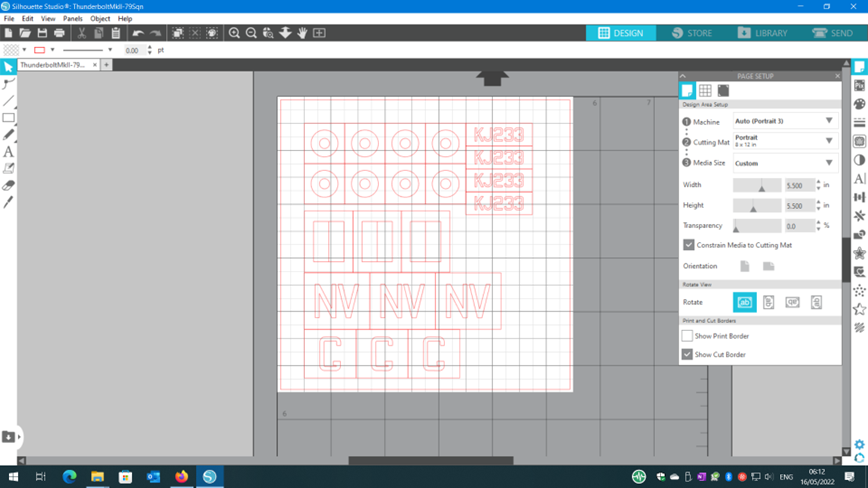
ThunderboltMkII-79Sqn.studio3
KJ233/NV:G of 79 Sqn RAF in Burma, seen at 2:55 in this short film: https://www.iwm.org.uk/collections/item/object/1060025281
Date? The latter part of 1944-1945, I can't be more precise than that at the moment.
Sized for Hasegawa 1:32 kit. Includes spares of all markings.
-
Submitter
-
Submitted05/16/2022
-
Category
-
3
-
-
-
-
-
7 hours ago, Kevin Futter said:
Of the two, I'd go for the Portrait. As I understand it, the main advantage of the Cameo for our purposes is that it can handle larger media, but I can't imagine ever needing anything bigger for scale modelling than what the Portrait can manage. The Cameo is overkill in my opinion, unless you can get it for a bargain. Max has one, however, and is therefore better qualified to make a knowledgeable assessment than I am.
Over to you, Max!
Kev
Agreed. I'm very pleased with my Portrait 3.
5 hours ago, denders said:One of the reasons I didn't go with a Cricut is the fact that all your files are stored in the 'cloud'. I guess that makes me a dinosaur, I prefer to have control over my 'stuff'.
Me too, and I'm not a dinosaur, but an ex-IT person. 😀
-
Edited by MikeC
Hello Gassman and
 . Like you & Max, I'm in the UK, in St Neots, Cambs. Yes, the machines are an expensive initial outlay. However, against that set the cost of all the aftermarket decal sheets you won't have to buy. It will pay for itself over time, and you can have the exact subject you want to do.
I have a Portrait 3 which does everything I need. The only accessory I've added is a low-tack cutting mat as the masking material I use - Artool Ultra Mask - did not easily detach from the normal-tack mat supplied with the machine. [Edit] I bought it from Graphtec, and highly recommend them - excellent service. https://www.graphtecgb.shop/shop/
-
1
-
-
Hello there, and
. I was a Brit in Texas once, in fact twice - a grand total of 5 hours or so in total passing through DFW en route LGW to ABQ and return. 🙂
-
 1
1
-
-
FINISHED!!
This one seems to have fought me most of the way: perhaps that's my fault, perhaps the kit, perhaps a bit of both. But here it is, warts'n'all, and I'm now rather pleased with it: it's been a useful learning experience from the masking point of view, not least the checks. I'll do some proper RFI shots in due course, but meanwhile, here's some "taster" pics:
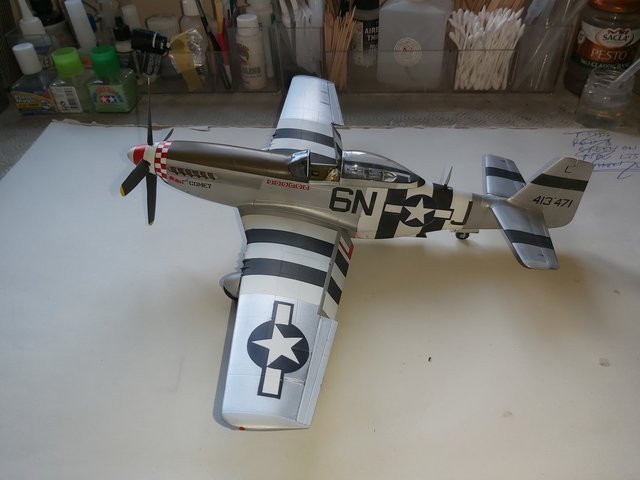

A small touch of artistic licence: I'm not one of those who insist that all invasion stripes painted in the days before D-Day were scruffy ("hobby-horse" alert!!), but the black straying up the aerial was deliberate on my part. The other stray black on the stripe behind wasn't, but I decided to leave it anyway.
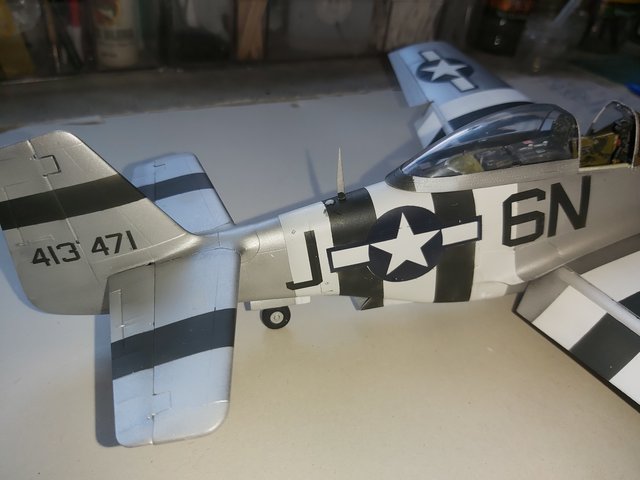
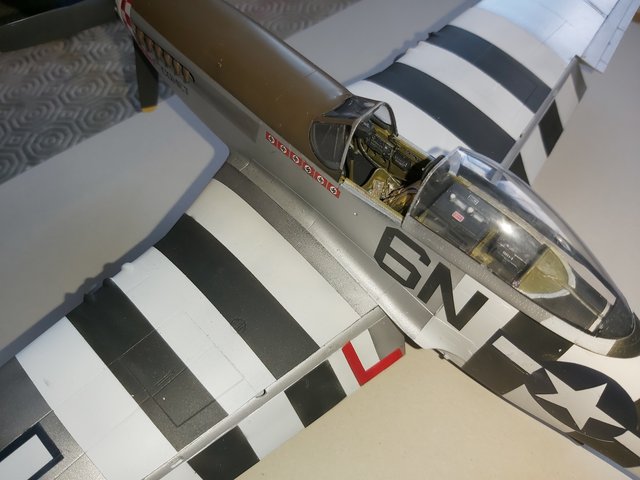
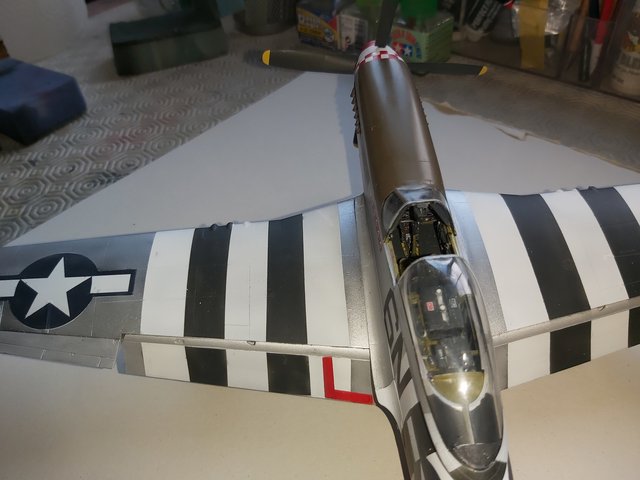
Did you wonder "Will it ever be finished"? I know I did. Thanks for staying with me, and for all the encouraging remarks along the way.
-
5
-
Airfix 1:48 Avro Anson Mk1 markings
in Aircraft - Military
Hi, and welcome aboard.