

Mozart
-
Posts
321 -
Joined
-
Last visited
-
Days Won
137
Content Type
Profiles
Forums
Events
Downloads
Posts posted by Mozart
-
-
Mine’s an older model Mike so USB is the only mode but I believe some of the newer ones also use Bluetooth. I’m really surprised that it’s not mentioned in any of the blurb or ads though. Kev I think has a Cameo 4 so he’ll doubtless chip in with some info about his.
What’s on your shortlist?
MaxPS, just found this:
The Silhouette Cameo 4 Digital Cutting Tool features cutting edge technology, operating three times faster than the Cameo 3. The ultimate DIY machine for creative craft projects, this can be used to cut over 100 materials, including paper, cardstock, vinyl, and fabric up to 12 inches wide.The Cameo 4 model has an increased cutting force of up to 5kg, and offers Bluetooth wireless connectivity with increased range. This is also compatible with PixScan technology.
-
6 hours ago, Mozart said:
All OK in sunny Oxford but I’ll check later if it’s reached as far as Dorset!
MaxYes, good in Dorset too!! 😁
Max
-
 2
2
-
-
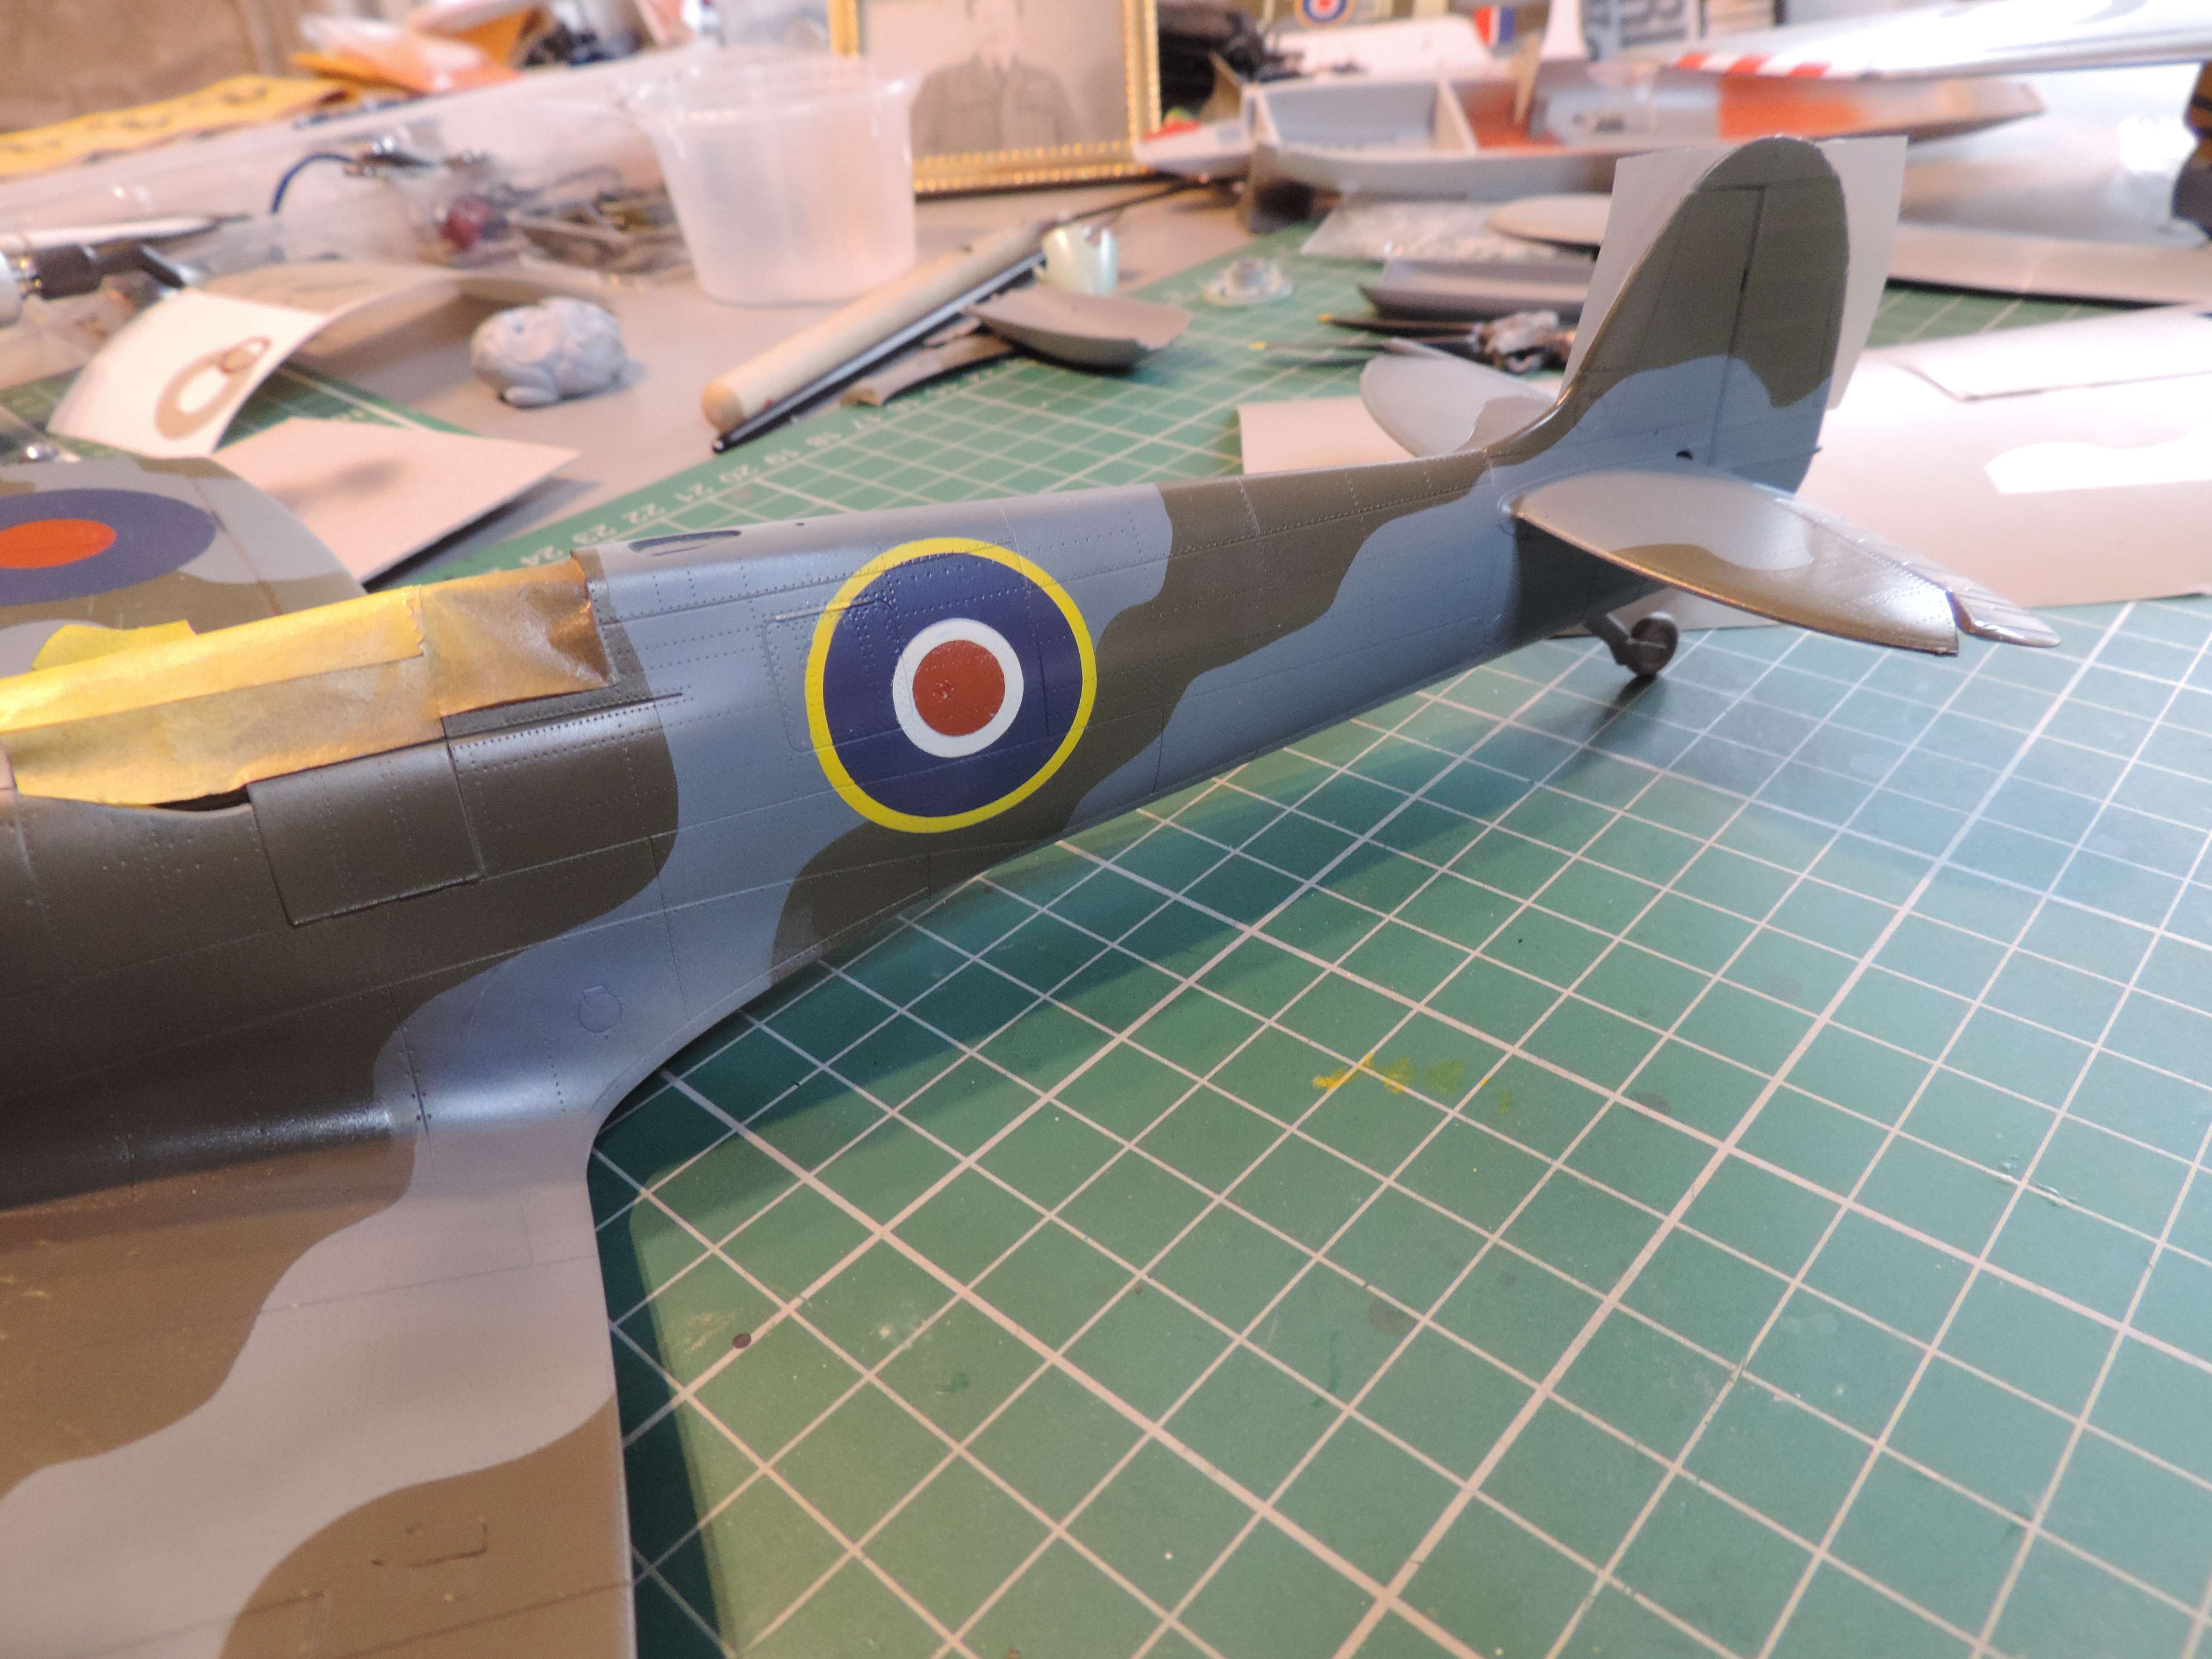
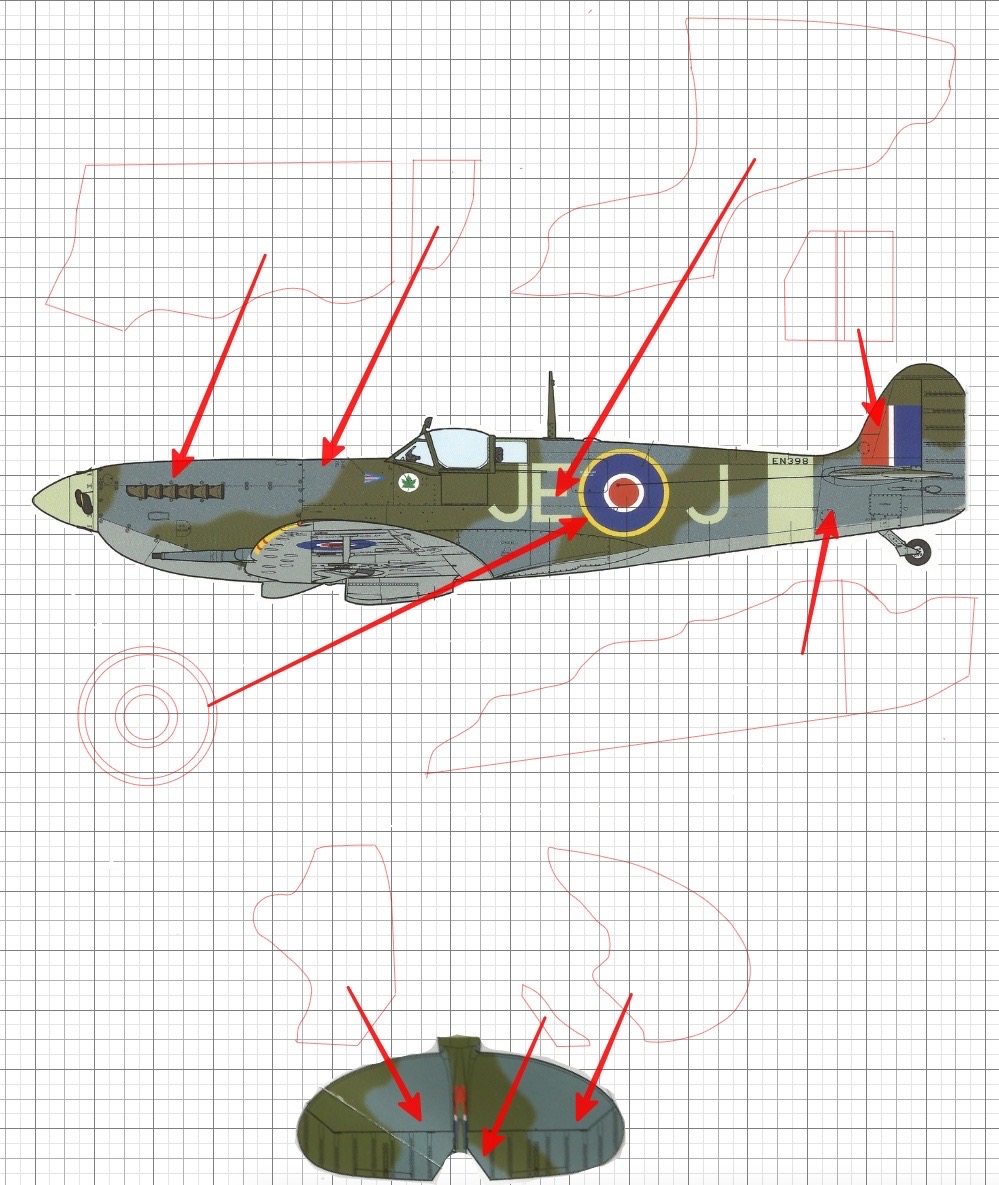
Hello bushande. The sizes that you are talking about are absolutely right on the limit with what is possible for I think any cutting machine, 3 to 4mm is the smallest that I’ve cut in 7 years of using my Silhouette machine. It can cope slightly better with more square letters and numbers like “T”, “E”, “1”, “4”, “7” etc but any number involving a curve or “centres” cause problems, with "B" and “8” possibly being the most demanding and “S” being challenging. I always cut multiples of these small areas so that I can pick the best.

This is a Spitfire that I did some years ago when I was fairly new to masking making, the letters are 3 to 4mm high. You can judge for yourself which work better than others, and experience has shown me how to improve some of the less than satisfactory parts here. Hope this helps a little.
Max
-
2
-
-
All OK in sunny Oxford but I’ll check later if it’s reached as far as Dorset!
Max-
2
-
-
On 7/15/2021 at 8:24 AM, Kevin Futter said:
Welcome aboard, Jerry!

Glad you found us, and glad to have you here!
Kev
Agreed! Hope you find the masks posted so far useful, and good luck with your adventures with your Silhouette.
Max -
I’ve been concerned too Kev about the lack of activity on the site. The problem as I see it is that, once basic tutorials have been posted, the site then simply becomes a library of masking schemes. That’s no bad thing at all, it will clearly encourage and attract visitors but will it promote much in the way of dialogue or interaction? There’s no easy answer, but I agree with Dave that questions often asked on LSP would be better asked, or directed here. Perhaps a more prominent “plug” on LSP would be in order?
Max-
1
-
-
Agreed, no doubt you'll be a very valuable member of the masking forum, welcome Mathieu. 👌
-
Hmmm, intriguing post Bax! I don’t own a 4, simply a 3 which as I’ve said before does everything that I ask of it, and very effectively. I’ll be as interested as you though to read what people have to say about their experiences with their 4, can it really be such a retrograde step as owners have stated in your post, it seems very unlikely. Let’s hope you get some answers from experienced users.
Max
-
On 4/7/2021 at 7:06 PM, Giorgos said:
Fender is included?
What's a fender?
-
 1
1
-
-
I’ve had my Silhouette since 2014, I needed the “professional” upgrade to get features which it now appears are standard on new models. I don’t know what the SW upgrade comprises so I’m sorry but I can’t comment.
Max -
You're making the right decision getting a mask-cutting machine, glad to see you here.
Max
-
Good to see you here Pascal. Hopefully some of the tutorials here will help you get started with your Silhouette but ask if you have any problems. No guarantees for answers but we’ll do our best!
-
Like that very much Steve, especially the finish you’ve achieved. Brilliant!
Max-
 1
1
-
-
You’re welcome Tom, hope the masks are of use.
-
1
-
-
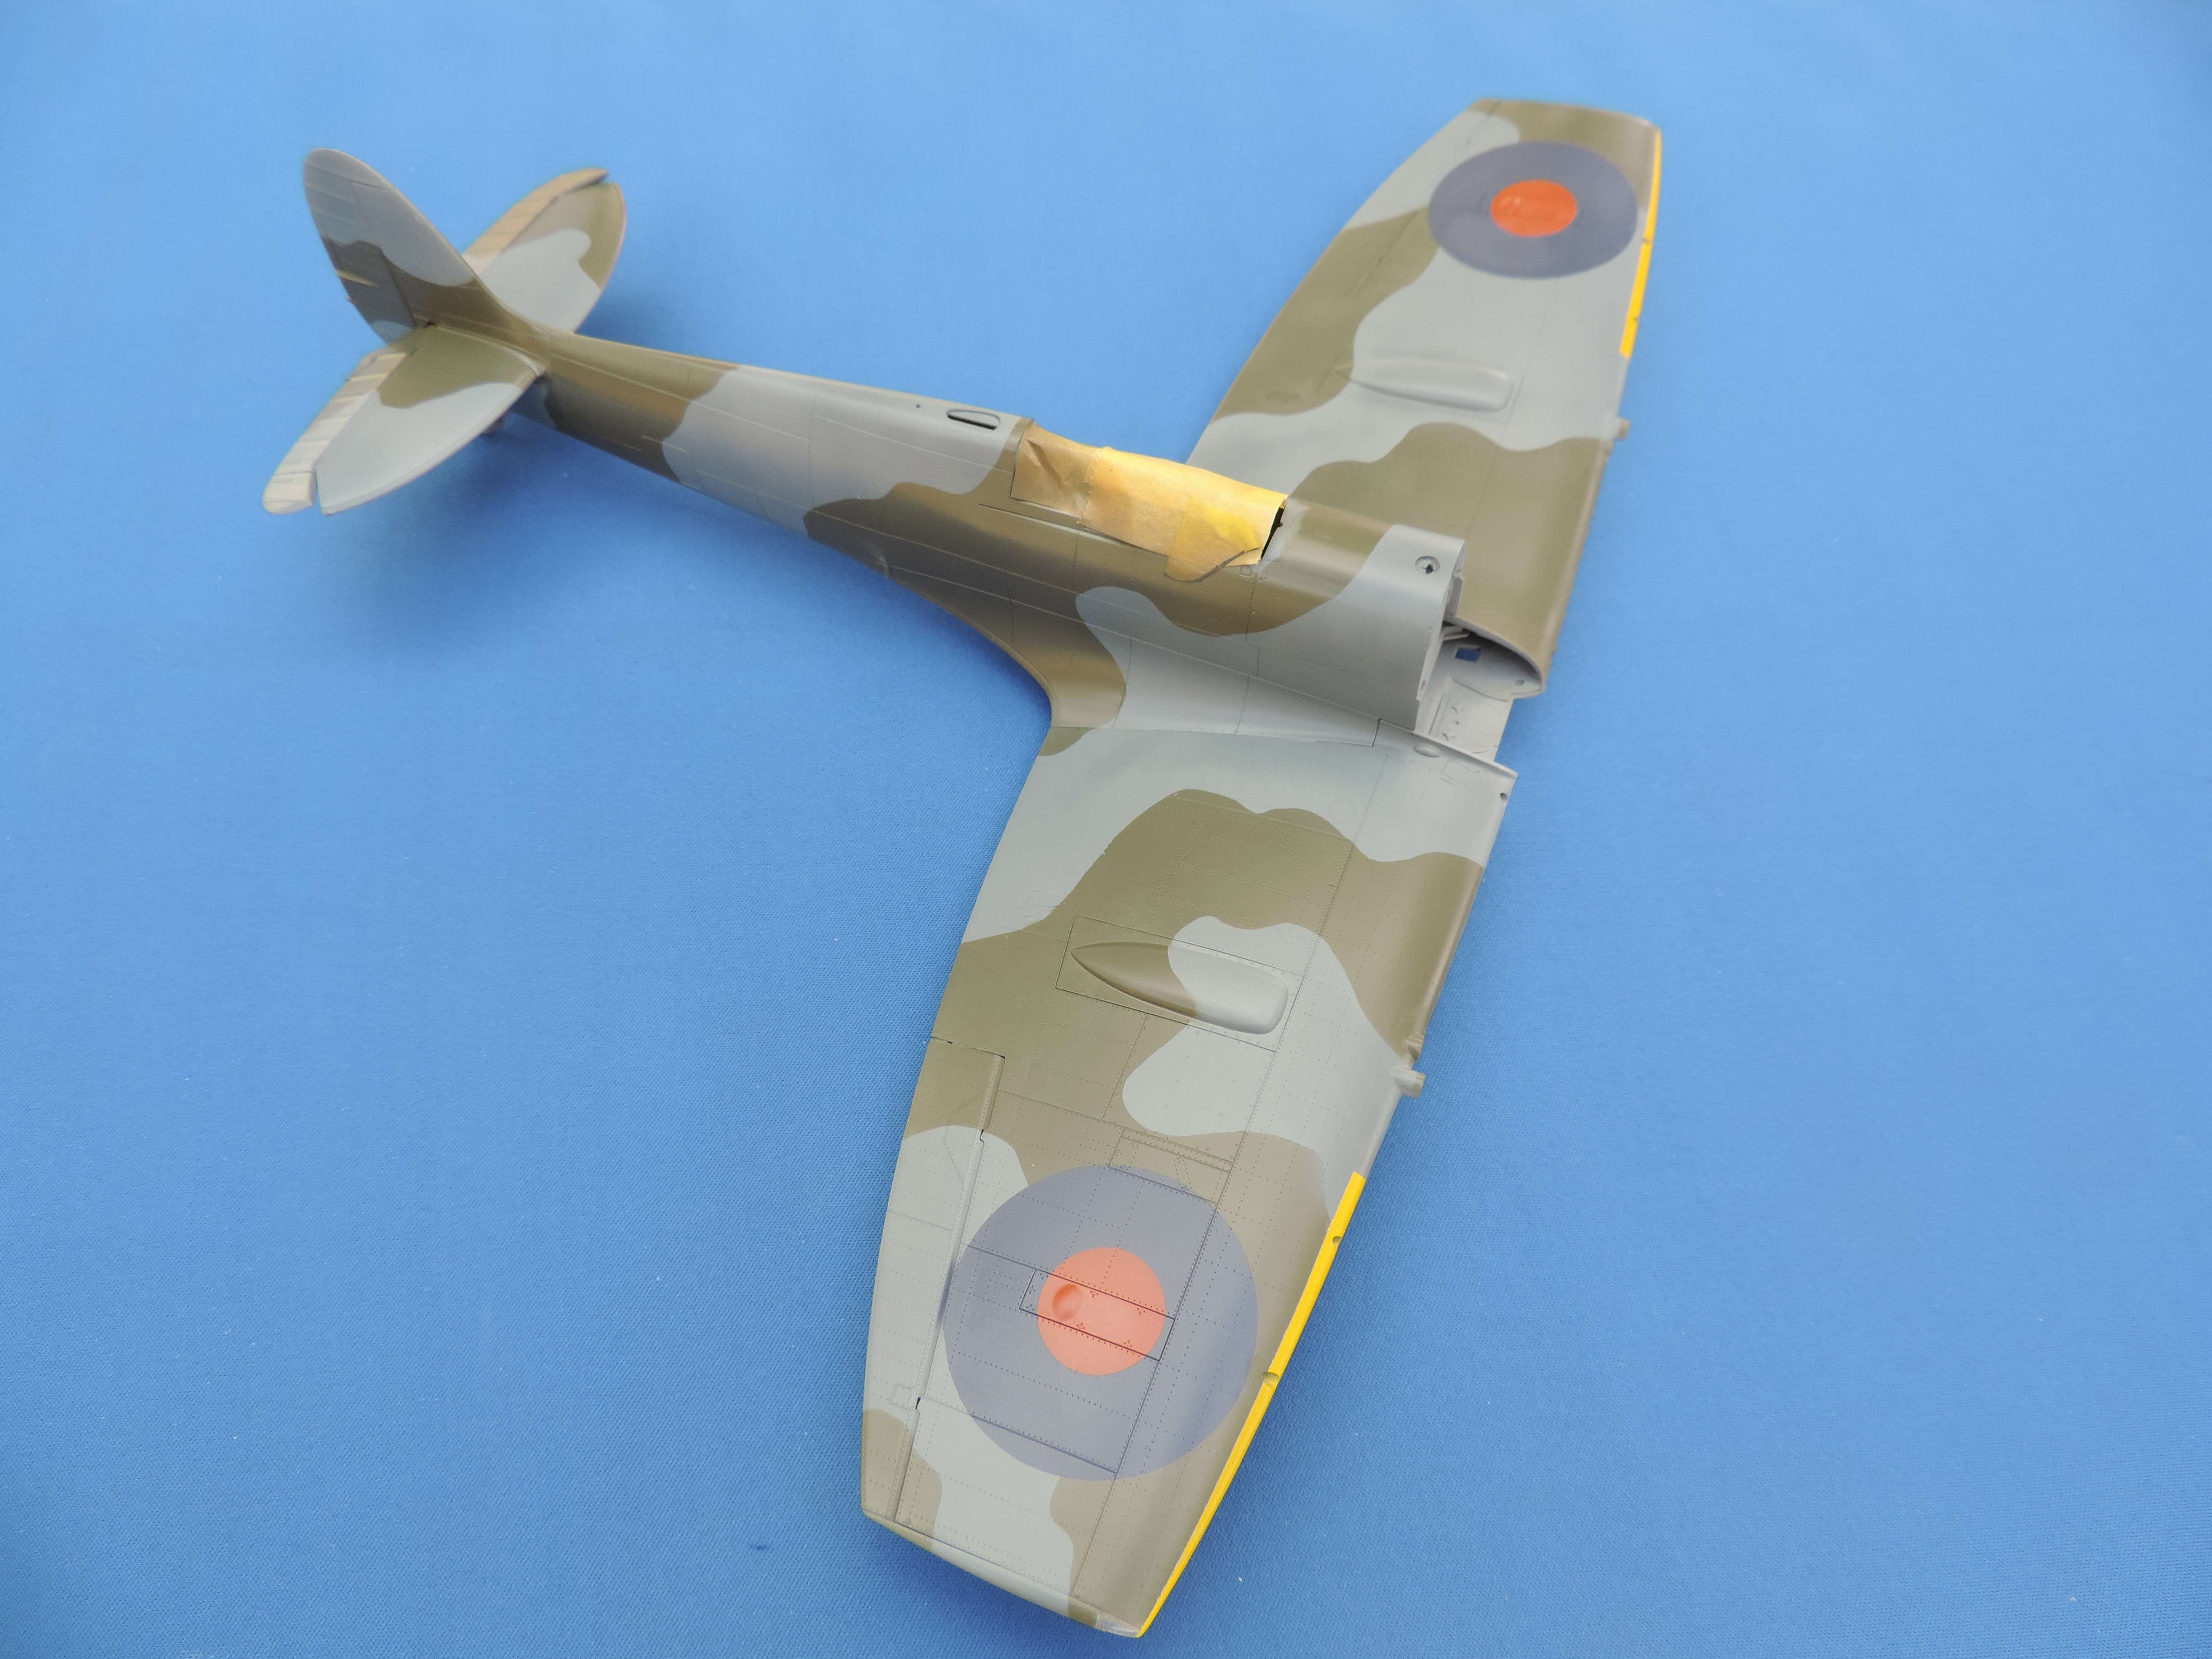
Final stages, whole roundels put back in place then red centre removed, replaced and blue outer done:
The transfer piece here is sold for Cricut machines - low tack, completely clear (which is a distinct advantage) and with the grid on it which helps:
and before very long at all:

-
4
-
1
-
-
Well done Bax, welcome to the merry band!
-
Thank you Mark, I'm happy that it's coming along quite well. 😁
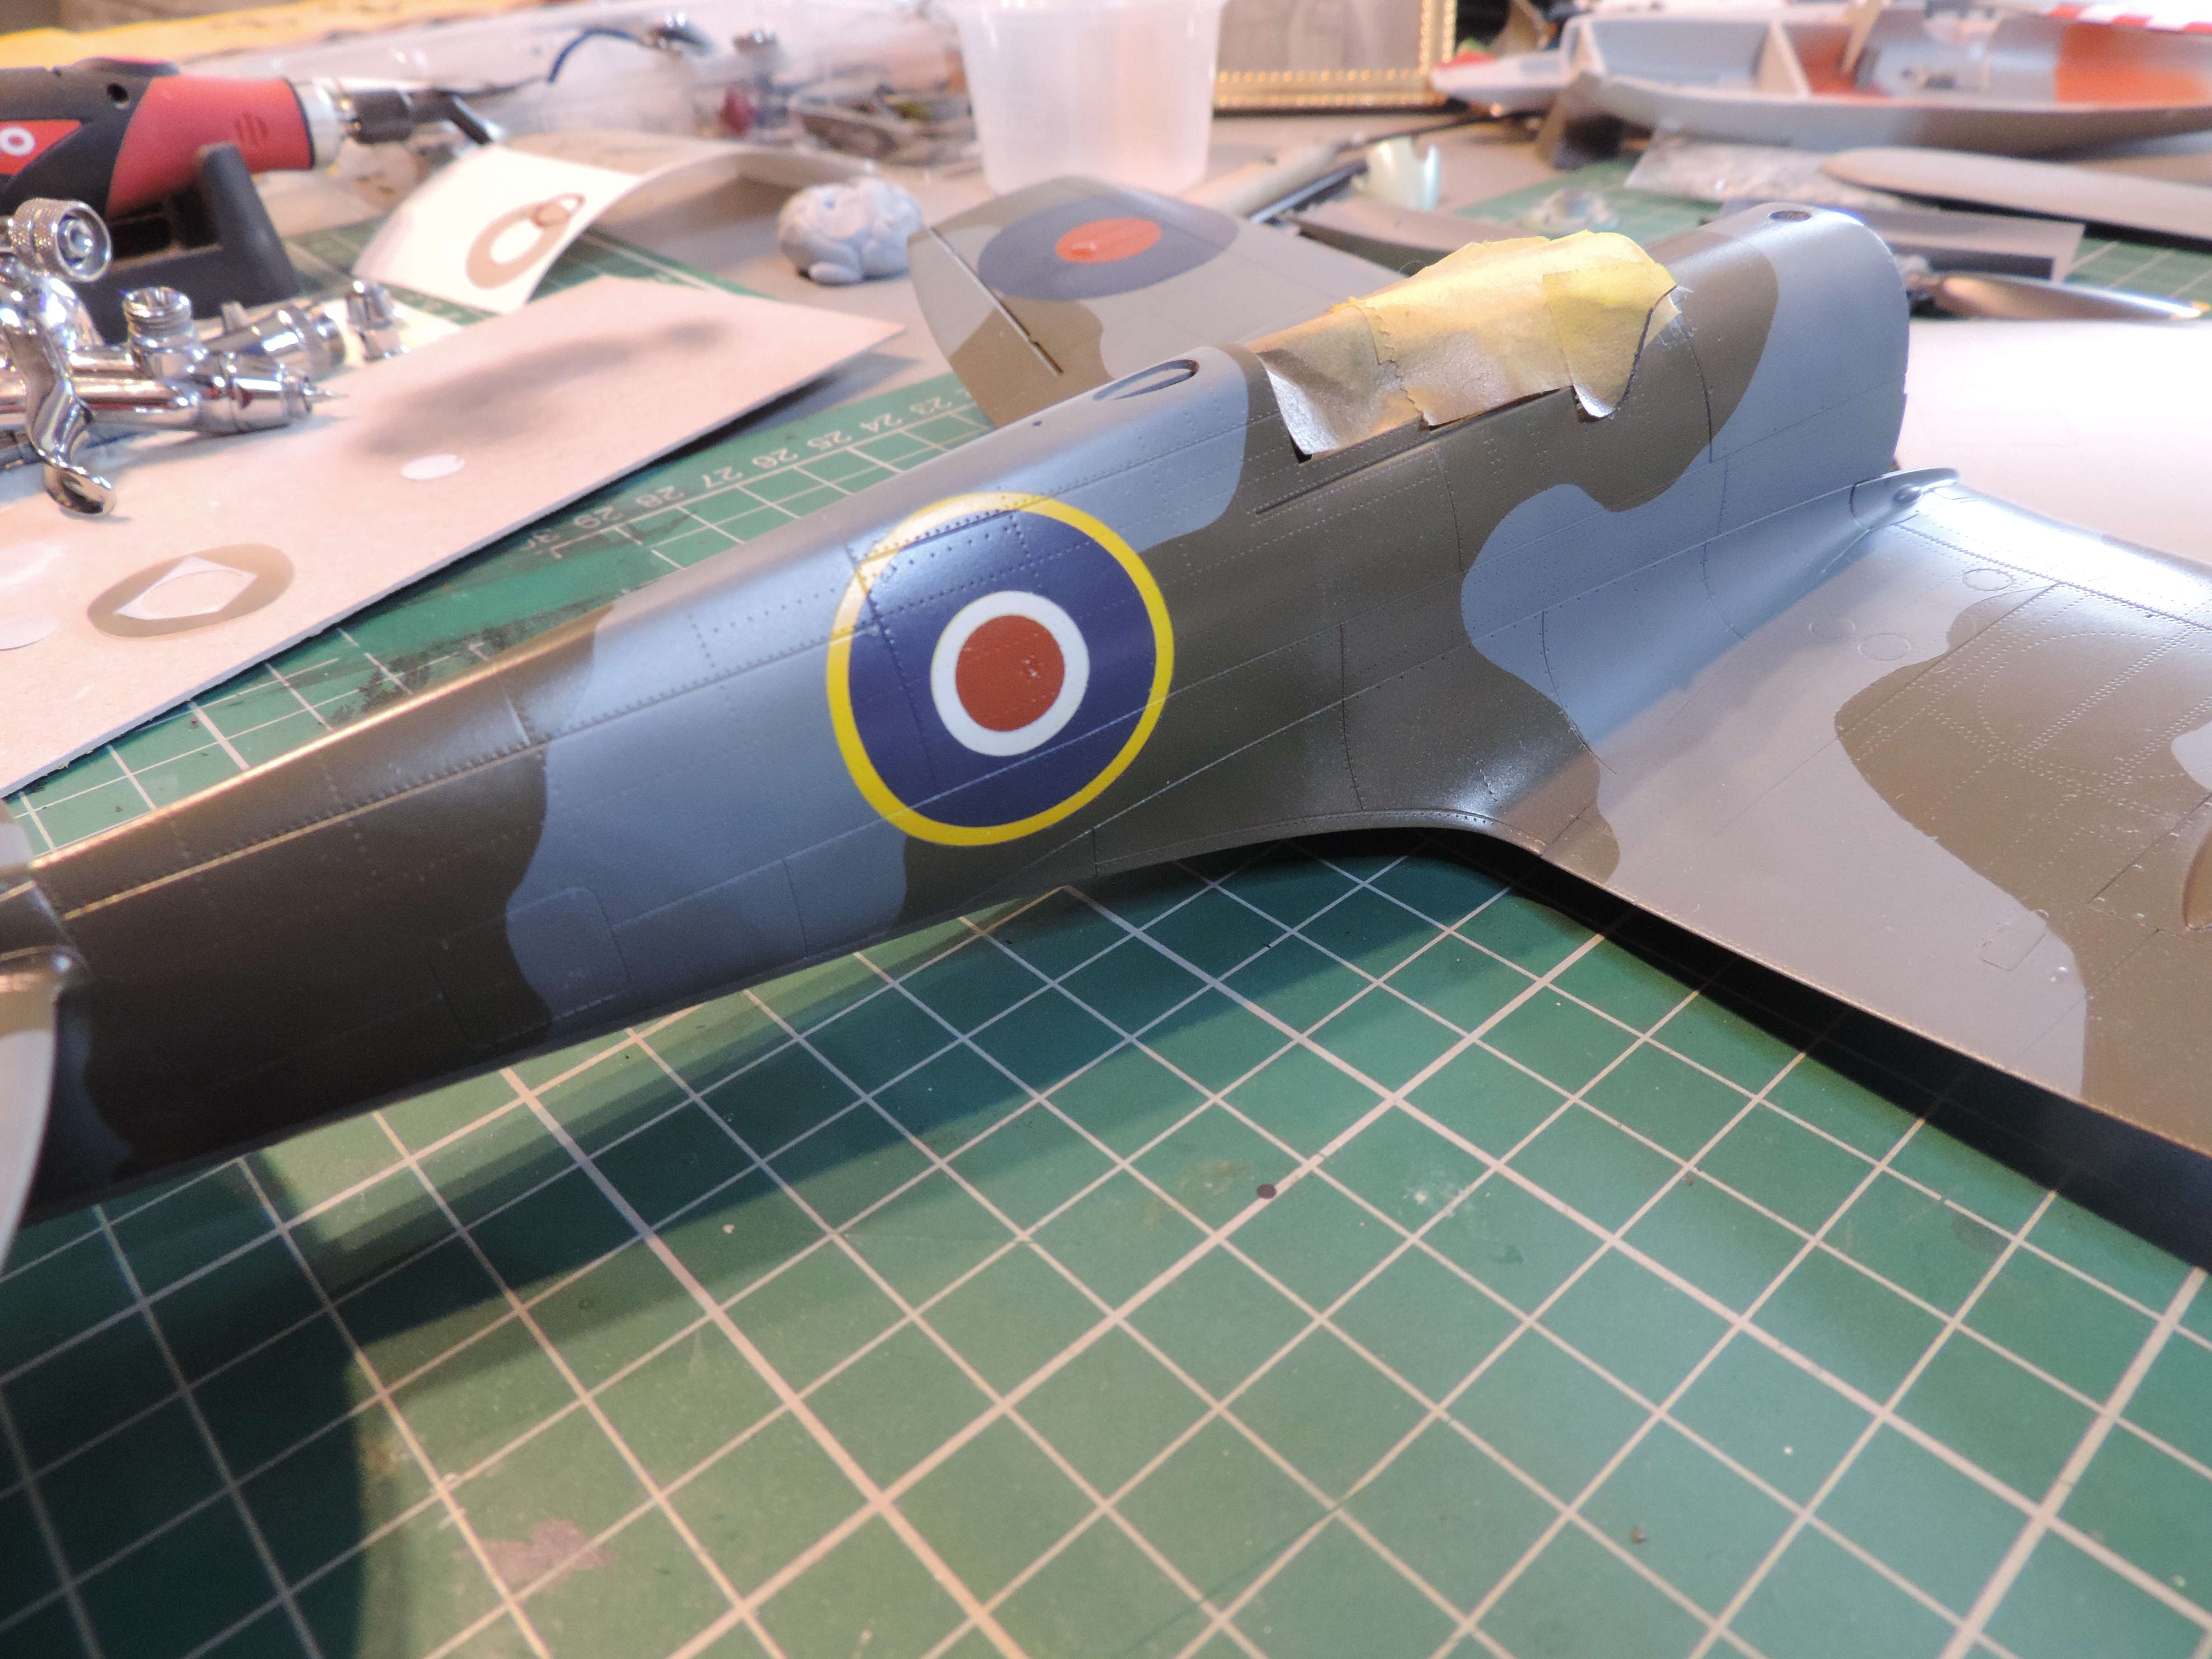
I've started on the fuselage roundels: firstly the "empty" mask was put in place:
and the white base collar sprayed:
This was quickly followed by the yellow outer area:
Tomorrow I'll put the whole roundel back in place then firstly "weed out" the red inner circle, leaving everything else as is. When that's dry, the red centre mask goes back in (easy to get this correctly centred) and the blue outer weeded out and the area sprayed. When all the masks are removed......Hey presto....with luck.....simple perfect

 roundels!
-
2
-
1
-
-
Mark, not dumb questions at all. The best material for masking is low-tack vinyl, Oramask 810 is very popular but Artool make similar products.
Leaving masks on? I can only speak from my own experience using MRP lacquer-based paints as my standard paint. I get my masks off as soon as the paint is dry (typically 15 minutes with Oramask) but I have also left them on for a couple of days on occasions with no problems.
Hope this helps but ask more if you need.Max
-
1
-
-
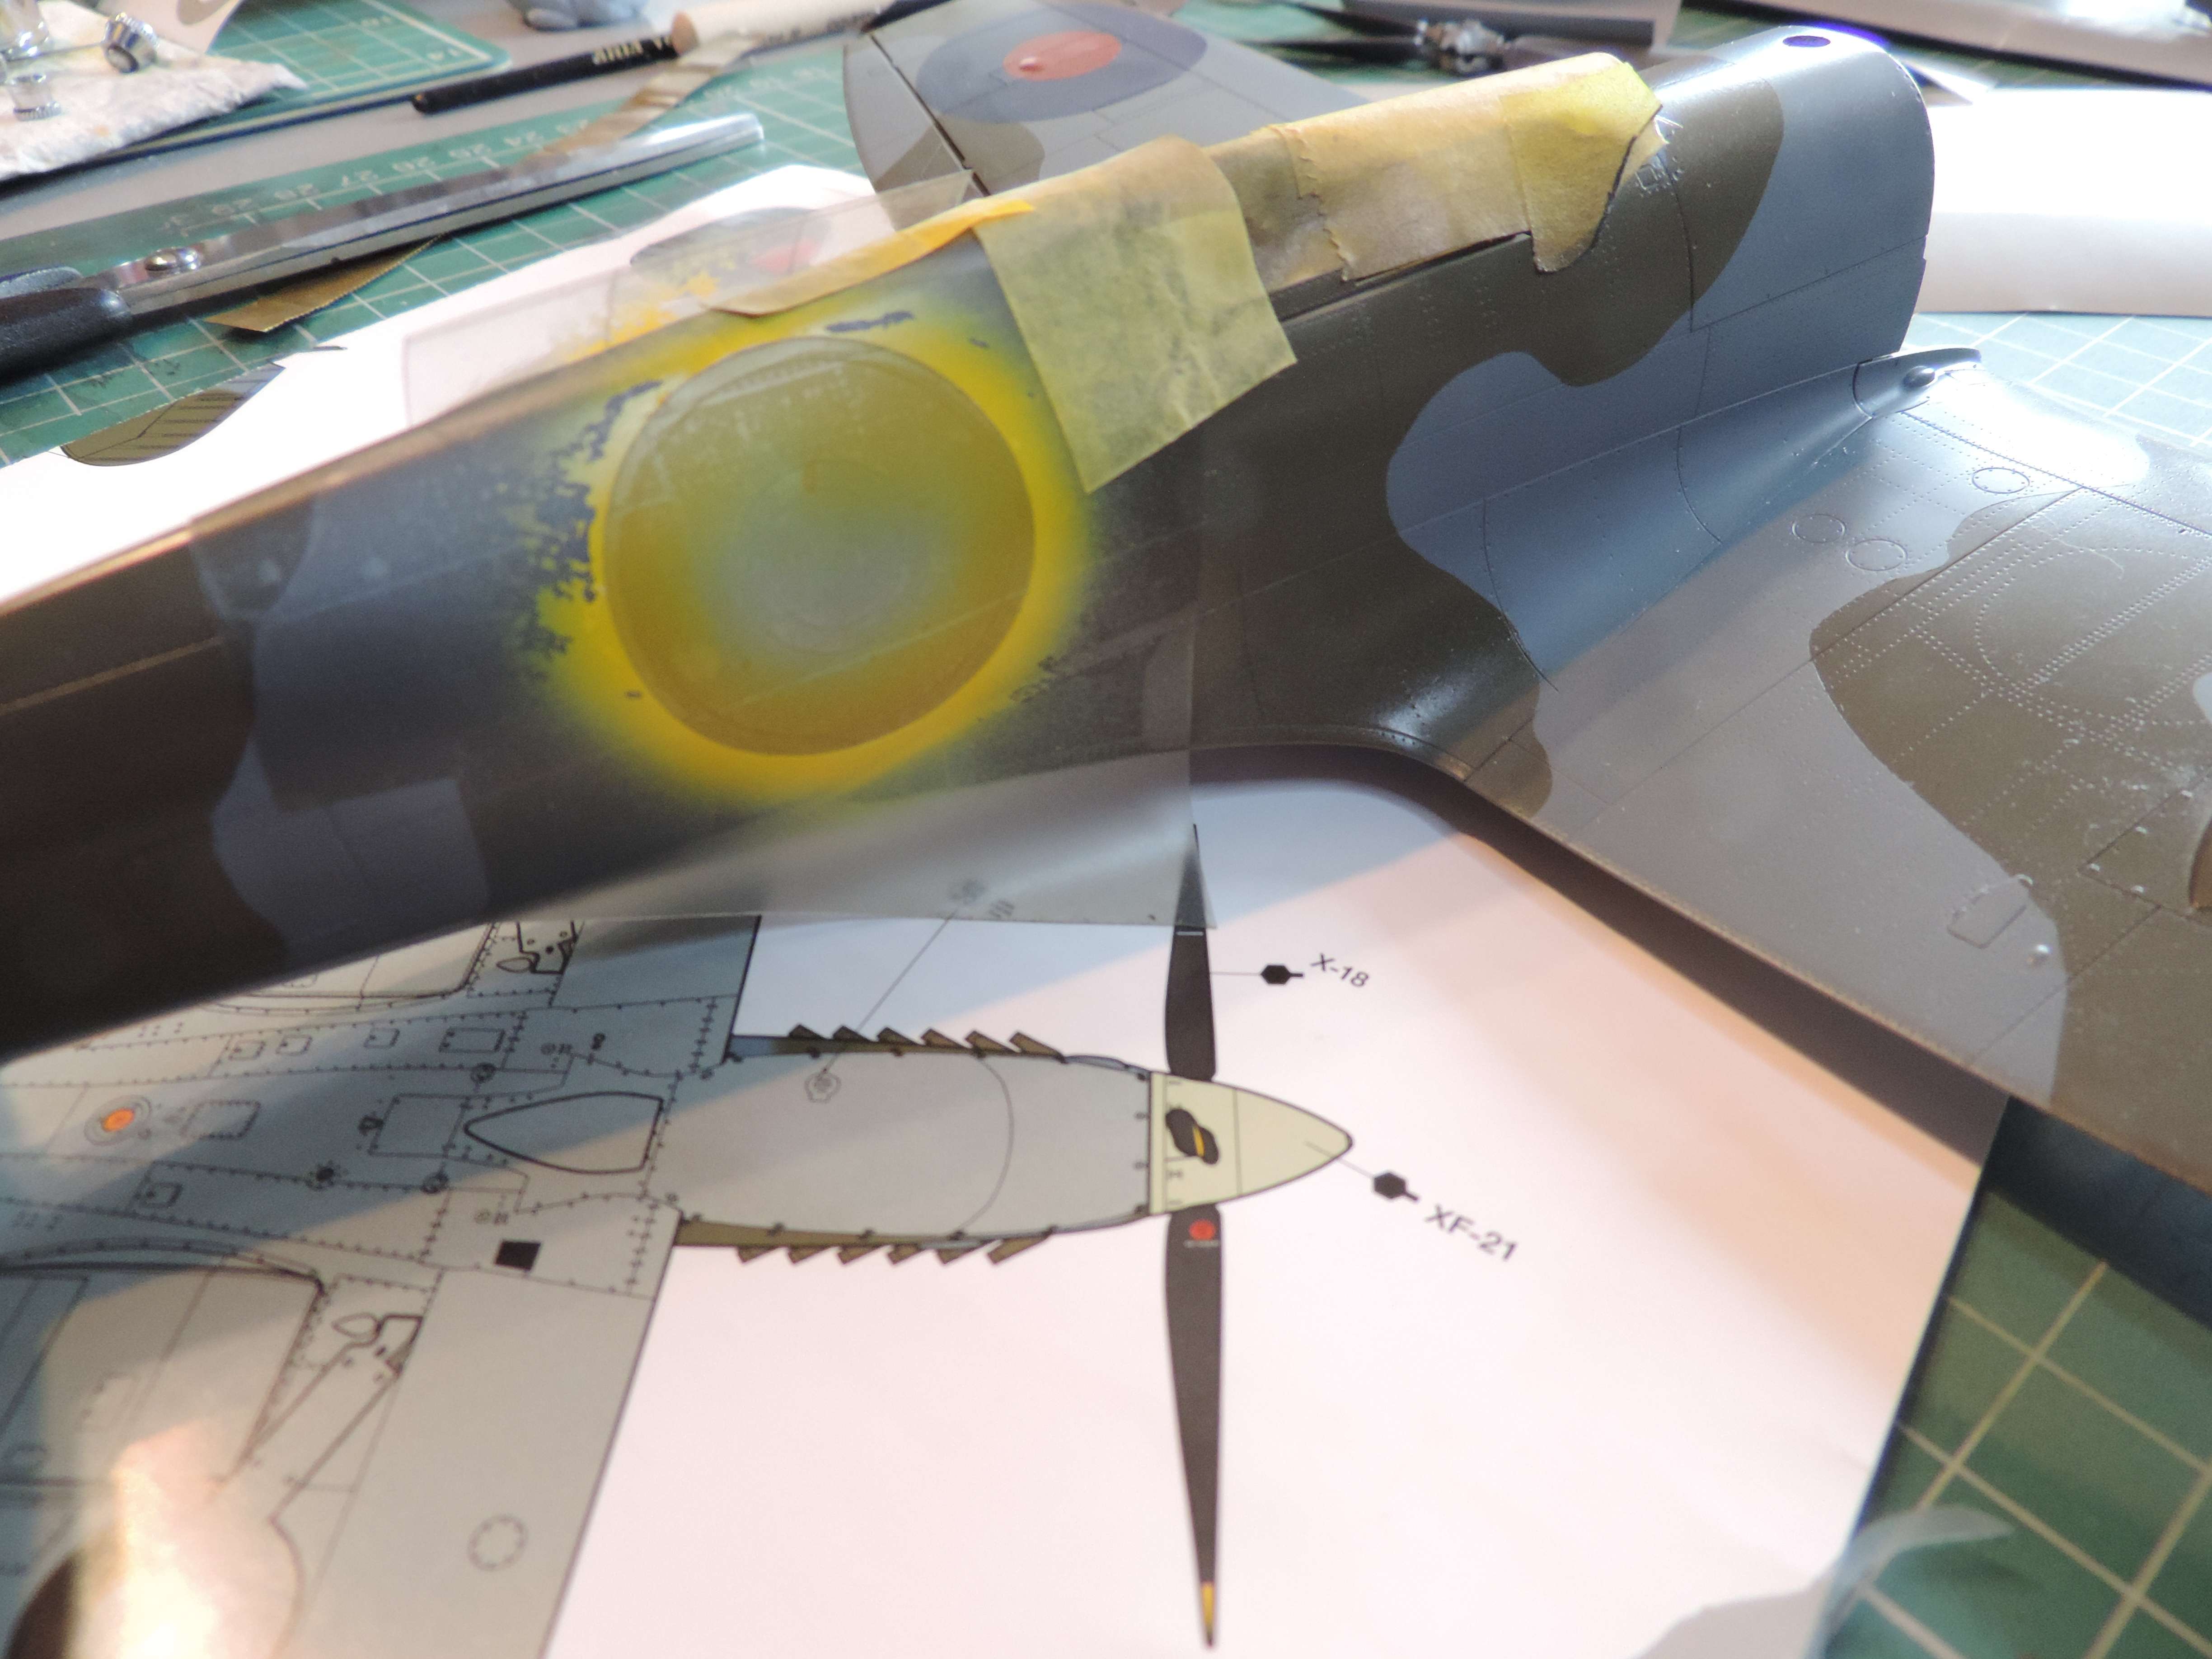
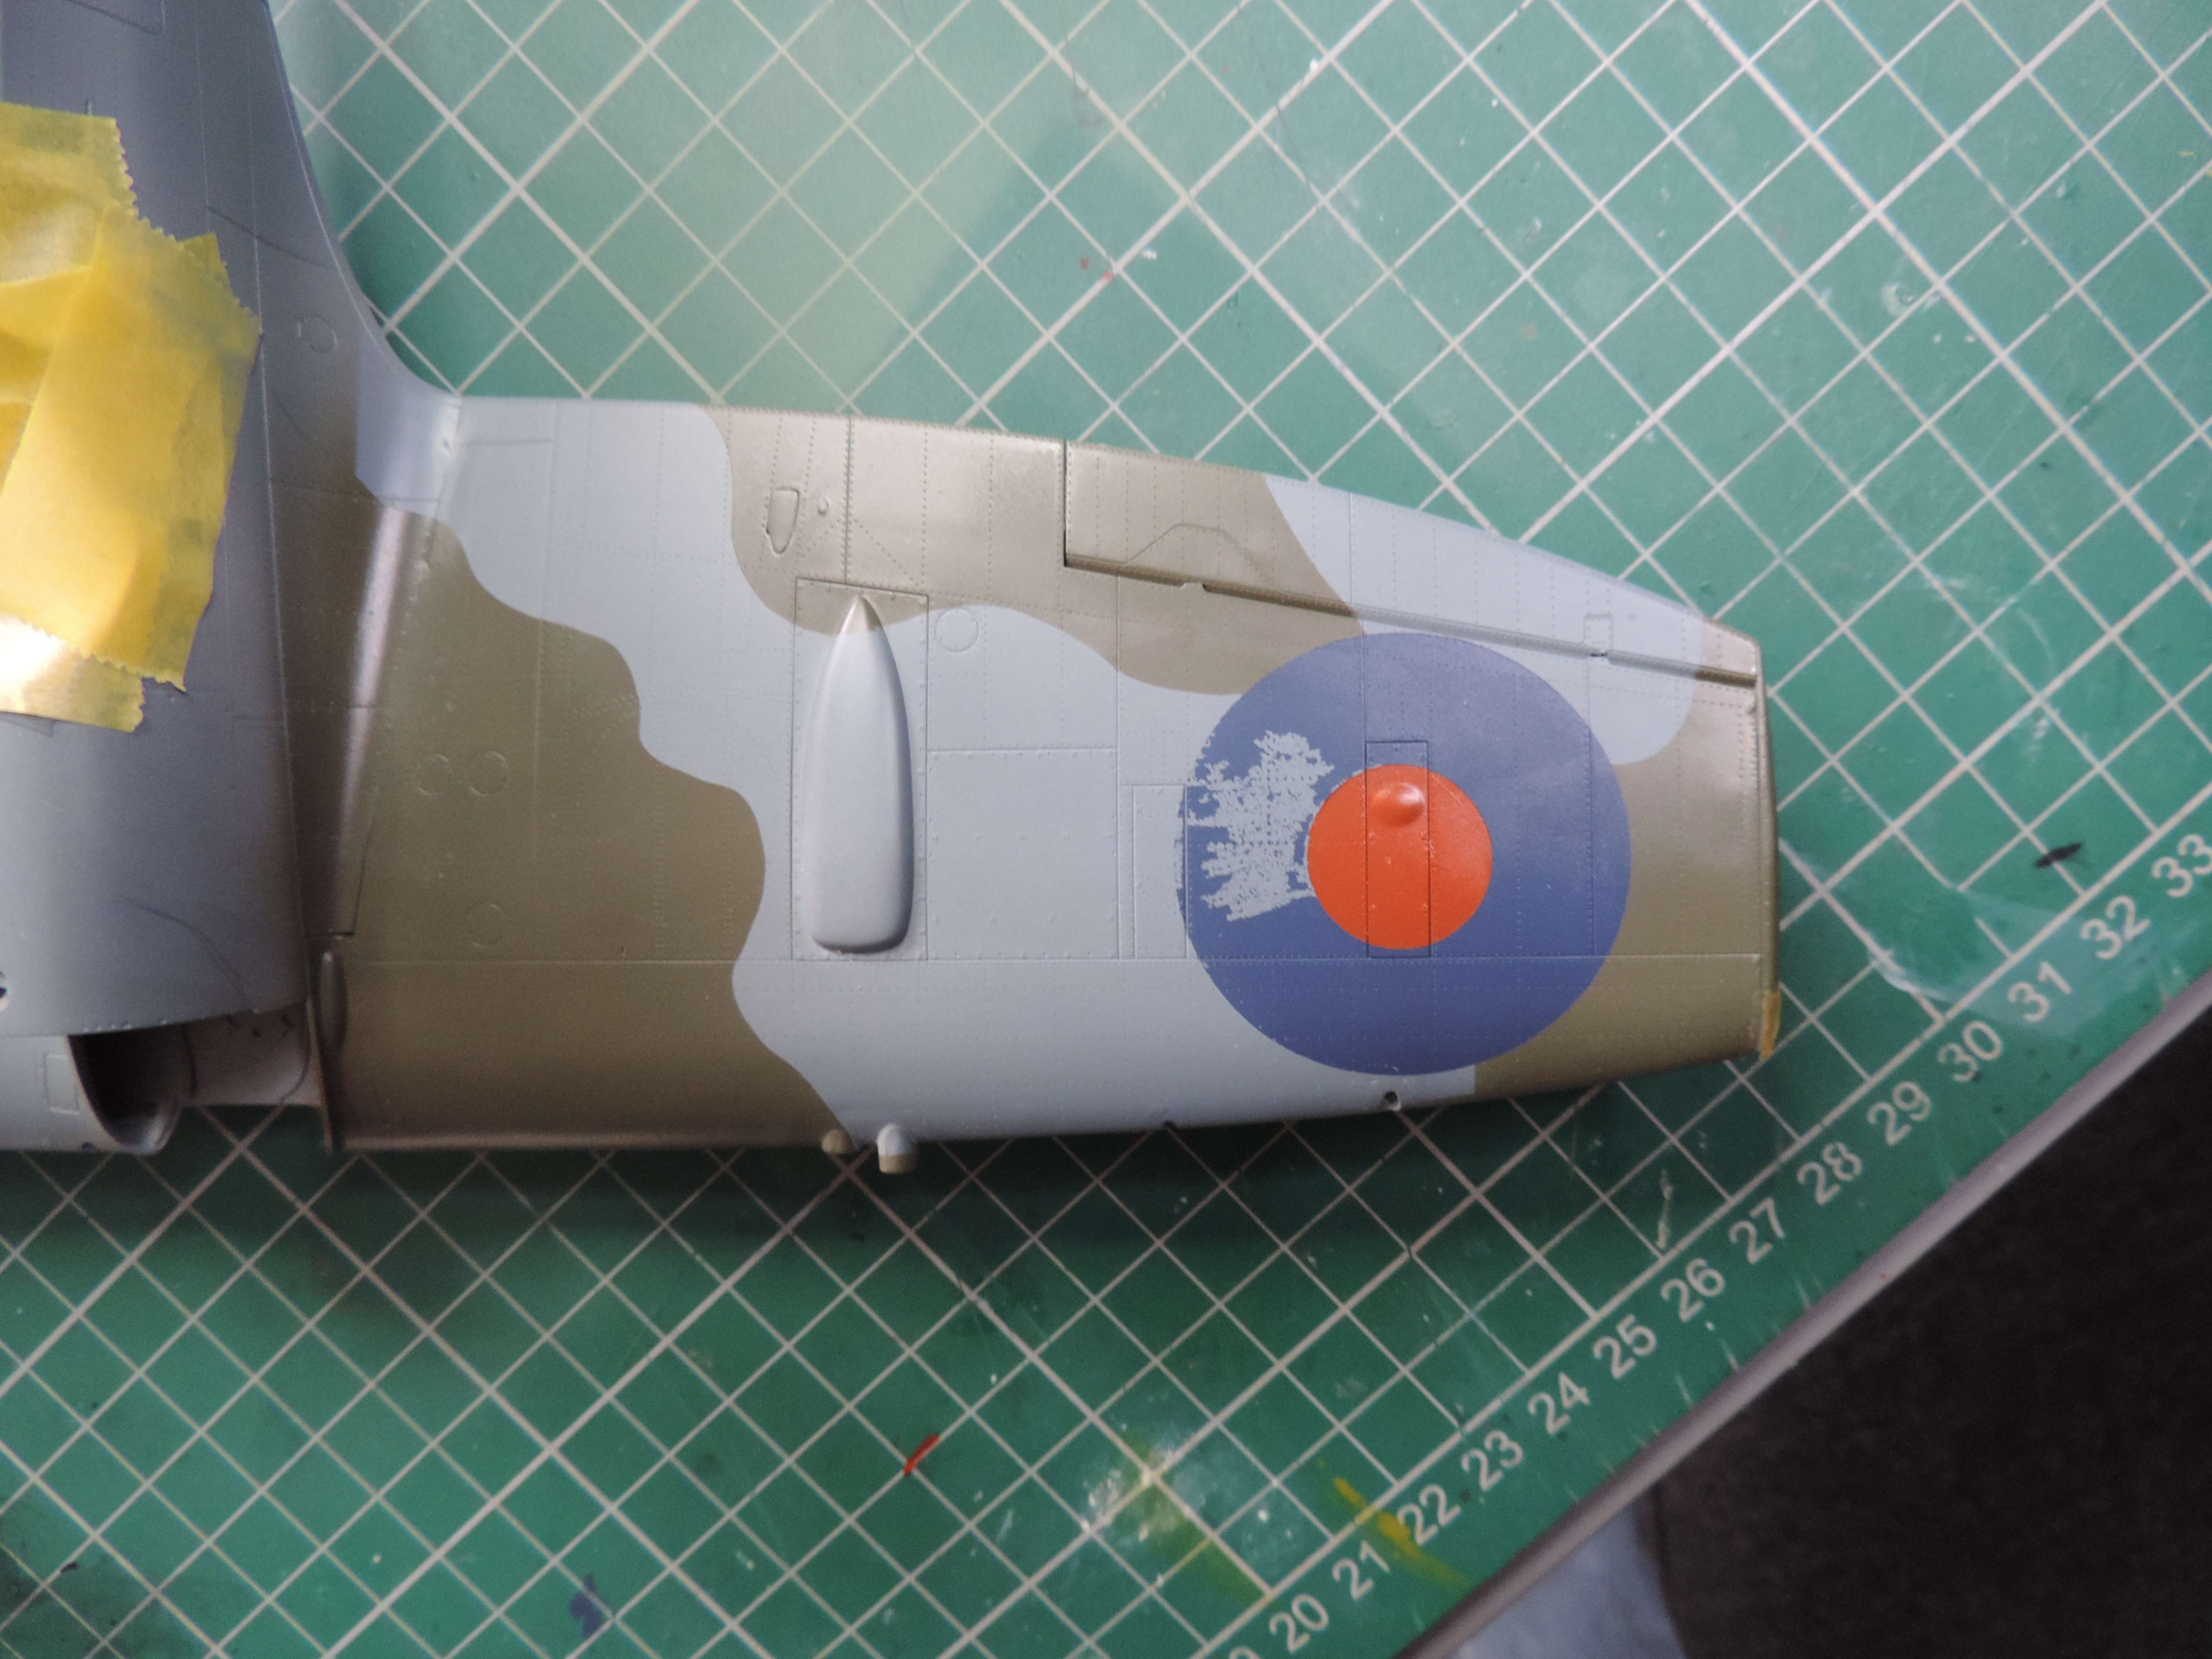
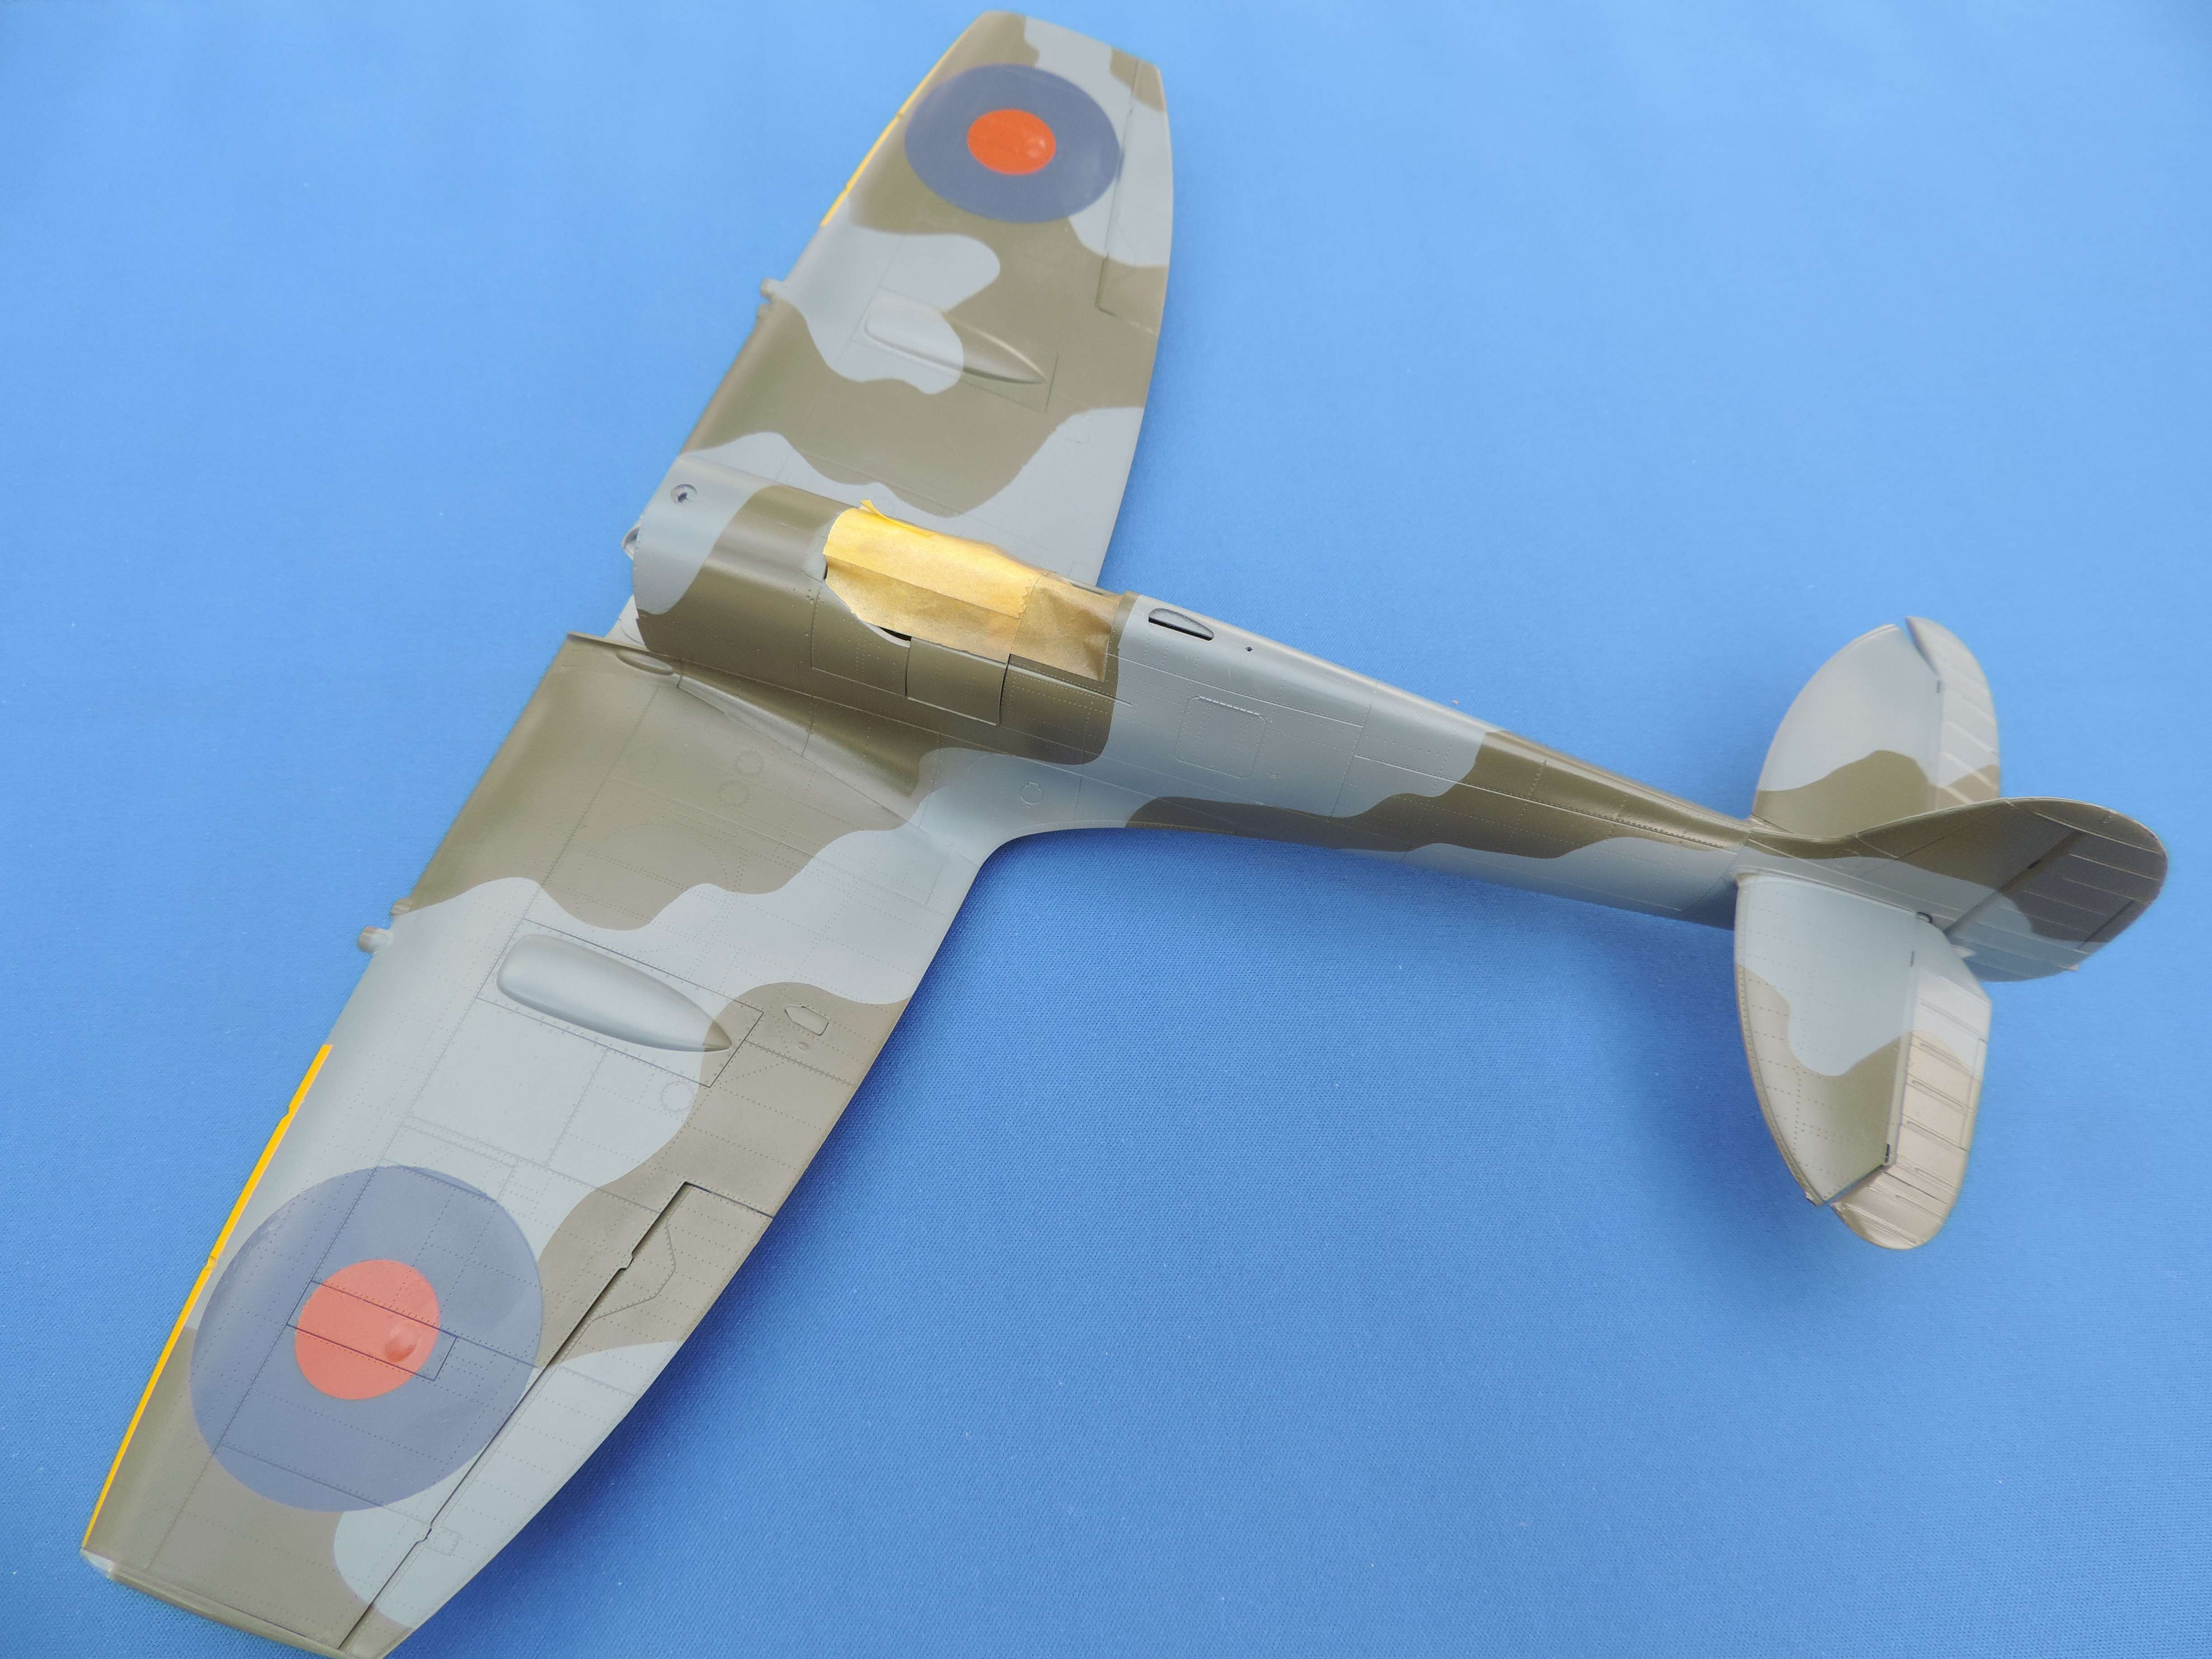
Funnily enough I haven't built that many WW2 RAF fighters in standard camouflage, and those few I have "free-handed" with the airbrush. But with the sublime Tamiya Spitfire kit I decided to explore making camouflage masks. I scanned the colour A3 sheet provided with the kit then imported the image onto the Silhouette screen, starting with the wings:
I measured the distance from leading to trailing edge on the kit where the wing walk stripe goes, then scaled the image onscreen to match that distance (just draw a straight line the measured distance, rotate and move it over the wing image and drag that out to match the line size).
Once that was established it was very easy selecting the line "figure of eight" draw tool to (manually) trace the outline of the camouflage lines:
I had already put down a base coat of Ocean Grey so the masks for those areas were pulled off and carefully laid in place on the wings. It took no time at all to spray the Dark Green resulting in crisp lines when the masks were removed:
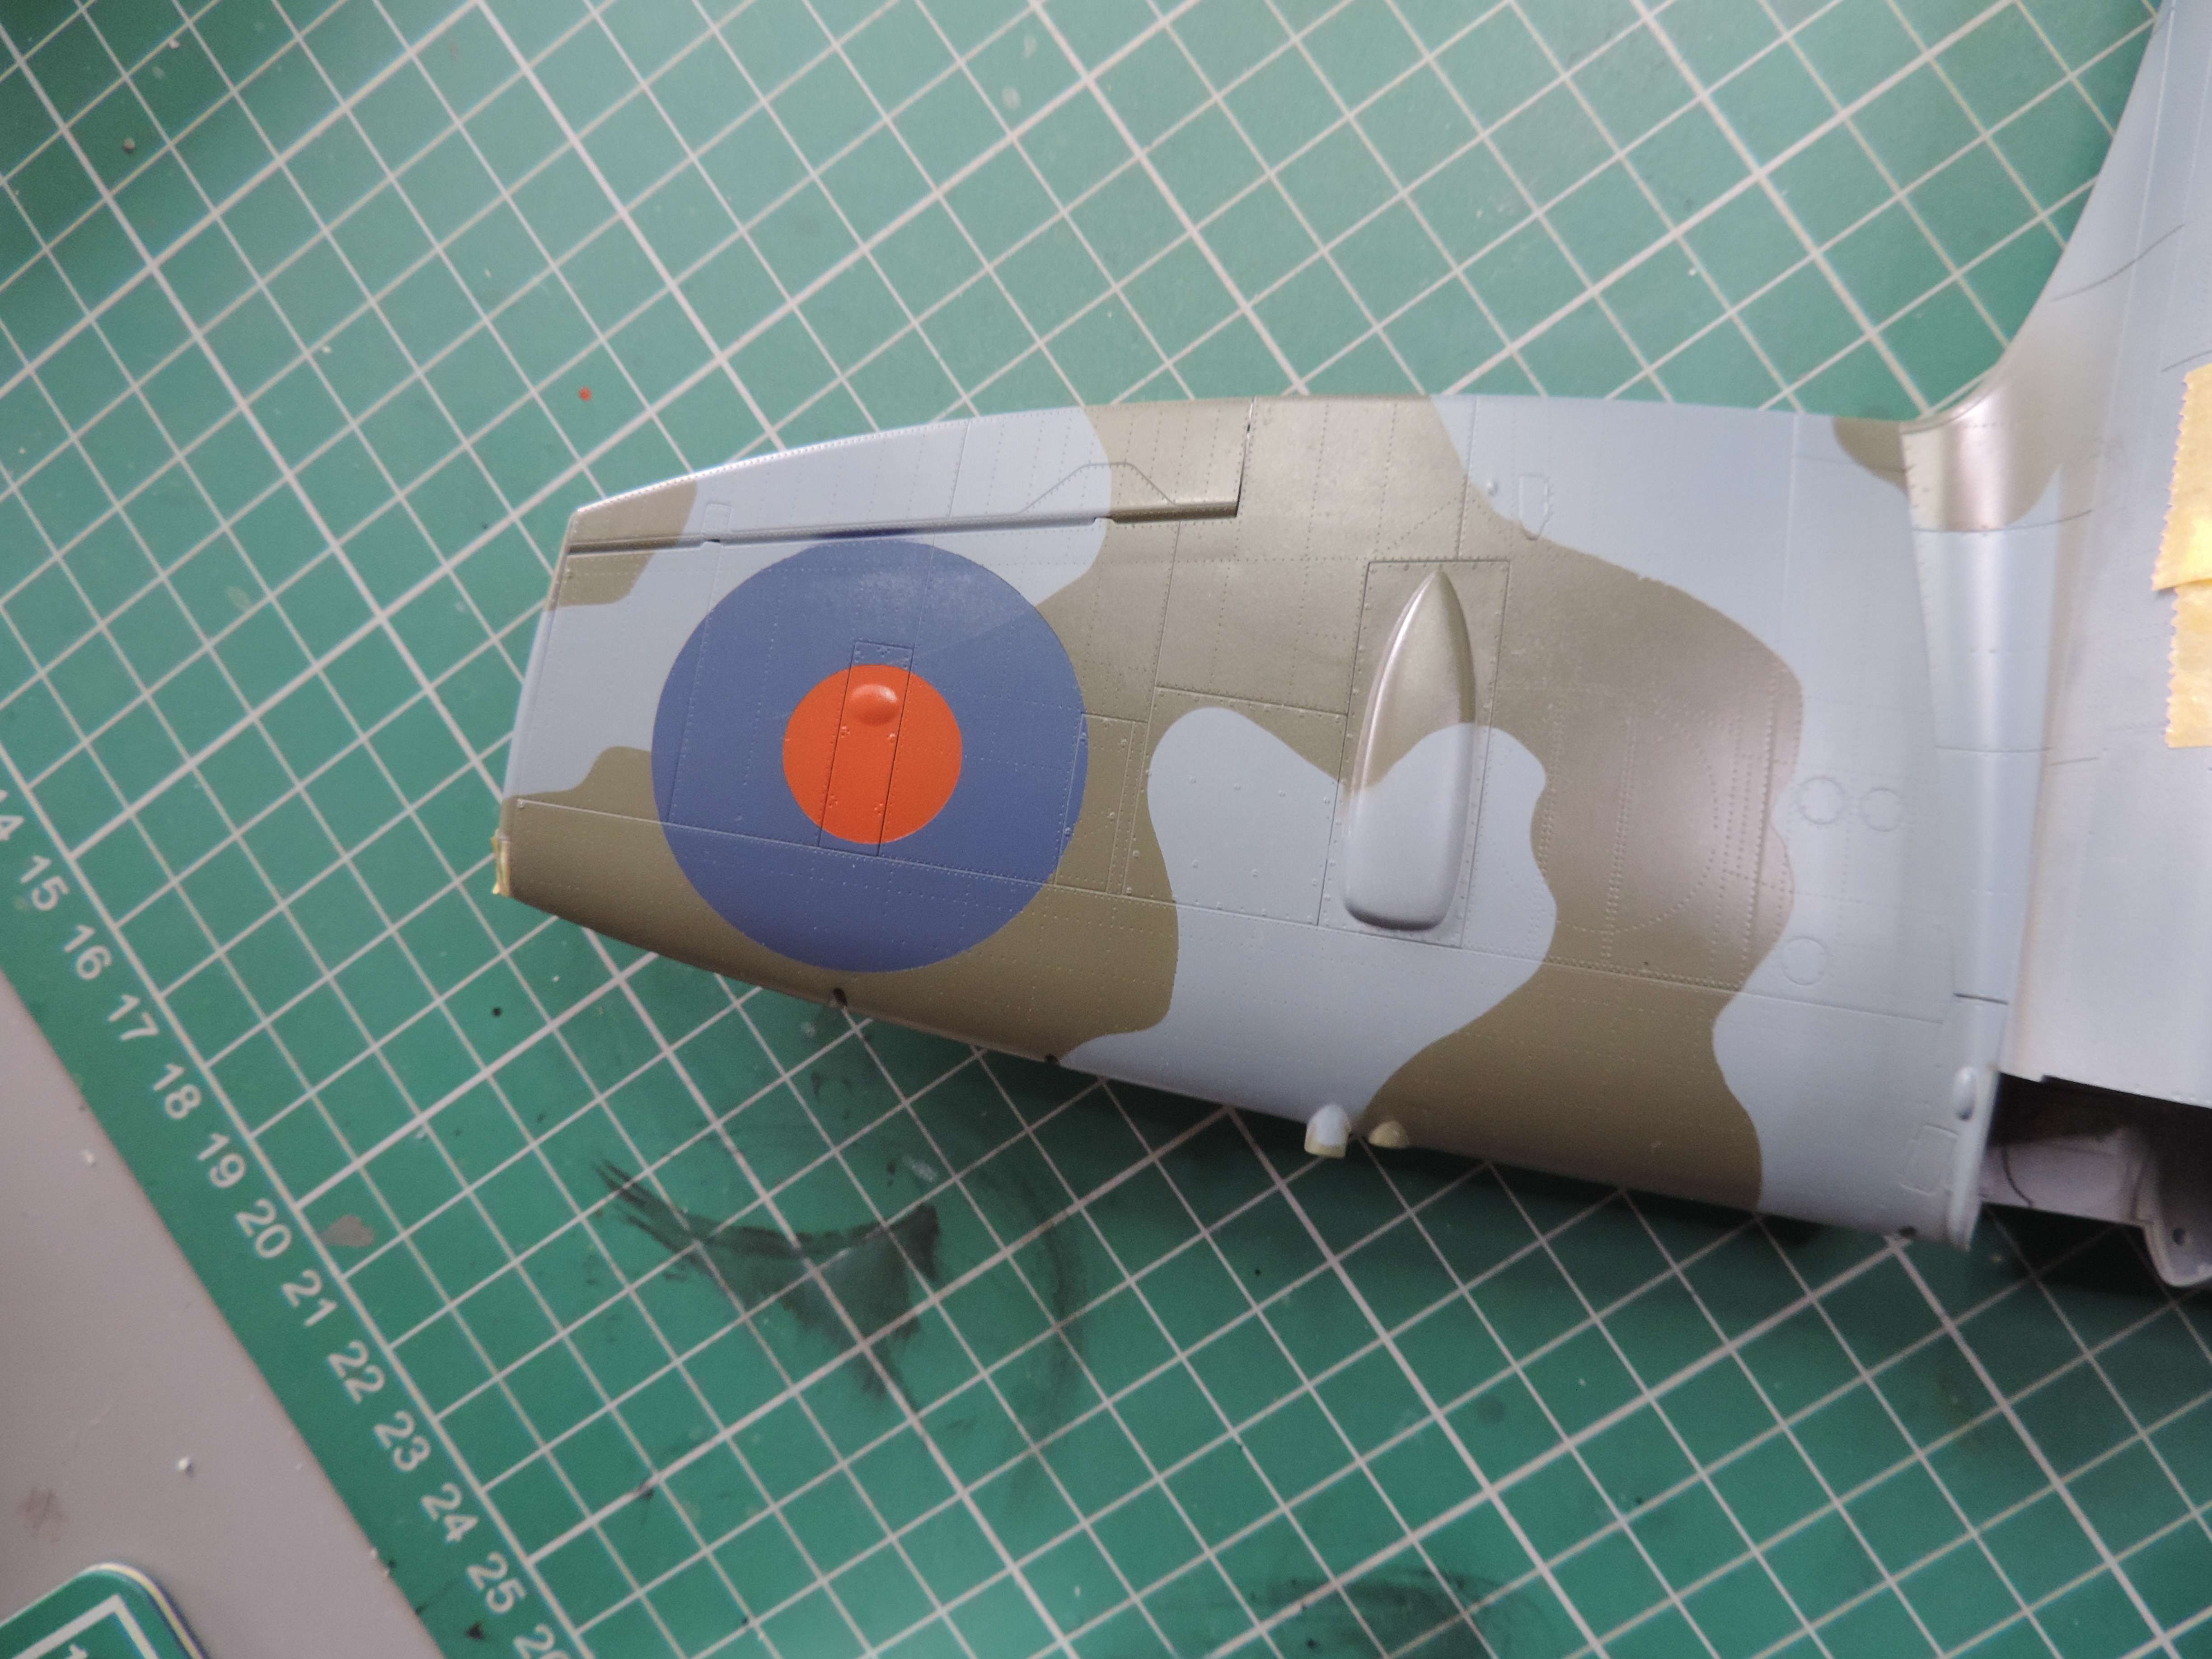
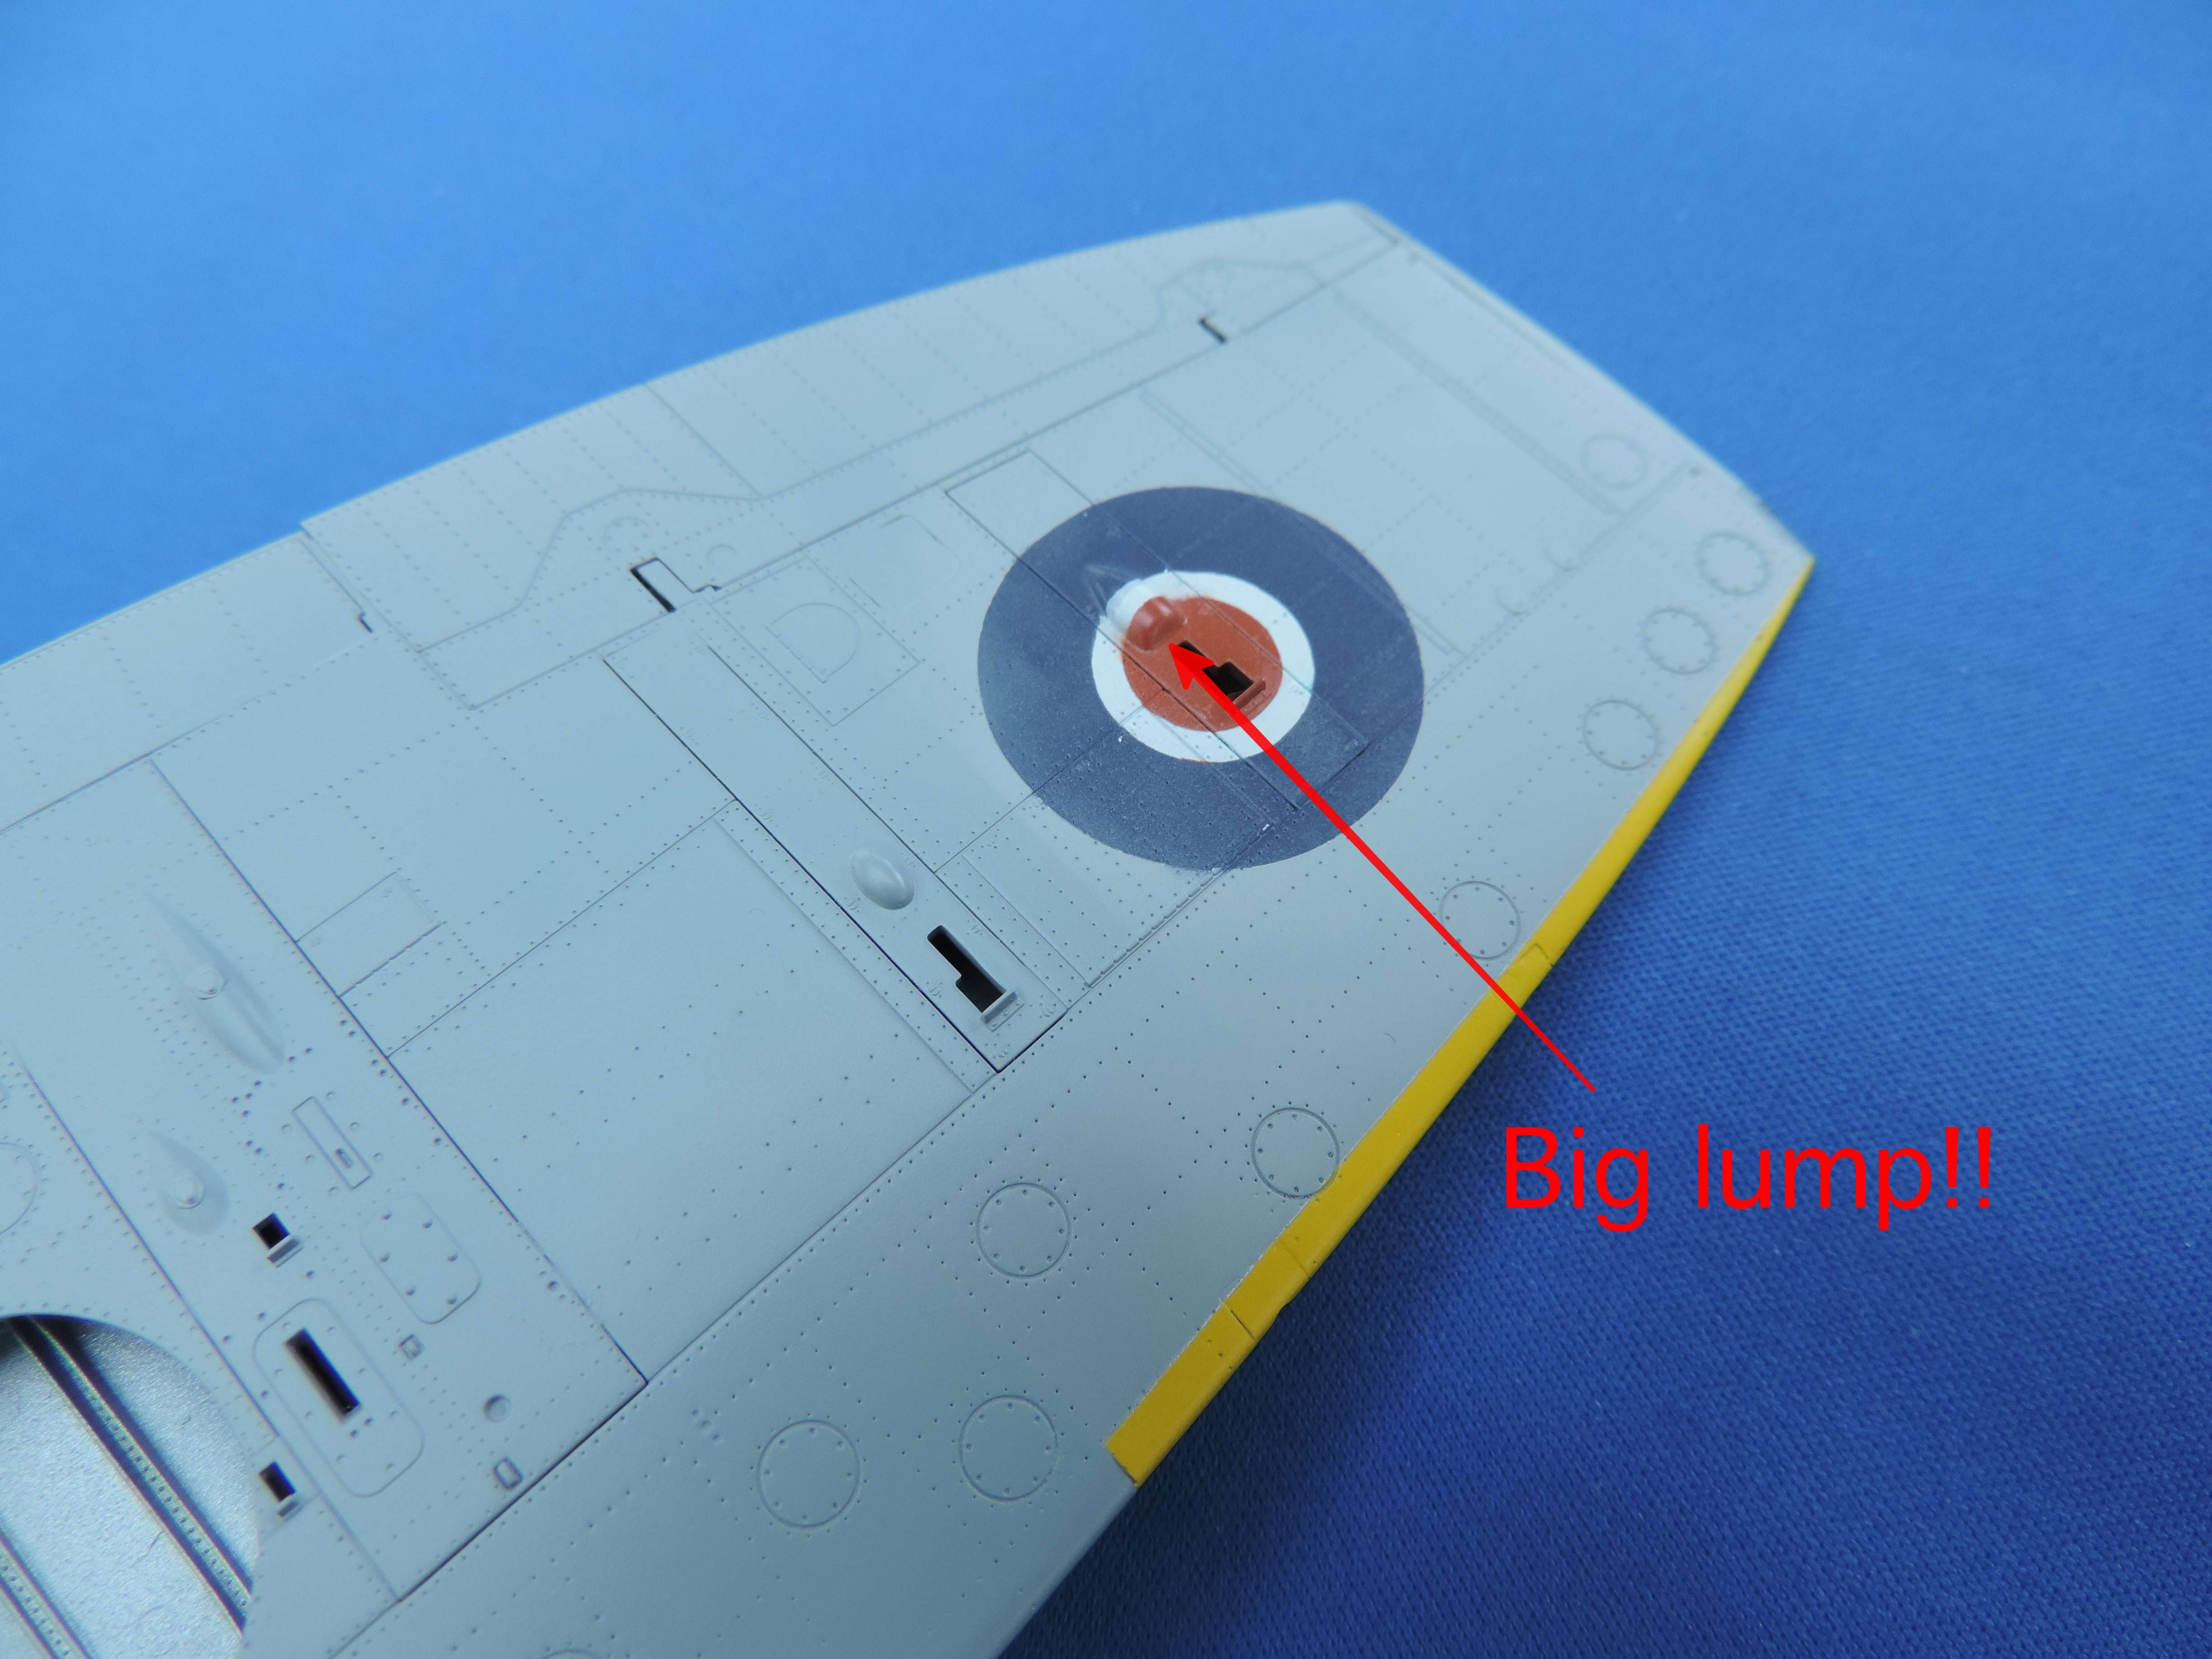
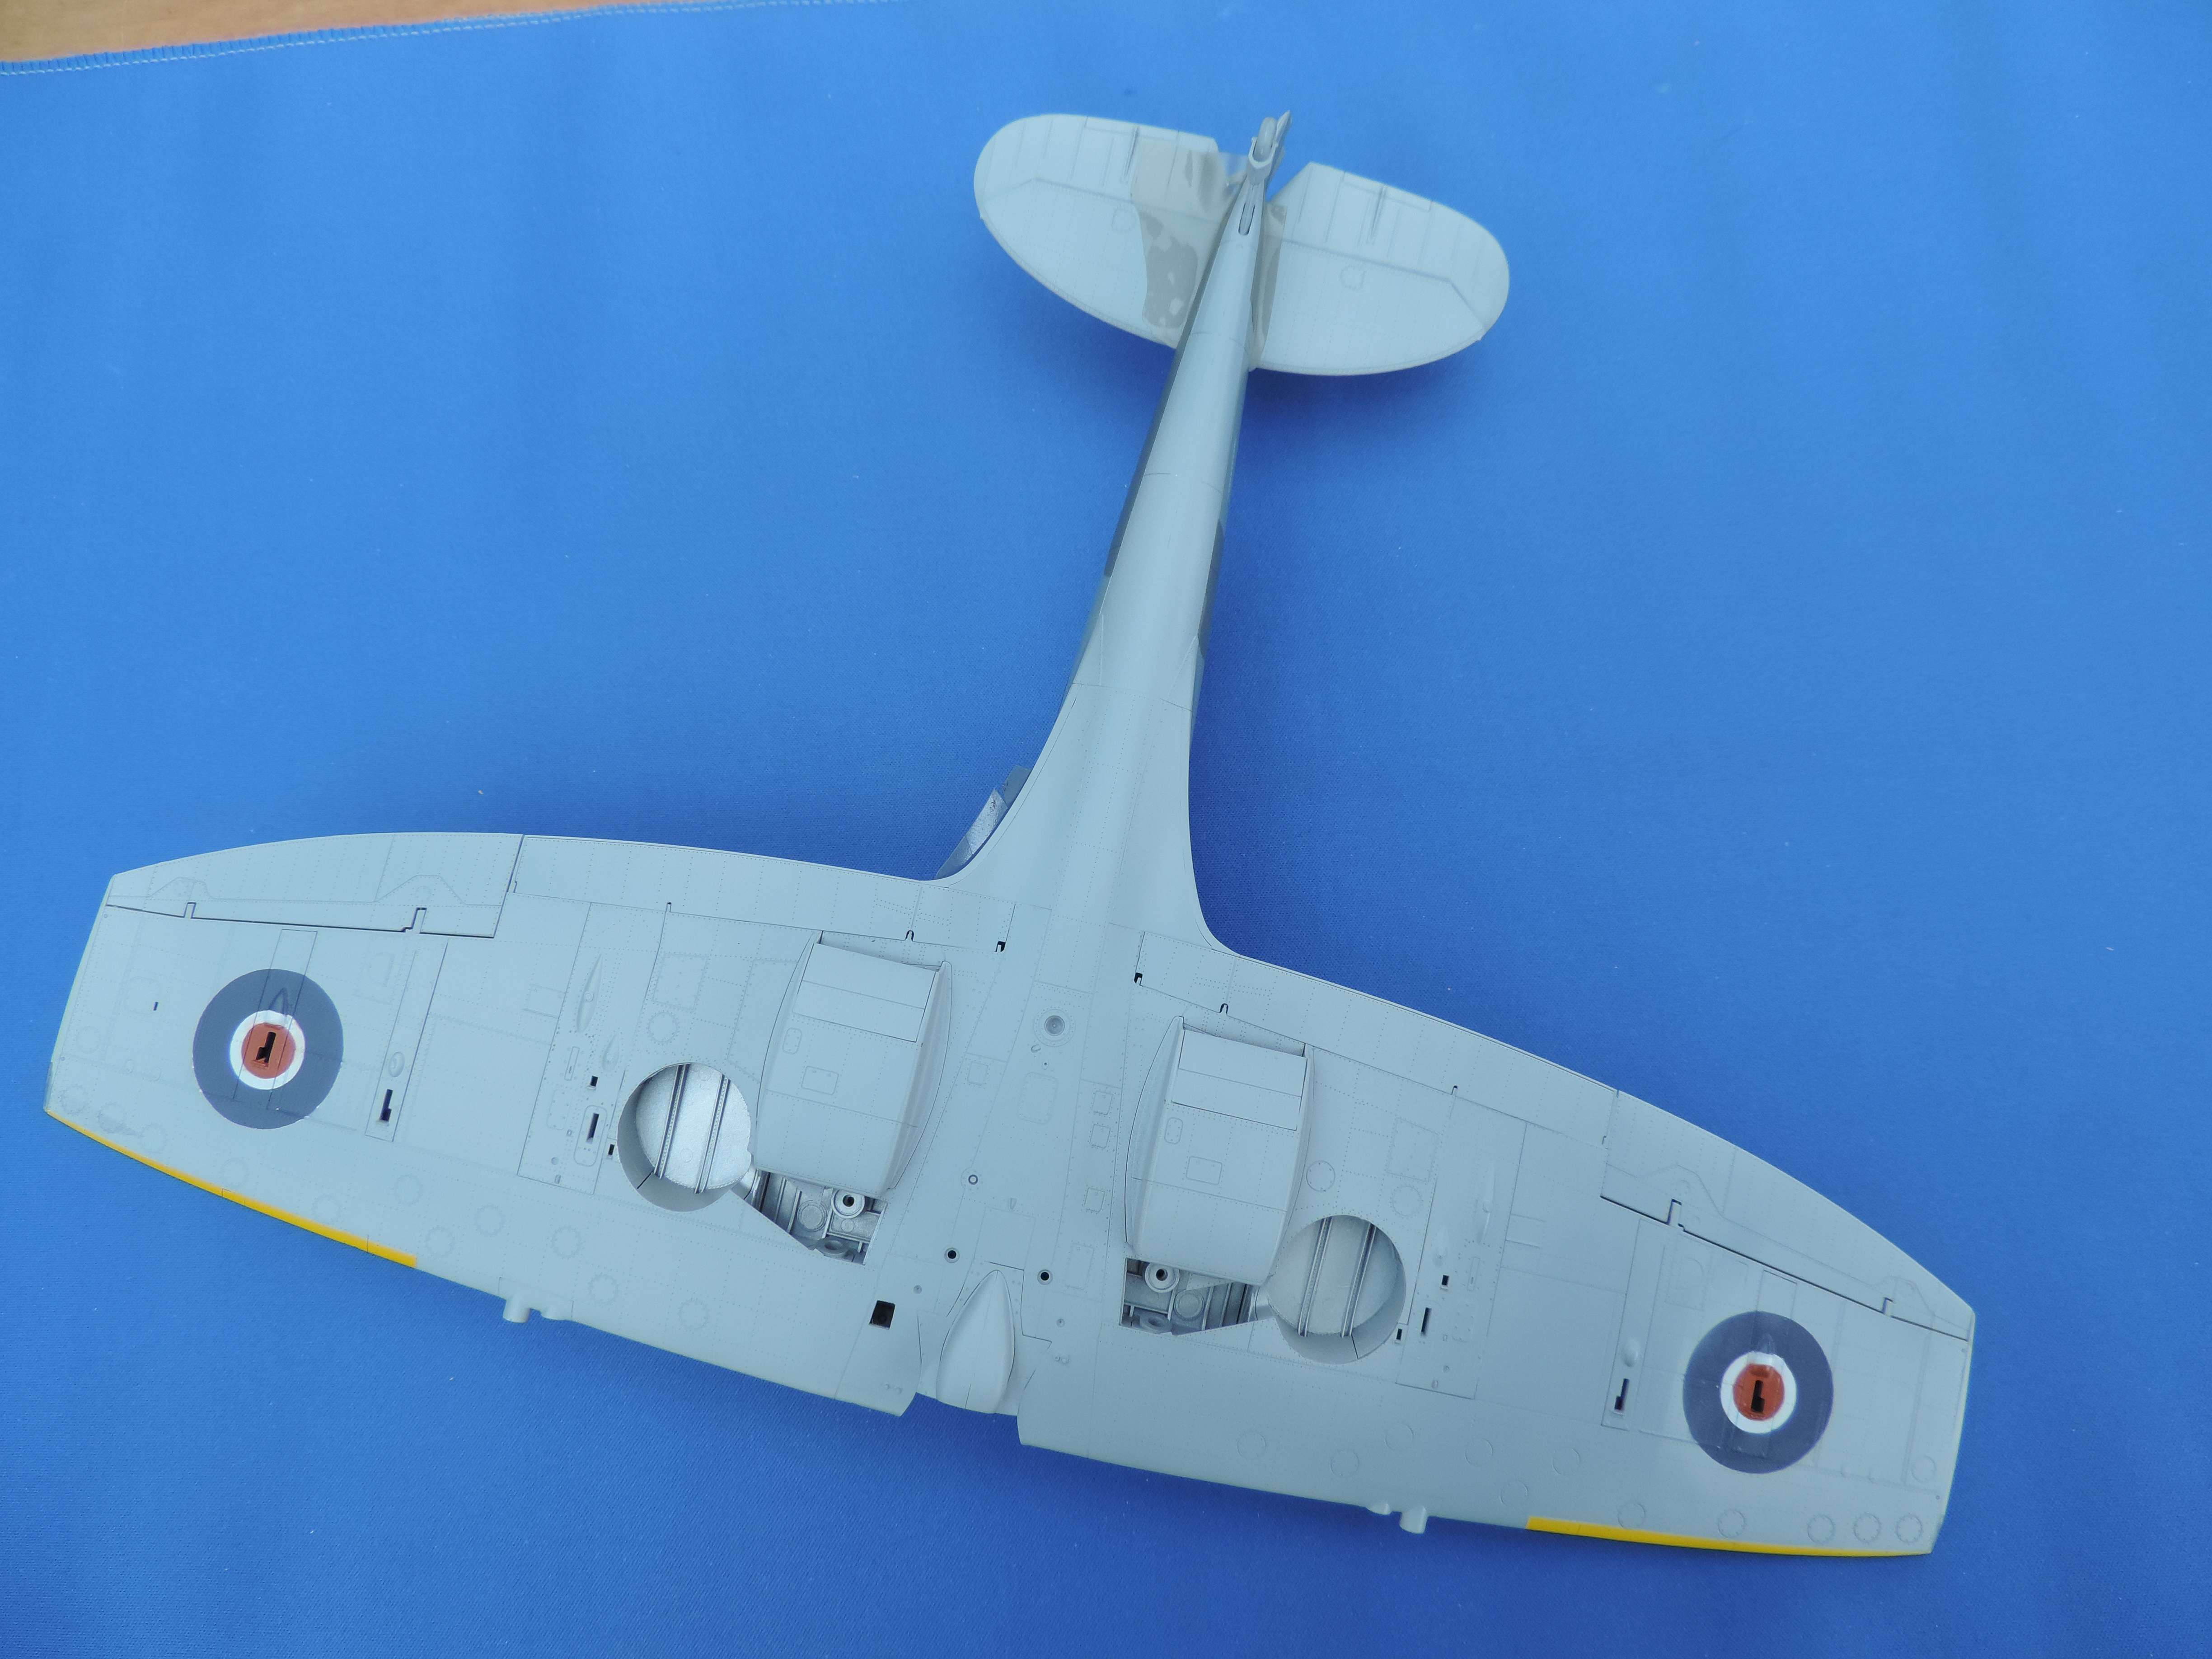
That was the easy bit done, then "3D fuselage would be a different matter. But first I decided to finish the upper and lower wings. Slight problem, unaccountable problem, with one roundel on which the blue lifted when the mask was removed, no idea why:
but the other was fine:
There was a potential problem with the under wings; the centre of the roundel coincides with a large fairing....."lump" to me, that no mask or decal for that matter is going to willingly conform to. I sliced around it carefully once the roundel mask was in place then used masking fluid to fill the gaps. Worked well enough:
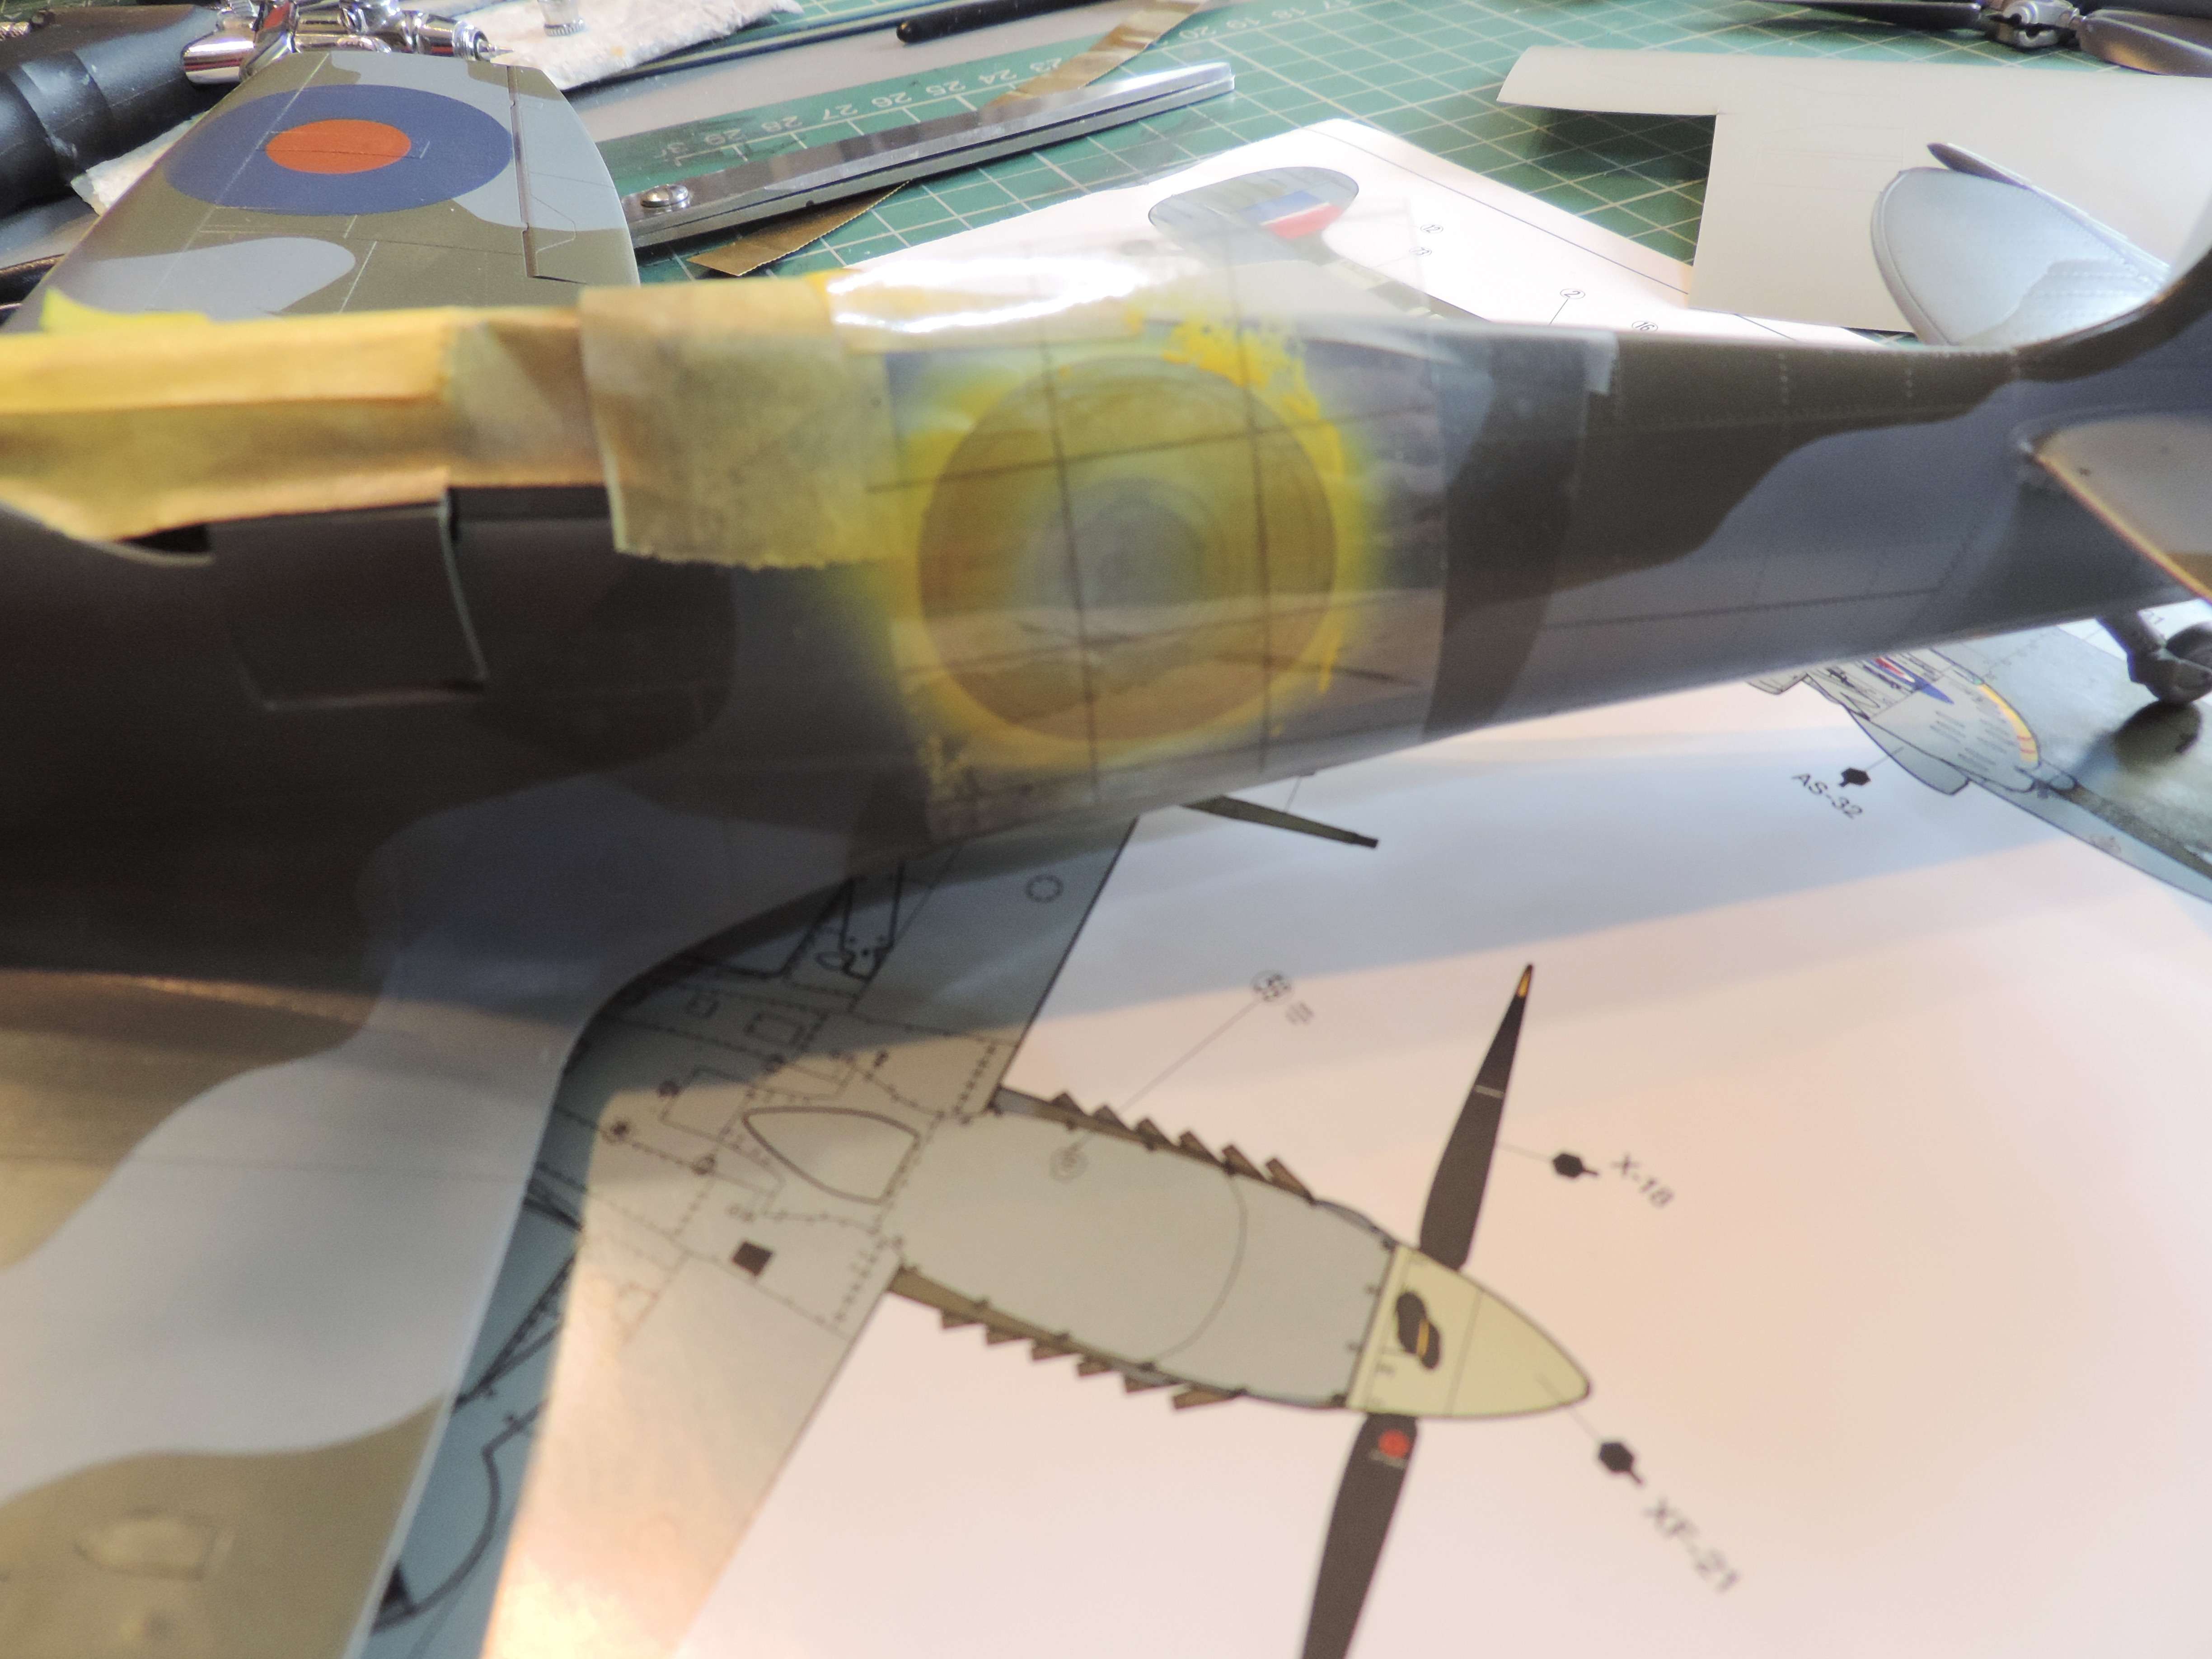
Adventures with the fuselage: I wasn't sure of the best way to go about these masks - separate port and starboard ones or a one piece "wrap-over" one. Well after a few experiments the latter wasn't that practical. So I used the same technique as the wings - scanning, importing (and flipping one image), scaling, tracing:
which ended up something like:
(but this has now been revised and uploaded to this site.) Screenshots showing mask positions:
and after applying to the model, spraying and removing:
Drawing the fuselage masks involved a certain amount of trial and error, and there is still a little touch up to do but generally speaking it's been a successful exercise.
Please feel free to download the masks but please read the caveat with the masks.
When I do the fuselage and tail markings I'll add them to this thread.
Max
-
2
-
2
-
-
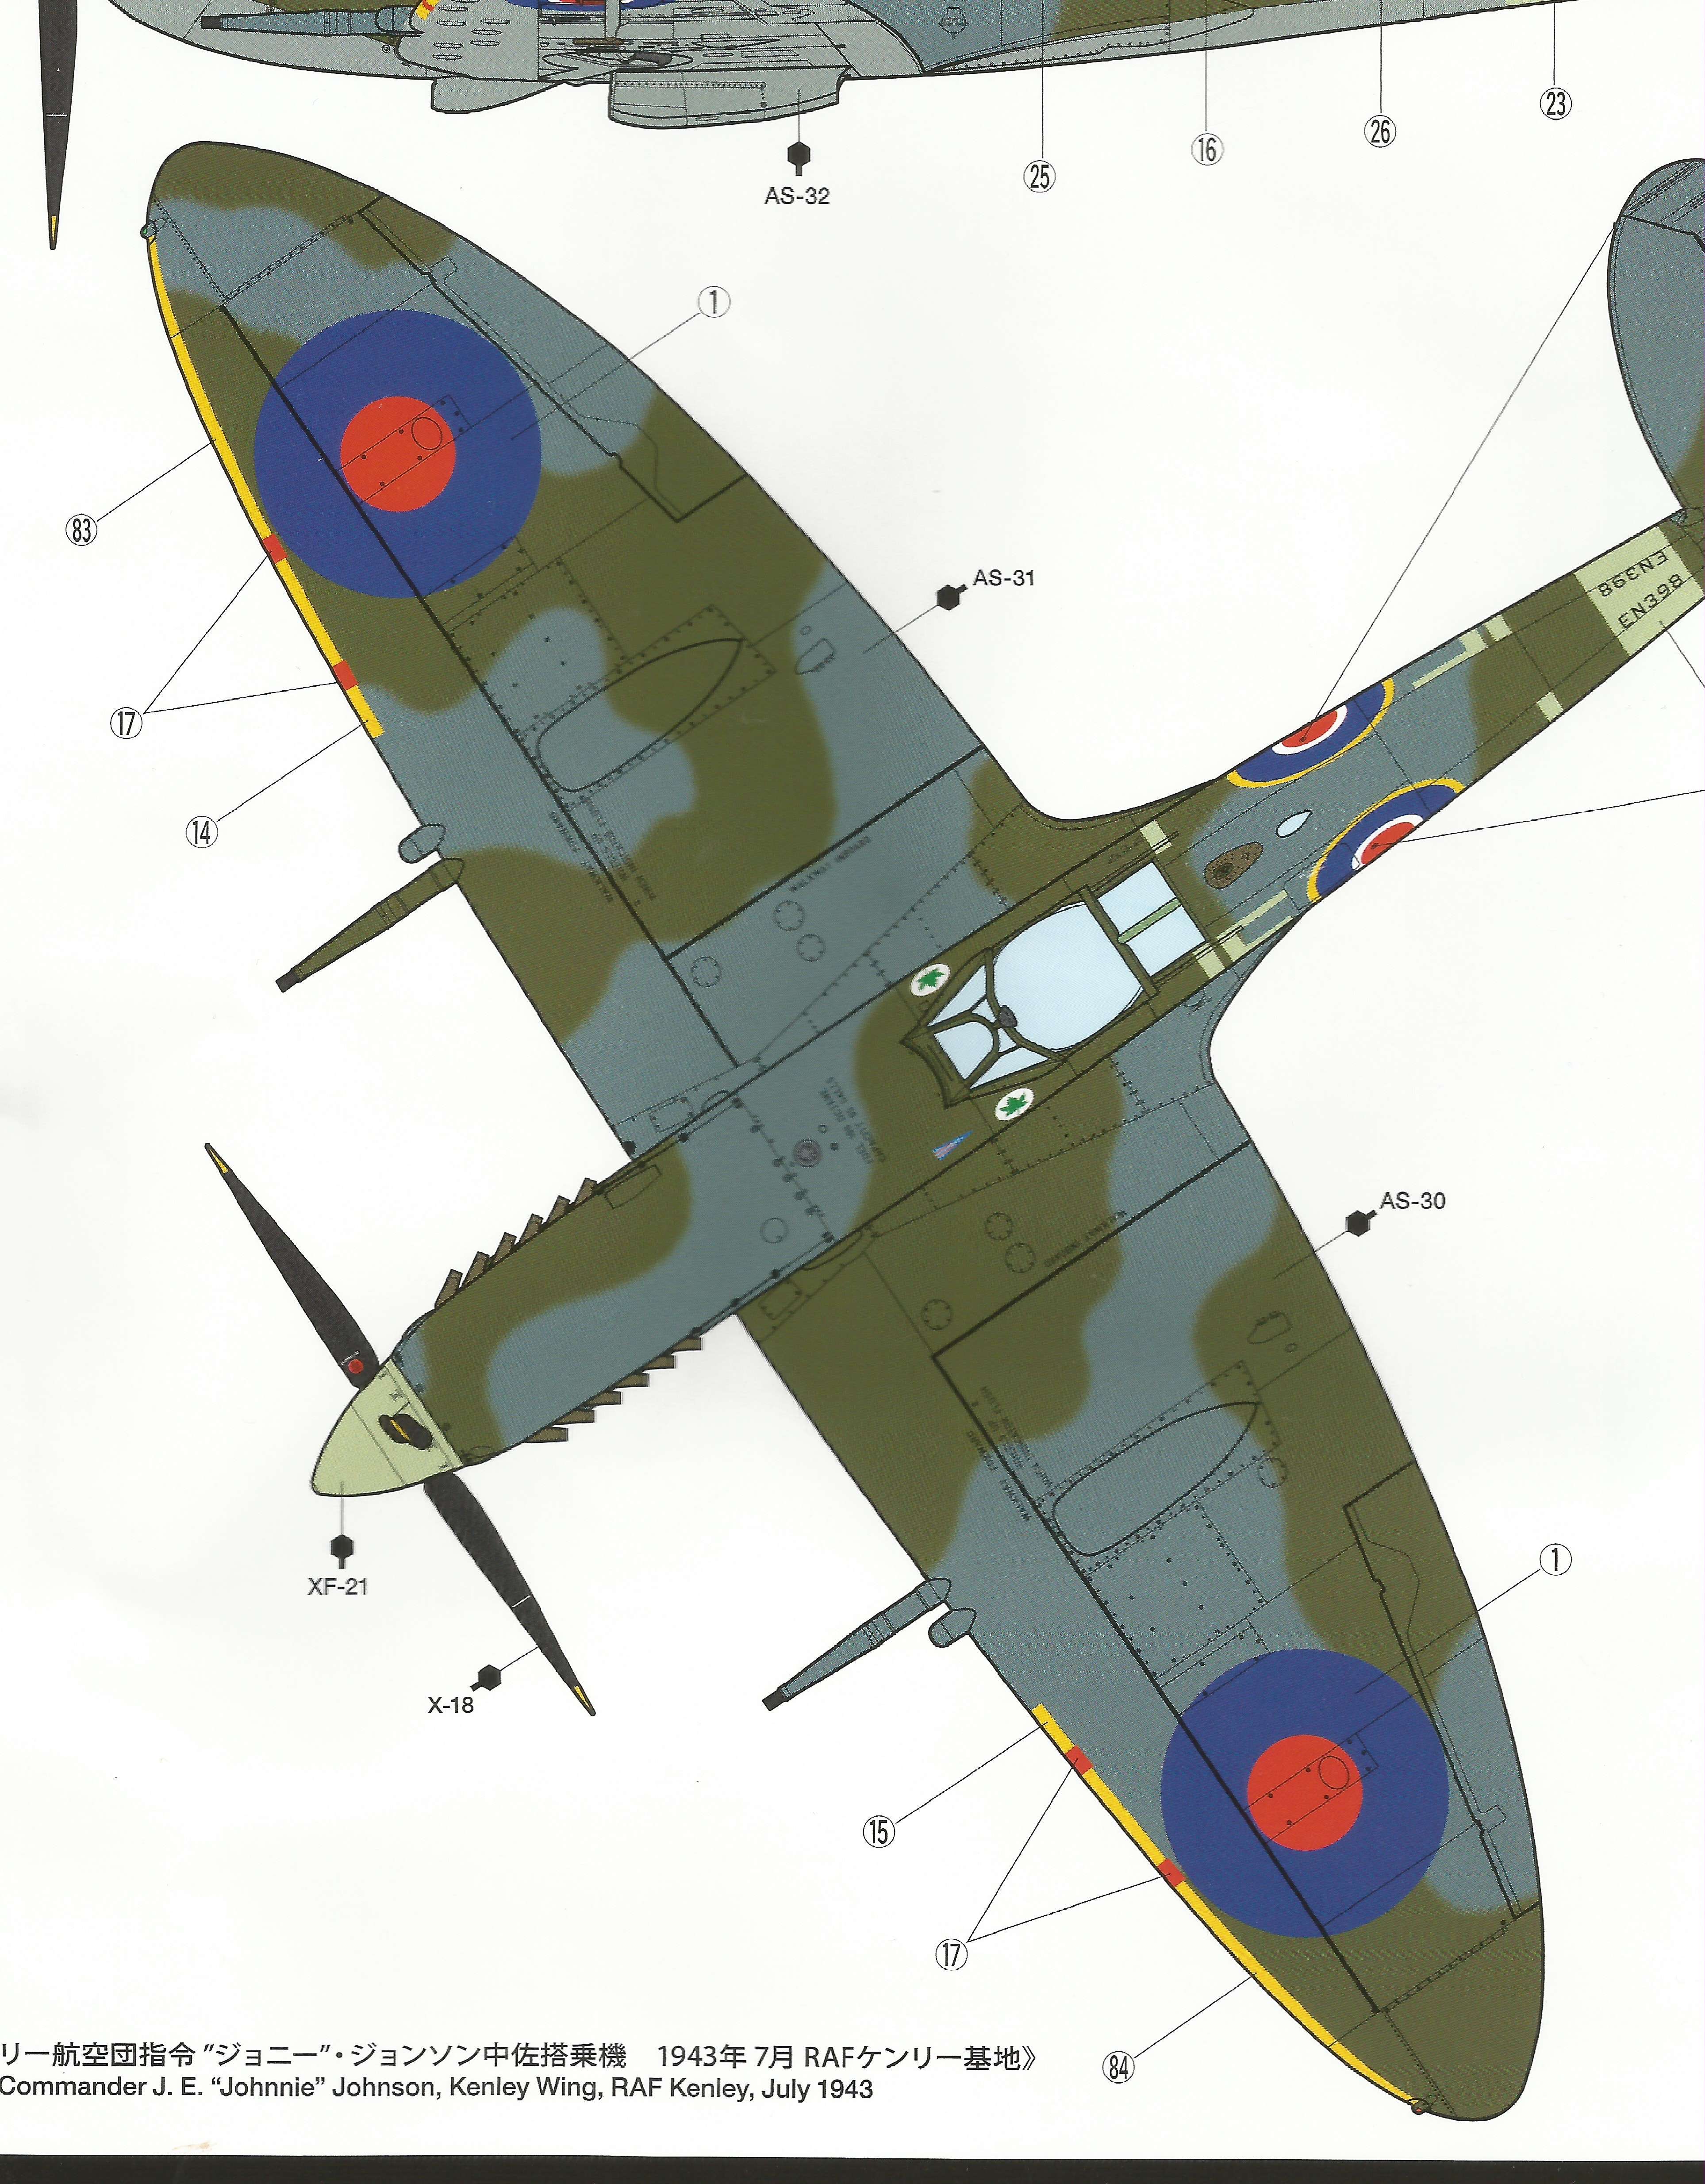
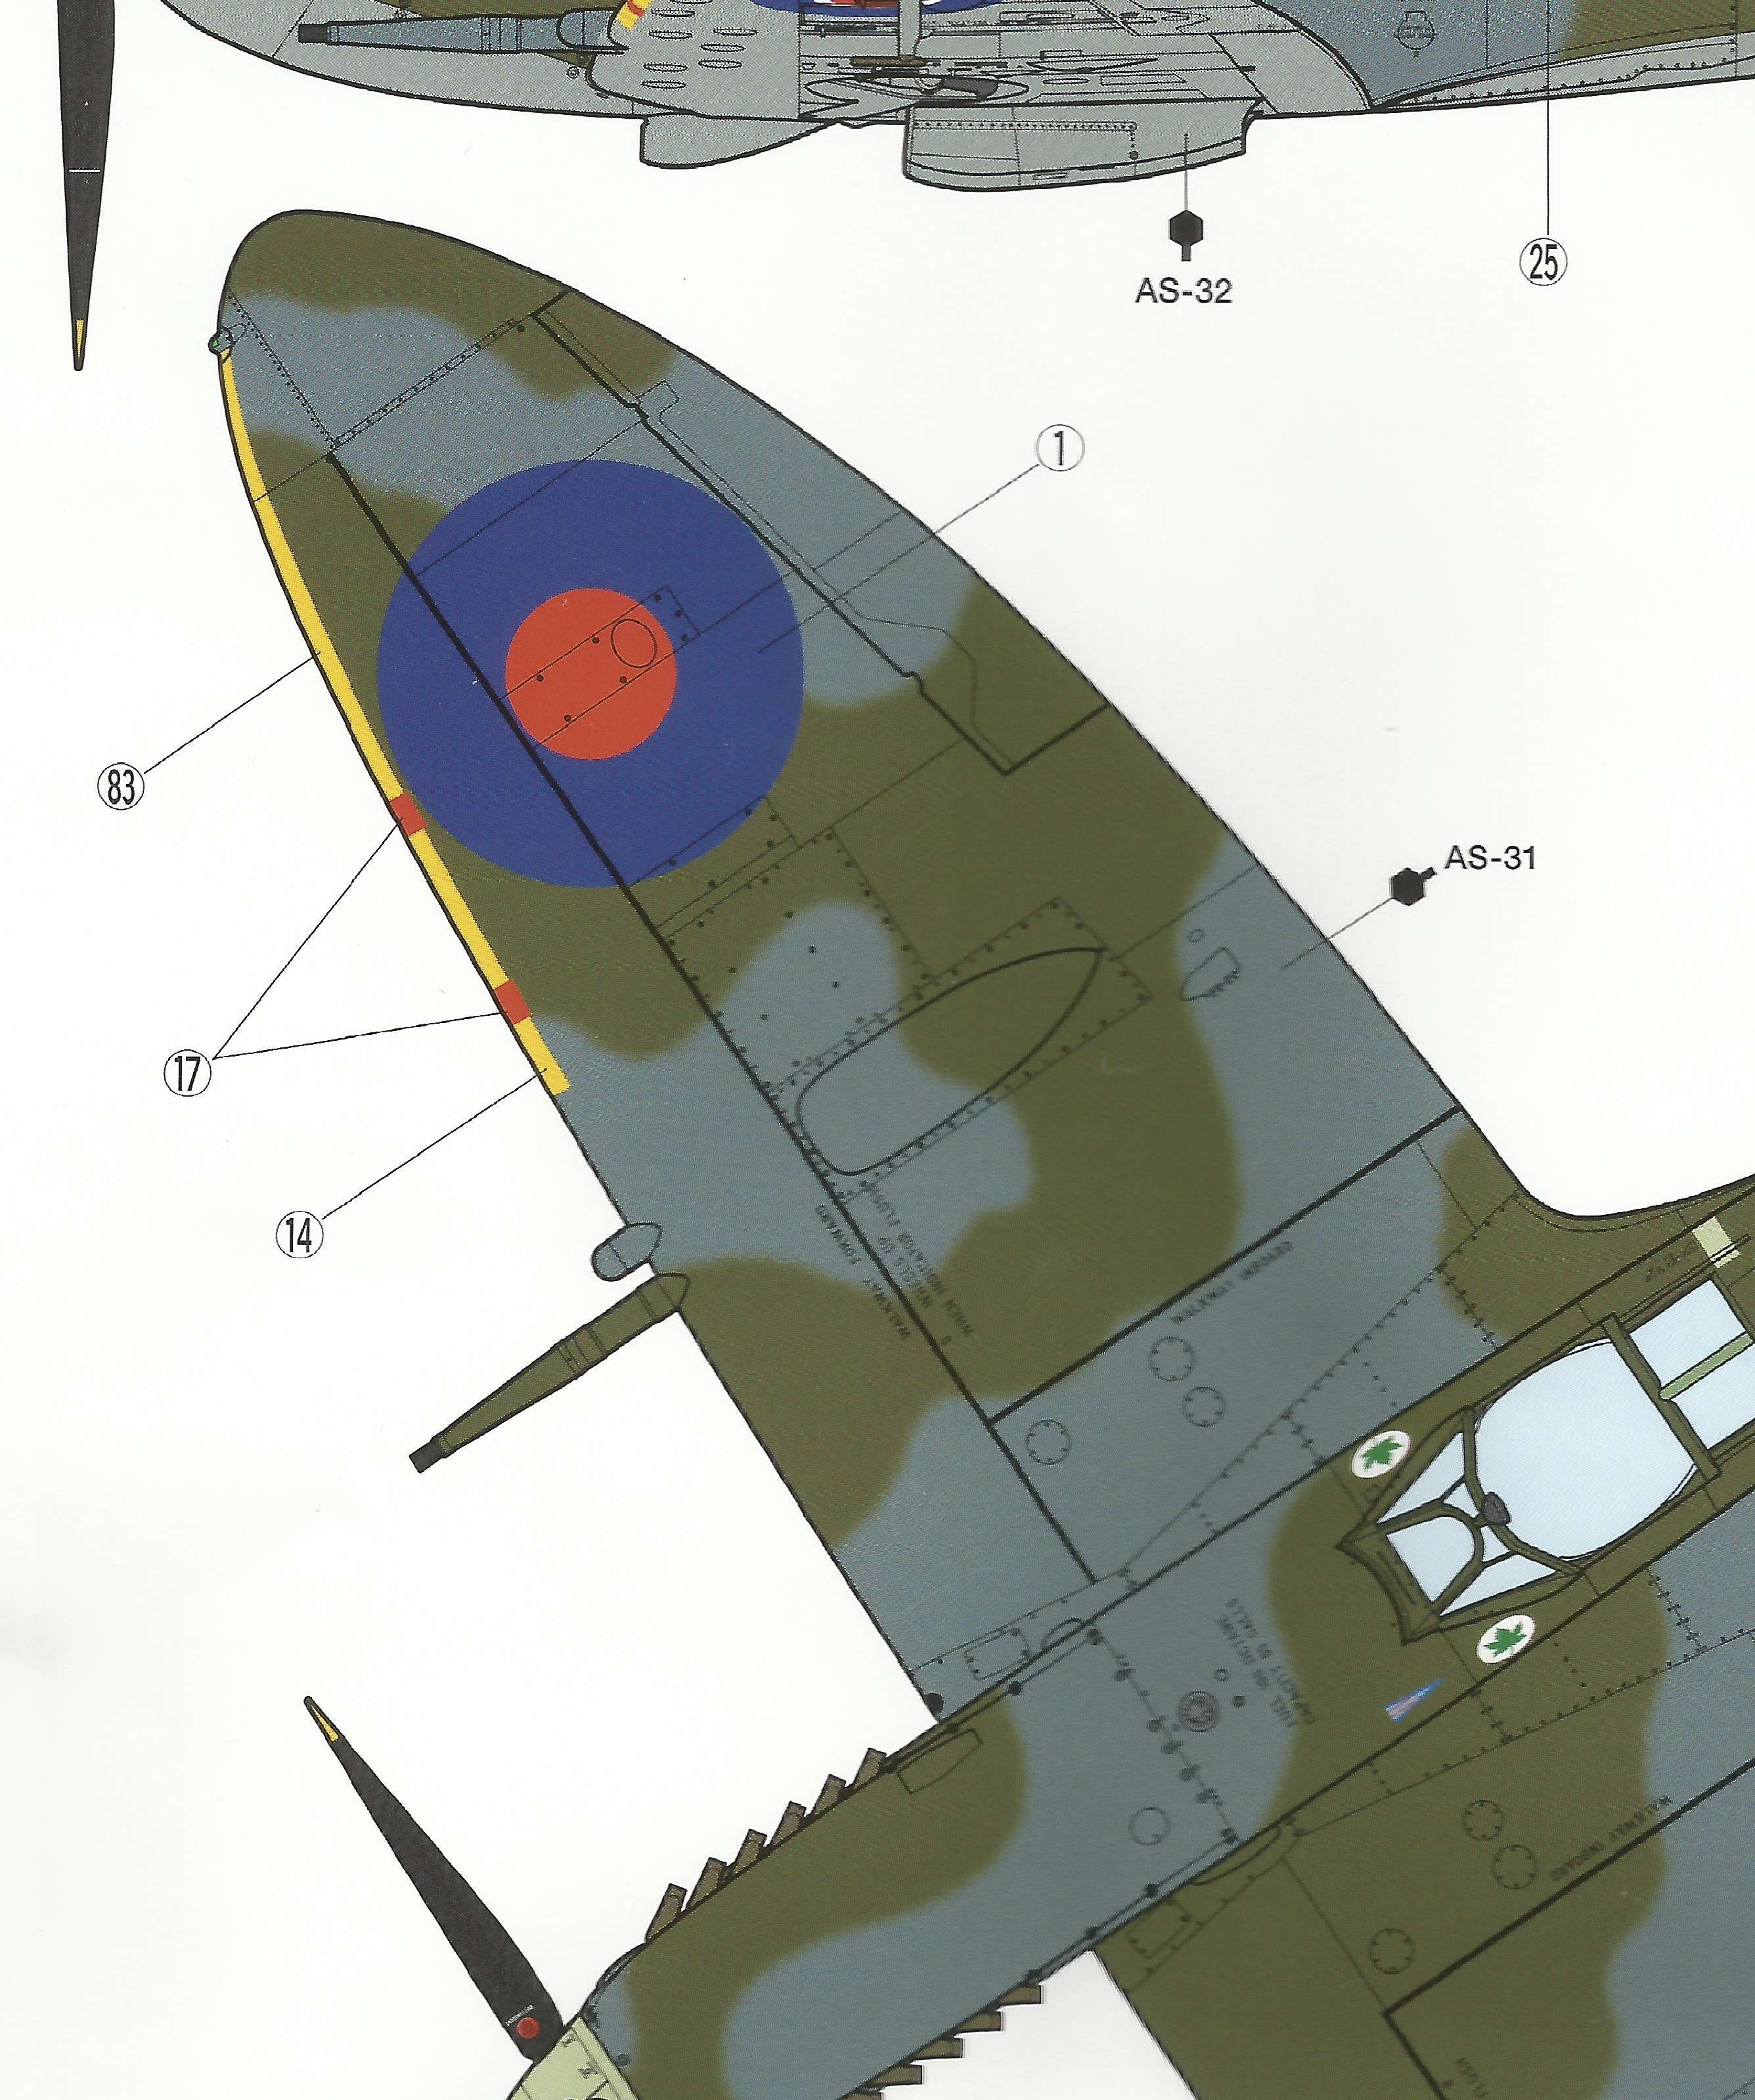
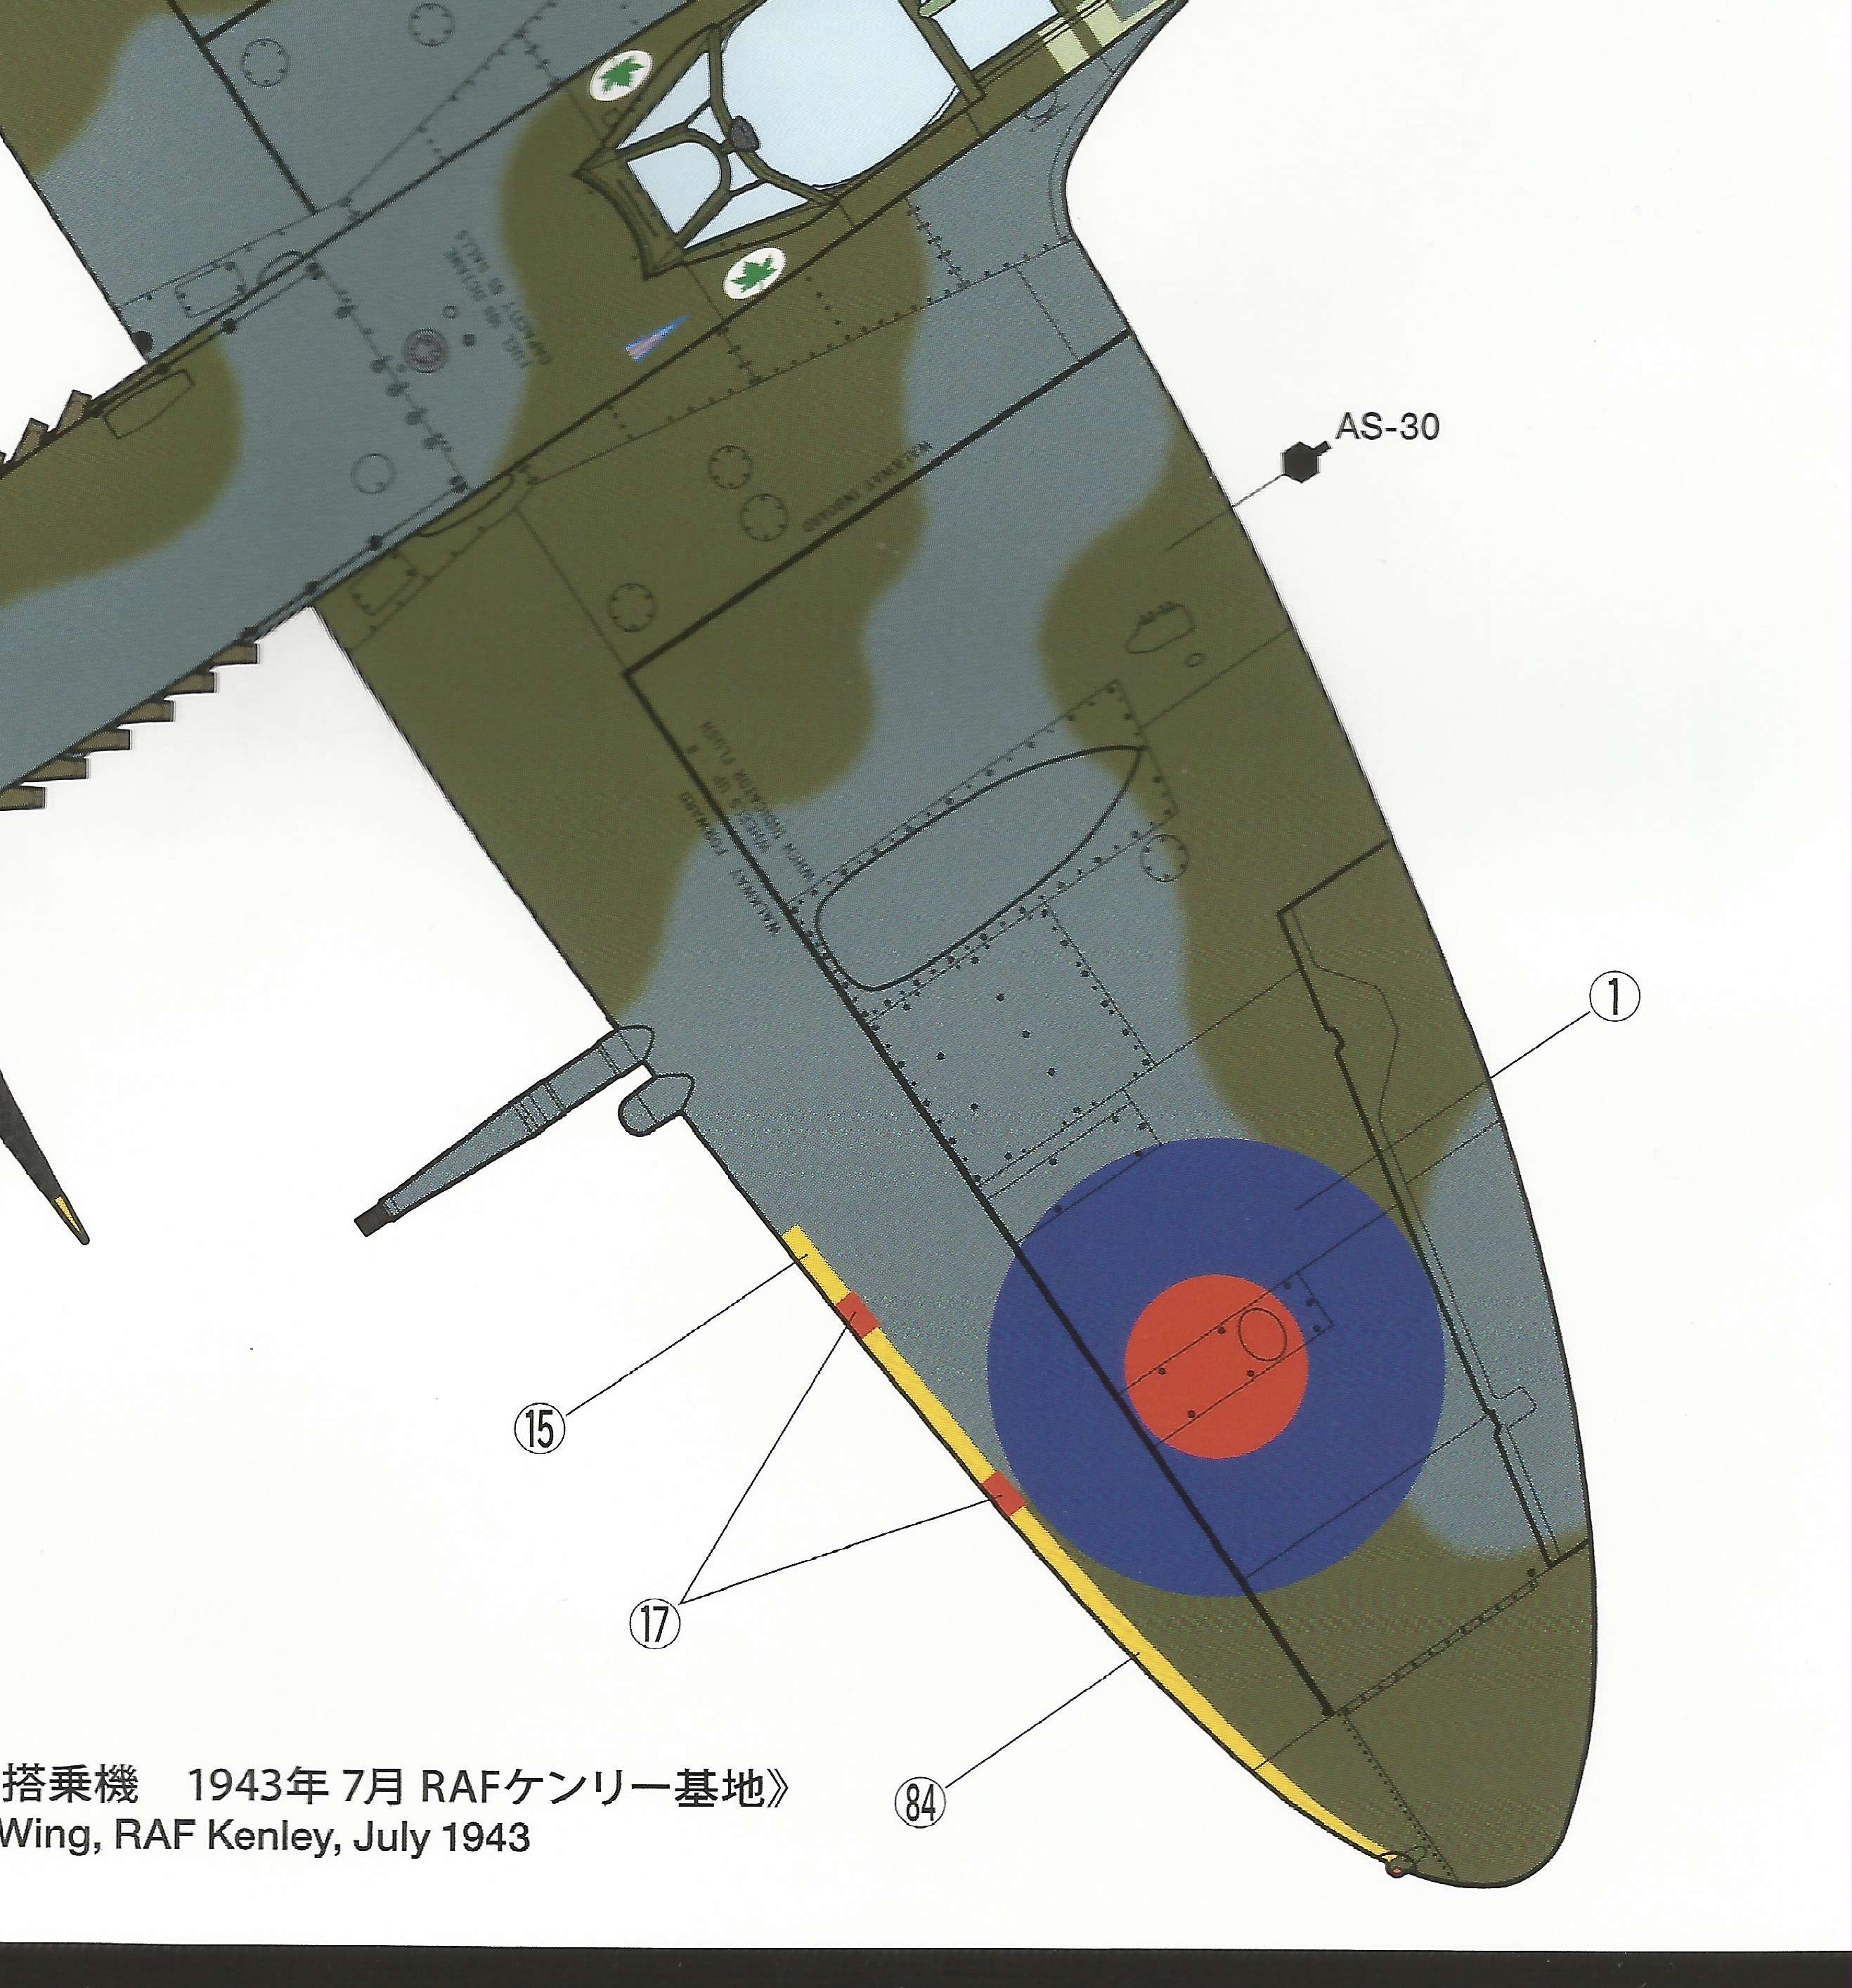
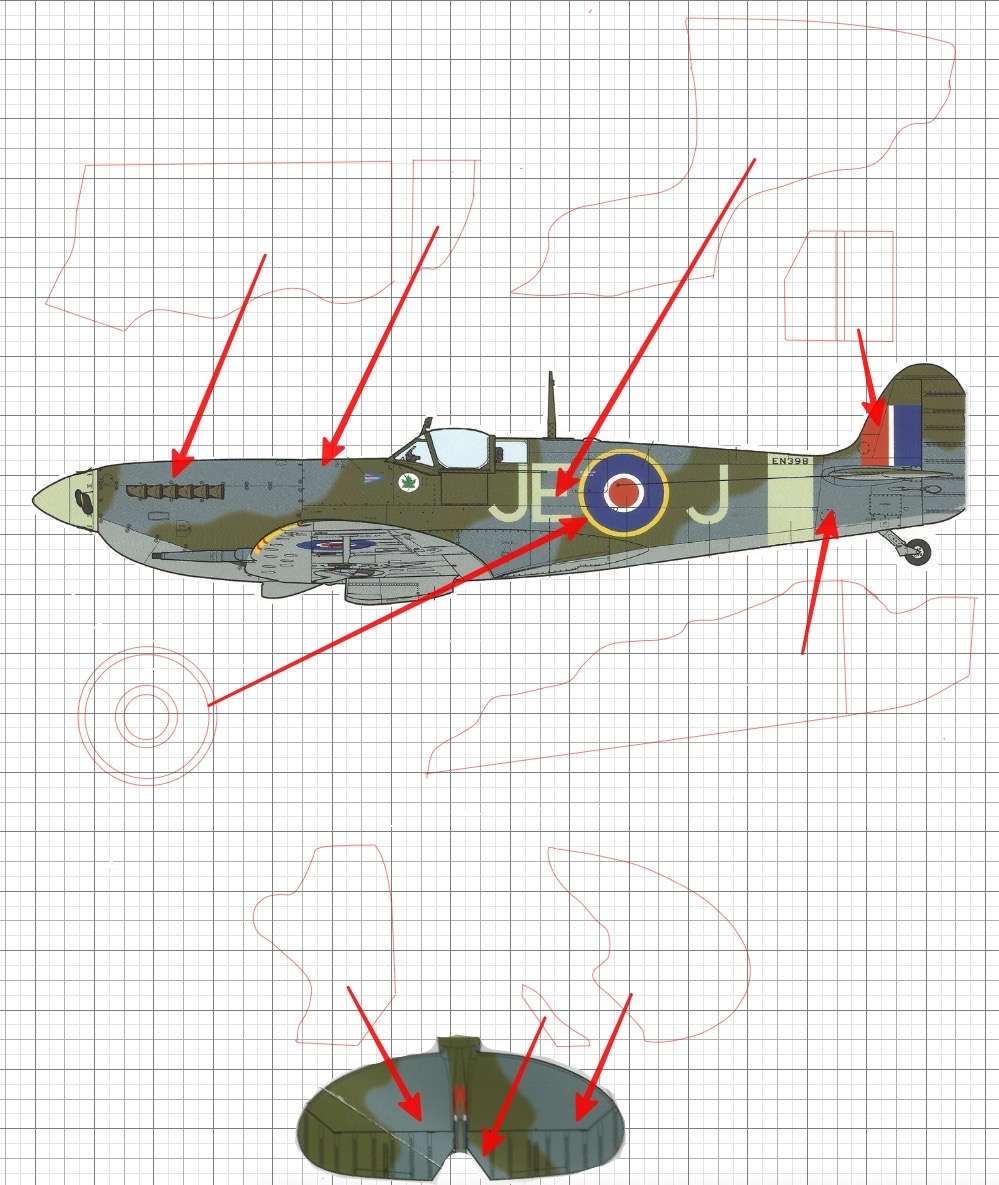
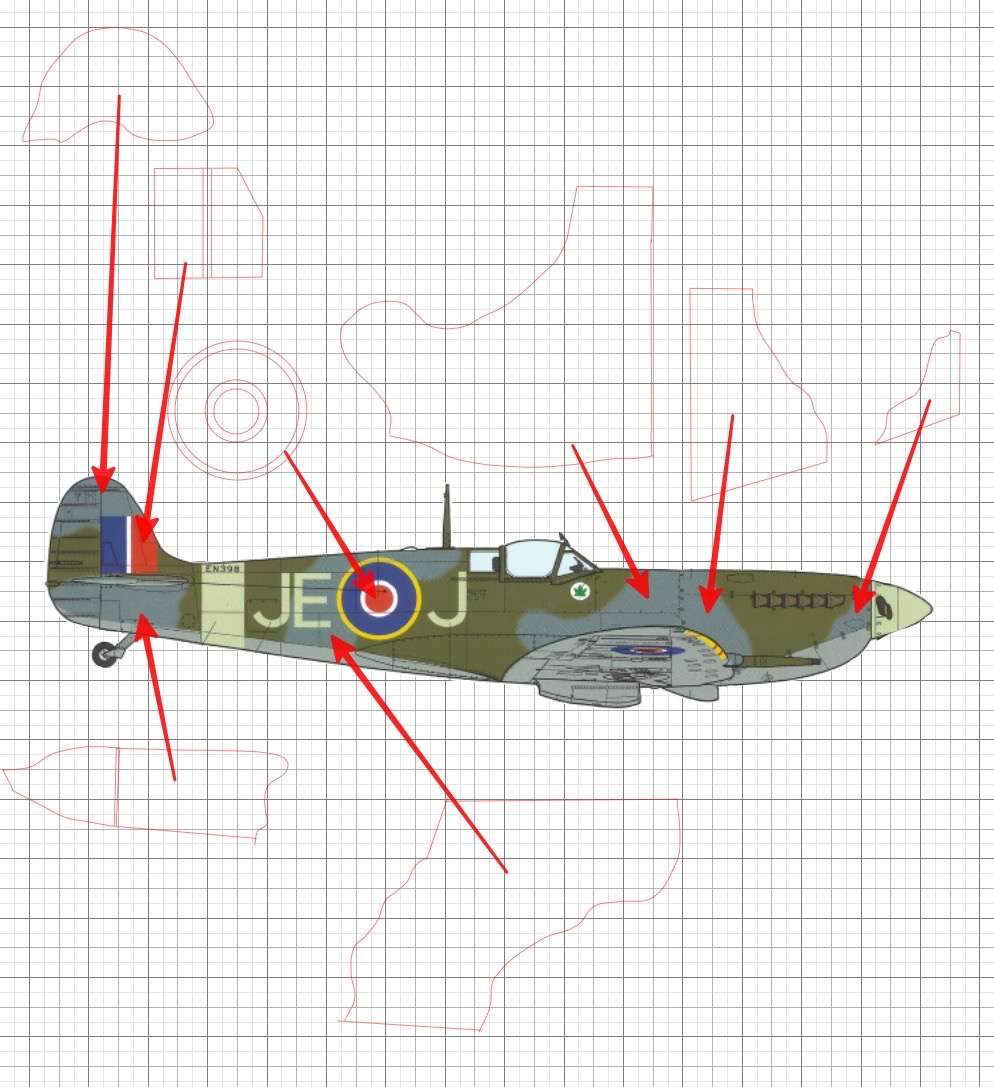
Camouflage and insignia masks for Mk IX Spitfire
These masks were drawn from the Tamiya instructions for their Mk IX Spitfire but are probably useable on many types as a generic scheme. Please note, I drew these for my own use, they are not perfect and not professionally produced so will probably need "tweaking" if you decide to use them. The screenshots show location of the camouflage sections, it presumes that a base coat of Ocean Grey has been applied so these allow for Dark Green only.
UPDATE 26/3/21 I've amended the file for the fuselage; on fitting the masks to my model I found that I had omitted to provide a mask for the port side above the tailplane, this is now included and positioned on the sheet in the bottom right hand corner. Also amended are the engine panels, the original versions were too high.
Max
-
Submitter
-
Submitted03/24/2021
-
Category
-
2
-
2
-
-
Welcome Dave! Chequers are one of the hardest things to do in my experience, easy on a flat surface agreed, but get a curve or a narrowed surface like a rear fuselage and it becomes very, very tricky both to design and apply. Good luck!
-
Good to see you here Jamme. 😄 Are you a Silhouette user already or interested in getting one and the opportunities it offers?
Max -
I understand your frustrations, been there done that! Simple answer first, I NEVER omit using the mat, it’s there for a purpose and that it to stop the cutting material sliding about, which it will do, so you don’t end up with any sort of cut at all. The settings assume you are using the mat. I only use Oramask 810 vinyl and my settings are blade 2, force 4, speed 5, pass 1. If I cut something else, like plastic, I experiment depending on the thickness and hardness of the material but experience means it’s usually quickly resolved.
If I’m using a photograph I just literally drag it across into the Silhouette screen then scale it to a suitable working size by using the handles at each corner. Then I can send it to the back, sounds like you know about that, and start tracing.....and I always do this manually. It’s sometimes difficult to see the line you draw, I always work in red but the colour of course can be changed, but again working in a zoomed in way helps resolve that.
I hope this is of some help!
Max
-
1
-
-
That’s a bit of an angry sounding introduction Snigel. I’ve posted a couple of tutorials which I thought were pretty basic and straightforward, “Working efficiently” was the first one which detailed the main buttons used in drawing masks and mentioning one or two possible pitfalls.
Let me know which areas you need more help with, without any “effing” thanks.
Max-
2
-


 roundels!


Silhouette Cutter/PC Connectivity
in Hardware & Software
Posted
Mine’s a Cameo 2 Mike, I bought it I think 8 years ago and it does everything that I need. I had a problem with it last year but found it was the power supply that was faulty, easily rectified. My advice would be to definitely go for the Cameo 4. My wife makes greetings cards and she also uses it for her crafting activities.