Leaderboard


Popular Content
Showing content with the highest reputation on 10/06/2021 in all areas
-
Here are a few recent completions using my Cameo4. Eduard's rebox of Hasegwa 1/72 B-26. All marking done on Cameo except for nose art. Eduard's 1/48th P-51D as June Nite.2 points
-
Funnily enough I haven't built that many WW2 RAF fighters in standard camouflage, and those few I have "free-handed" with the airbrush. But with the sublime Tamiya Spitfire kit I decided to explore making camouflage masks. I scanned the colour A3 sheet provided with the kit then imported the image onto the Silhouette screen, starting with the wings: I measured the distance from leading to trailing edge on the kit where the wing walk stripe goes, then scaled the image onscreen to match that distance (just draw a straight line the measured distance, rotate and move it over the wing image and drag that out to match the line size). Once that was established it was very easy selecting the line "figure of eight" draw tool to (manually) trace the outline of the camouflage lines: I had already put down a base coat of Ocean Grey so the masks for those areas were pulled off and carefully laid in place on the wings. It took no time at all to spray the Dark Green resulting in crisp lines when the masks were removed: That was the easy bit done, then "3D fuselage would be a different matter. But first I decided to finish the upper and lower wings. Slight problem, unaccountable problem, with one roundel on which the blue lifted when the mask was removed, no idea why: but the other was fine: There was a potential problem with the under wings; the centre of the roundel coincides with a large fairing....."lump" to me, that no mask or decal for that matter is going to willingly conform to. I sliced around it carefully once the roundel mask was in place then used masking fluid to fill the gaps. Worked well enough: Adventures with the fuselage: I wasn't sure of the best way to go about these masks - separate port and starboard ones or a one piece "wrap-over" one. Well after a few experiments the latter wasn't that practical. So I used the same technique as the wings - scanning, importing (and flipping one image), scaling, tracing: which ended up something like: (but this has now been revised and uploaded to this site.) Screenshots showing mask positions: and after applying to the model, spraying and removing: Drawing the fuselage masks involved a certain amount of trial and error, and there is still a little touch up to do but generally speaking it's been a successful exercise. Please feel free to download the masks but please read the caveat with the masks. When I do the fuselage and tail markings I'll add them to this thread. Max1 point
-
Hello, Here the Tarangus 1/72 SAAB JA37 Viggen, using my paint-masks. I used a Silhouette Portrait for the canopy, wheels and landing gear wheels. The splinter cammo was made using Maestro Models masking set. Painted using MRP paints.1 point
-
You can do 1/48 serial numbers, my Anson proves the point! Not easy by any means and getting to the limits of my Silhouette Cameo 2 (or is it 3, can never remember!): Max1 point
-
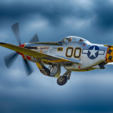
My Portrait 3 can do 4" lettering in 1/32, so 0.13", which is also a 6" serial in 1:48. Have a look at a test spray towards the end of this post, in particularly the "Royal Navy" legend and see what you think. https://forum.largescaleplanes.com/index.php?/topic/90601-p-51d-5na/&do=findComment&comment=13000341 point
-
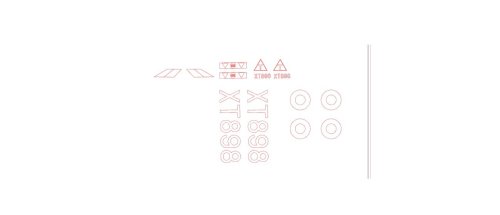
The aircraft serial number was done with a mask from my cameo 4. They're a little smaller than 3/16". The aircraft numbers (6Q-R) were also done with a mask. It's one of my first attempts so it's a little heavy on the paint. I should have painted white, then yellow, and then the green but I had originally intended on using all decals. The A-20 was started at least 10 years ago and became an experiment. I imagine that some experimentation with speed and force settings on the Cameo might result in a little better cuts.1 point
-
Version 1.0.0
14 downloads
Hello to all this is for revell phantom fgr the big decals that i am working now1 point -
I originally built this model some time in the early '90s, after just getting back into the hobby from a long layoff. In 2007, I decided to rebuild it rather than toss it out, and can actually present before and after photos! Here it is as originally built and painted, prior to being disassembled for the rebuild (apologies for the crappy photo): And after several months' work, which featured lots of scratchbuilding and a complete rescribe, here's the renovated result: Needless to say, all the markings, save for the tail number and a few stencils, were painted on using hand-cut masks (this was long before consumer-level craft cutters had become commonplace). Still one of my most enjoyable builds! Kev1 point
-
Hannover CL.II pattern 1/32 View File Hello, this pattern it's for the Hannover CL.II WingNut Wings 1/32. Michel Submitter Gruson Michel Submitted 08/14/2021 Category Camouflage Patterns1 point
-
Final stages, whole roundels put back in place then red centre removed, replaced and blue outer done: The transfer piece here is sold for Cricut machines - low tack, completely clear (which is a distinct advantage) and with the grid on it which helps: and before very long at all:1 point
-
This is my second attempt at using the Silhouette Portrait 3 for paint masks. A little more involved this time and I have to say it seems like a pretty good result for the markings. ALL of which were sprayed on, so no pesky decalling to fight with. I've uploaded the Silhouette image into the downloads section if anyone wants to try them out in the future. They are a straight replacement for the Tamiya decals, with a few tweaks to get a more accurate set of markings. (eg. Size of the upper wing crosses and style of the tail numbers)1 point
-
Looks pretty impressive to me Steve! You’re right to start off gently! The more work I do on the Silhouette the more I realise it’s all about method, especially finding shortcuts that not only save time but ensure accuracy. An example from yesterday: I was drawing an “S”, it was a squarish one (WW2 RAF style) so there was a horizontal line of symmetry on it. I drew the top half, grouped the lines, copied it, went to “object” on the top bar, flipped it vertically then horizontally then joined the two halves together and grouped them as one. Easy.....and so much easier than drawing the whole thing! Max1 point