Leaderboard
Popular Content
Showing content with the highest reputation on 07/26/2020 in all areas
-
So I've had a Cameo 1 for a couple of years but only used it to a relatively small degree. I have the full boat of software up to and including the business edition (mainly so I could import AI images. Thanks to Kevin we can share our knowledge and experiences with these contraptions.2 points
-
Thank you Kev! :) Yeah, I guess there are some of us that are very interested, but still are in the want to get stage. Still need to figure where to put a plotter when I get one. Think I might need to rebuild my hobby room somewhat first. A 3D printer is also on y wish list. :) So right now I'm here to learn and perhaps pick up some masks. Håkan2 points
-
KH North American T-6 1/32 scale finished as Harvard III. All markings, canopy masks and walkways via Silhouette Cameo 2 + Designer edition software. The (inner) middle canopy section was also cut with the cameo from ten thou plastic card. Max1 point
-
Bf109A(B) '6-10' Legion Condor Günther Lützow View File Intended to be used with an Eduard Bf109E-1 plus the Alleycat conversion, although I guess other paths to this would do. Günther Lützows '6-10' was delivered to Spain as an A type, but was later upgraded to a B type. Also it did go through a lot of marking changes, but I've done it as it was on April 6th 1937 when Lützow used this machine to score the first victory for the Bf109 Submitter Thomas Lund Submitted 07/26/2020 Category Specific Aircraft1 point
-
Howdy everyone, another LSPer here! I'm an aircraft mechanic during the day, and after seeing the results guys were getting with paint masks, I thought I could apply the technique to full sized aircraft. The shop I worked at did a lot of high end avionics upgrades, and the need for unique stencils and placards allowed me to convince the boss to buy a Cameo III for that purpose. Since It was my idea, I got tasked with learning and putting it to use. Here are a few results. This is a circuit breaker panel from a Cessna 172 An entire brand new panel for a Piper Commanche 4001 point
-
G'day Ladies and Gents, I've never made paint masks, however I'm familiar with Adobe Illustrator and I'm planning to make paint masks for my 1/24 Jagtviggen. Therefore I'm here to learn all about paint masks. Cheers Rainer1 point
-
Good morning (here at least) to everyone. Just ordered a Portrait 2 a few days ago, so the timing is great for this forum. Looking forward to getting my feet wet and hopefully contributing some. Chris1 point
-
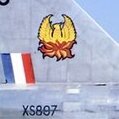
ICM's excellent 1/32 scale Gladiator I shown in 56 squadron colours. K8000 was definitely a 56 Squadron aeroplane, whether it had the famous red and white chequers has yet to be proven! All markings including the firebird on the tail fin designed and cut using the Cameo. The firebird was the limit of the cameo's capabilities I think and was tidied up afterwards with a fine brush.1 point
-
Long time LSP member and modeler here. While I've not yet entered the world of custom masks, aside from some Montex store bought goodies, I anxiously look forward to learning more, and most certainly will benefit from some custom stuff, in the hopefully not too distant future. Kevin1 point
-
Hi all, Love my silhouette, the plotter, not me 🙂 Hope to update my knowledge about masks and share some files. Cheers. Richard1 point
-
One of the skills, perhaps considerations might be a more accurate word that I’ve learned over the years that I’ve been using my cutter, is how to efficiently draw the designs. My favourite “buttons” on the top tool bar are “copy” (Ctrl +C), “paste” (Ctrl +V), “Object” - the drop down menu enables a mirror or flip function, and “Group/Ungroup” (Ctrl+Shift) which enables you to select drawn lines/shapes and group them as one entity. Being familiar with these few keys gives you the ability to be able to draw shapes quickly and accurately and to make the best use of the design software. I am by no means whatsoever claiming to be an expert with these things, more a functional user using what I have found works for me and if I can pass on a few of these tips then I’ll be happy! I love the challenge of having a new set of masks to draw then planning how to go about it. I spent an hour or so yesterday drawing some masks for my Lightning so I’ll add to this thread a little later with some pointers about how I did them. Watch this space......😀 Max1 point
-
This is the last model I "completed" and is a what-if scheme I came up with. Scale is 1/32nd. All the markings save the actual camouflage itself and the JG 27 badge were done on the Silhouette cutter. This also includes the very small and intricate crossed swords and leave 200 kills badge. Some of the masks made for this (upper and lower crosses, fuselage hakenkreuz ect) have been uploaded here for anyone to use: I also have an actual JG-27 badge in Silhouette cutter form, so will try to upload that here as well. Cheers!1 point
-
Bit of a grand name for it Kev, but I hope it's helpful as a starting point for new users. It still forms the basis for all that I do with my cutter. I thought I might add a screen shot of the main tools that I've been referring to, without getting too technical - cos I get lost very quickly with techie-lingo!1 point
-
Yeah - sorry - will try to remember BTW - it dawned on me that it was not this way this plane looked on april 6th.... how could it have 15 kills on the tail if it was the first? Since Lützow only had 5 in Spain, it must be from other pilots scoring on this plan. But it did most certainly look like this at some point... I have the pictures to prove it1 point
-
So these are the masks that I drew for the Lightning, all in 1/32 scale. Firstly it's worth saying that I draw everything with the page really enlarged so that the positions, points and edges of my lines are as precise as possible. You can reduce the page size to check every now and again. My starting point was the sheet of markings provided with the kit, I measured the diameters of each part of the largest roundels then selected the circle tool from the left hand selection box - it doesn't actually draw circles per se though. The latest update to the software includes a centring cross to everything you draw, it's so useful for alignment purposes. See below for the main tools in this article: I drew the inner circle, noting the distances shown on the x and y axes as I drew it, making sure they were the same! I changed to the "edit" or "move" tool at the top of the left hand selection and dragged the circle so it was centred on a grid. Then I copied it and pasted another circle, dragged it out to the required size and centred it over the first one. I then repeated this operation for the largest circle. To group these three, press and hold "Cmd" + Shift then click on the "Group" icon on the top bar. The roundel should now move as a whole design. To do the smaller roundels it's simply a matter of copying the first one then scaling down to the required size. For the nose art I was lucky that the roundel was the same size as the underwing one. The original transfer sheet had a chequer design which again I measured; 6mm squares. I reset the grid settings* to that size which helped with line length. Once I'd drawn the first 24mm horizontal I copied and pasted two more, then dragged and spaced 6mm apart vertically, lined up on the first one. Next was a 12mm vertical, again copied and pasted three times then dragged to position which gave me the main longer chequerboard design. Again, group this as a unit. One little complication is that the edge next to the roundel has a slight curve on it to "fit with" the curve of the roundel, though spaced from it. To achieve this I moved the correct roundel into approximately the right place, then copied and enlarged another roundel so that part of its circumference looked right over the "mating" edge of the chequers. Then I used the eraser tool to get rid of the rest of the large circle and cleaned up the other edges. Note, if you erase any part of a grouped design, it automatically ungroups the whole lot, so you have to go over it all and re-group. *Note: you can select "Snap to grid" but I haven't found this at all useful, I prefer the control I get with "freehand" drawing. Once this was done I copied the chequer, went up to "Object" on the top menu bar, selected "mirror" + "horizontal" so I had both sides. One of course was too long so I ungrouped this, reduced the size of the horizontals (either with the eraser or by grabbing the handles and moving) and cut out (Cmd + X) the unwanted verticals. That just left the fin flash colours, a couple of words of caution in this little bit! To get the angle right so the flash aligned with the front edge of the fin, I scanned a drawing from the instructions and saved it to my photos. With the Designer edition (but not the basic one) you can then simply drag the picture onto your drawing screen; it effectively "sits" on top off what you've already drawn. You'll undoubtedly need to reduce it to a workable size and then before you can draw "on top of it", ie trace it, you go to the top bar where, next to the Ungroup icon (see above) are some more little juxtaposed squares. Click on the one that has Alt text saying "Send to the back", this brings your drawing to the front so you can draw lines over the picture! Clever stuff!! 😃 I drew a line about a third of the length of the front edge of the fin, then a horizontal about the width of the three stripes, all approximate because I have no set dimensions so it's Mk 1 eyeball stuff. I copied the horizontal line and dragged it to the bottom, then copied the sloping first line thrice and spaced them according. Click on all and group. As before, once you've got one, copy, go to "Object - mirror - horizontal" done! Word of warning through bitter experience! DO NOT HIT THE "Save" BUTTON ON YOUR DRAWING WHILST THE PICTURE IS UNDERNEATH IT! If you do, you will have saved the whole lot together and I don't think you can "unstick" it? So do your design, move the picture well out of the way, then hit Save. And that was that really. Just about as basic as you can get, but it works.1 point
-
Another brilliant build, Max! Excellent work with the masks, too. Kev1 point
-
Silver Wings 1/32 scale Stieglitz, home-produced masks to replicate the trainer flown by Peter Spoden: Max1 point
-
Very nice work, Max! I remember you building this one. It's great inspiration for when I tackle this kit myself. I can only hope it turns out half as nicely as yours! Kev1 point
-
1 point
-
At the moment, I have a 1/72 P-40, that I am finishing in a RAAF colour scheme, a 1/32 Spitfire VIII in RAAF Grey Nurse scheme and slowly working on a 1/72 Super Constellation refurbishment. Which will eventually look like the airworthy “Connie” that is at the HARS museum down south from where I live.1 point
-
1 point
-
Thanks for your impressions, Max. We've just had a new member join who is a Cricut user, so I'm hoping he'll share his experiences and perspectives on the brand. I'd also like for us to be able to publish some hardware reviews and evaluations at some point. Kev1 point
-
Silhouette is the market leader and I believe offers the most flexibility and range. Another popular brand is Cricut; I have no personal experience with these but users on the Facebook group about mask cutting give the impression that they are not as well suited to the tasks that we as modellers require. Max1 point
-
1 point
-
1 point
-
Welcome aboard, Rainer! Great to have you here. As it happens, I've never made paint masks either, despite owning a Silhouette Portrait for nearly 2 years now! I'm here to learn, too. Kev1 point
-
OK @Thomas Lund, I think I've added screenshot thumbnails to all your uploads now. Let me know if I've missed any! Kev1 point
-
After that, I played around with different designs, making some stickers for various applications. Stickers on my car Laptop I've since moved on from that job, so I'll be buying a Cameo IV to cut the masks for the 1/32 ME110 thats half built on my bench! Super excited to see what you guys all come up with 😁 Denzil1 point
-
If you've painted a model using paint masks, this forum is the place to show them off! It can be masks you've cut yourself, either manually or using a cutter, or they could be from a commercial mask set you bought. Just include a brief explanation for the benefit of your readers. Note that you can't upload your model photos directly to the forums, and will have to link them from a third-party image host, such as Imgur or ImageShack. I look forward to seeing all your fantastic builds! Kev1 point
.jpg.c5cb30f08408b2d1a8772e75071e8091.thumb.jpg.b269d3f88cea21c3dc4bc025ac115108.jpg)


