Leaderboard
-
geedubelyer
SMPM_Members13Points29Posts -
Kevin Futter
Administrators13Points438Posts -
Timbacat
SMPM_Members8Points36Posts -
Rick
SMPM_Members5Points4Posts


Popular Content
Showing content with the highest reputation since 06/06/2025 in all areas
-
3 pointsThanks to the the file I found here I made the letters. Now the serial number, I cannot find the right numbers. Some help would be appriciated. Rick.3 points
-
3 pointsHi all, I have been making models for just over a year now and I am really enjoying it, although being an ex-mechanic and having fingers more suited to undoing bolts and handling spanners, I find them a bit fiddly sometimes. I have made mostly 1/72 so far but my last model was a 1/48 scale Tiger Moth and hoping to do something bigger in the near future. Recently discovered the beauty of after-sales extras (think that is the term), so having seen the advantages of not struggling to mask canopies, etc I decided to 'buy my wife' a Cricut Maker 4, for her crafting hobbies 😉. Looking forward to sharing ideas and tips in this brilliant hobby on here and I hope everyone is well and having a good day/week/month/year. 😁 Thankyou for reading. Jamie.3 points
-
2 pointsThanks Kev. The image above was the final try. This used low power and slowish speed. Anything stronger or faster didn't cut the finer details well. As you can probably imagine I'm still at the experimental stage of all of this. One thing in particular I've been keen to try is engraving onto metal. In this instance, wine bottle foil. For many years I have made data placards by scratching lines into the coloured surface of the foil with the tip of a blade. This new tool permits greater sharpness and fidelity. I cut these out with a blade but in theory I could turn up the power on the laser and cut them out using that. 🤔 Another thing I've thought about but have yet to try are instrument faces. My plan is to overpaint some white/off white wine bottle foil with black and see if I can buzz just the black away leaving the white showing. Should be fun trying. 😄2 points
-
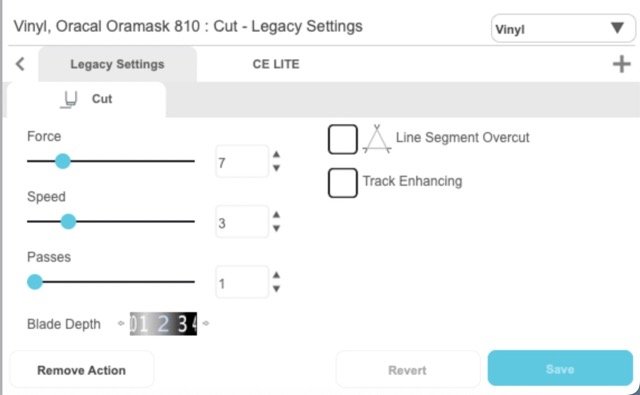
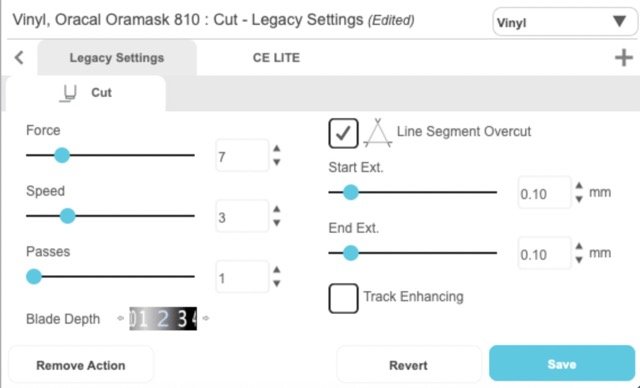
Line Segment Overcut is very useful, but be careful that you do not inadvertently clip off very small parts in tight places. Gene K2 points
-
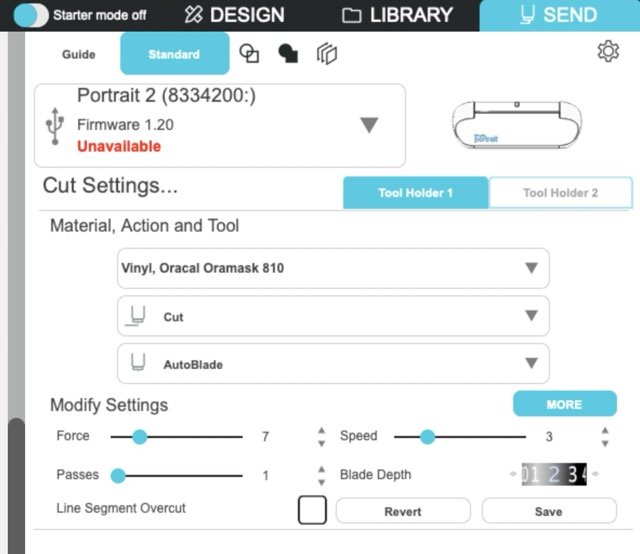
It's come to my attention that the interface for these settings is quite different in the latest versions of the Silhouette Studio software. I'm using v5 of the software (5.0.219ssbe Business Edition), and I found them by going to the SEND area, then clicking on the MORE button in the Modify Settings area: This opens up a long list of material types, but there's a settings panel at the bottom, which contains the settings in question: And a couple of parameters you can adjusted when selected: Kev
 2 points
 -
2 pointsSo, I've had a very brief play with the machine. I wanted to create a couple of masks for the seat of my Hunter model but lost enthusiasm when I couldn't get the laser working and hand painted the lettering instead. However, I had already created a file in Lightburn so used that as a test. Taking some scrap from the 1ManArmy masks I had left over from the Spitfire build I experimented with various speeds and power outputs. There is still some work to be done as you can see. This was two passes using 5% power and a speed of 3300. I admit I'm more optimistic than I was this time last week! 😉2 points
-
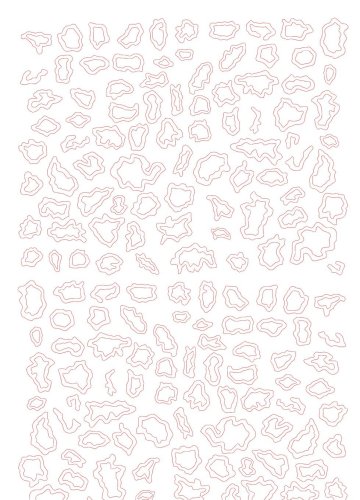
2 pointsSmoke rings - Rauchringe - 1/48 Hello! I've created a "smoke ring" for the Italian camouflage in 1/48 scale. Have fun crafting! Harry File Information Submitter Timbacat Submitted 06/24/2025 Category Camouflage Patterns View File
 2 points
 -
2 pointsHi guys. A short update on (lack of) progress. I've had a great deal of help from Craig (CraigH on LSP) who has been enormously patient with my ineptitude. However, we have come to the conclusion that much of fault lies with my PC and Windows 8. A visit to the Lightburn forums seems to confirm this. I have access to a laptop running Windows 10 so when I've recovered a bit and feel less fatigued by it all I'll have another try on that machine. 😮💨2 points
-
2 pointsIt looks like Imgur doesn't want to give you access to the proper image link, which is a bit annoying. The easiest way to get at it is to right-click on the image (assuming you're using a desktop browser and not a mobile device), and choose your browser's version of "copy image link". Then paste that link into the post edit window here. This should give you something like so: Very nice build, by the way! Kev2 points
-
2 pointsWelcome Chuck. Very much looking forward to seeing you get to grips with making custom masks for your epic projects. Having seen many of your magnificent offerings in the past I can only imagine how the freedom to create your own designs will benefit the schemes for your modelling projects. I hope you might bring your inimitable style to sharing your adventures and escapades as you learn this new skill Any of your customary "assistants" will also be most welcome. 😉 Cheers, Guy2 points
-
P-47D Thunderbolt - Francis Stanley "Gabby" Gabreski Hallo, 1/48 P-47D Thunderbolt - Francis Stanley „Gabby“ Gabreski Keine Abschussmarkierungen, da diese zu klein sind um sie vernüftig zu plotten. Leider ohne Camouflage, da ich noch keinen guten Weg gefunden habe, um diese spezielle Tarnung zu plotten. Gruß Harry File Information Submitter Timbacat Submitted 06/06/2025 Category U.S. - WW2 View File
 2 points
 -
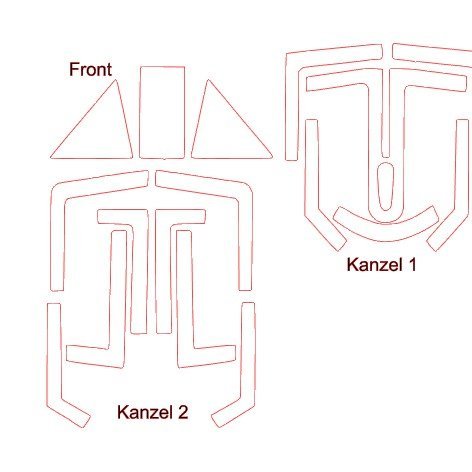
1:32 - Fw 190D-9 Canopy - Early and Late Versionen Hello Here are two versions of the canopy - Early and Late Versionen - for the Fw 190D-9 in 1/32 scale. Have fun building! Harry File Information Submitter Timbacat Submitted 07/04/2025 Category Canopy Masks View File
 1 point
 -
1 pointHello folk. I've just pulled the trigger on a Creality Laser Falcon laser engraver. This was a bit of a spur of the moment "looks like a bargain" knee jerk buy. 🫣 I have used 1ManArmy laser cut masks and enjoyed their fidelity. I am hoping that I will be able to create my own masks using this tool. I have zero experience with this sort of thing so I have to expect failures. There is also no guarantee that this device, which is aimed at the crafting hobbyist, will give me anything close to the fidelity I hope for. Experimentation will be the name of the game. It comes well packaged in a stout cardboard box. Rudimentary instructions and assembly guide on the top with some fun stickers. I made sure everything was present. Creality include a pair of tinted glasses to use during operation but no base plate in this kit. The user must source and provide a suitable flat metal plate to protect the workspace from damage. The working area is 400mm x 415mm once everything is assembled. The machine operates either by USB-USBC cable directly from your PC/other interface or by using a TF card straight into the engraver. Creality supply a square of thin plywood and a pre-loaded test piece to give the machine a whirl. I'll report back with more in due course. Cheers, Guy1 point
-
1 point
-
1 pointAfter spraying a piece of white wine bottle foil with Chaos Black spray primer I tried a quick test with the engraver and things look encouraging so far. The next test needs to be an instrument dial face. Watch this space.....1 point
-
1 pointI'd venture to say that this is still much better than any of the blade cutters could manage! Kev1 point
-
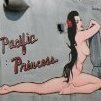
1 pointHi, I am working on LSP on the Border 35th scale Spitfire. This is how it must look when finished. I made the roundels the old fashion way by cutting up tape But now I have trouble finding the right letters for the V, S and the serial number. Anyone here who can help me with this problem? Thanx Rick1 point
-
1 pointThanks Kev. Here's another pic of something I've been asked to try. These stars are intended for 1/48th scale. I don't know exactly how they will look when painted. Also, I don't think the machine can do much smaller1 point
-
This handy article on the 3DCuts website discusses a feature introduced in v3 of the Silhouette Studio software that helps make sharp corner cuts better: https://3dcuts.com/silhouette-line-segment-overcut-tutorial Thanks for Leon over at LSP for posting the link! Kev1 point
-
Thanks Kevin, I had no idea that could be changed and I've now reverted back to the classic display.1 point
-
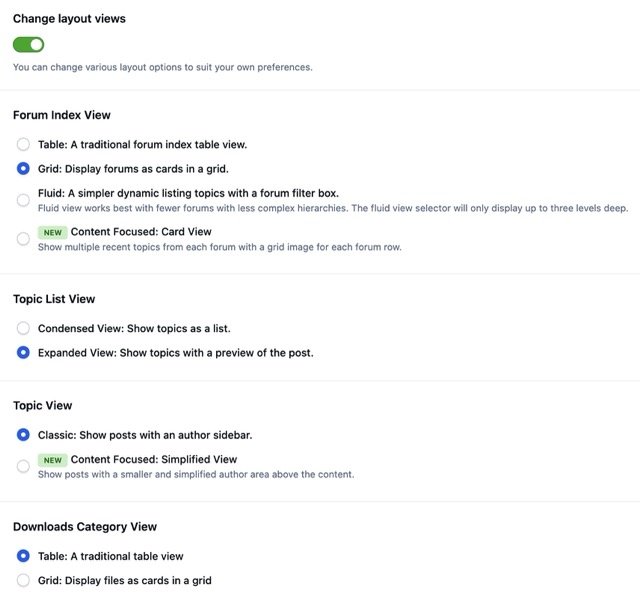
With the new v5 of the forum software comes a new interface, which is radically different from the previous one, and takes some getting used to. It's also not everyone's preference, so if you prefer the old style view, you can change this in your profile settings. Here's how: Firstly, edit your profile by choosing the "Edit Profile" option from the drop-down menu you get when you click on your forum name at the top right of the screen: Then choose the "Content Preferences" option at the bottom of the list of settings on the left: Enable the "Change layout views" setting, which will then reveal all the options and settings you have for viewing the forums: Kev


 1 point
 -
Let's hope they keep supporting it, as it seems they have a strong preference for the new style! I don't mind it personally, but I do appreciate its drawbacks. Kev1 point
-
Thanks for that Kev. I have to say that I don’t like the boxy- grid format at all, find it most off-putting, so I’m much happier now that I have reverted to the “classic” format. Max1 point
-
1 pointProgress is progress, Guy! Good to see you getting somewhere with it. Kev1 point
-
This is actually a user-controllable setting now. Edit your profile from the menu at the top right of the page, and then select "Content Preferences". This will give you something like this: Enable the "Change layout views" option at the bottom, and you'll be able to select how you view the forums: Kev

 1 point
 -
1 pointHI All, I'm not new to model kits, however, just wanting to get into making my own masks for airbrushing. I've recently purchased a very little used Cricut Maker 3, and using its program Design Space. So, I know that I probably am in for another learning curve, but I want to give it a go. I will trawl through the forum to try and find what I'm looking for, but any pointers would be greatly appreciated. Cheers, Michael.1 point
-
1 pointHere's the latest. With the help of my son we managed to get the PC and Lightburn to see the laser 😲 Whether I can do anything with it remains to be seen but it appears to be a step forward. More soon.1 point
-
1 point
-
1 point
-
1 pointThat's a shame, Guy. I hope you can get it resolved without too much mucking around. Kev1 point
-
1 point
-
1 pointHobby Boss F6F-3 Hellcat built as White 36 on USS Hornet in June 1944 The kit itself is very simple, light on details but the fit was much better than I was expecting. My biggest issue with it is the decals which were scaled oddly and looked toyish As the interior and decals were not that great I decided on closed canopy which would end up being be one of the key lessons learned I masked both sides of the canopy, prepped the inside then unmasked, cleaned and glued to the fuselage and continued with the rest of the build - at the very end when removing the outside masks discovered I managed to get overspray (which also highlighted some residue) on the inside of the canopy which you can see in some of the pics This is my 12th build since starting the hobby a couple of years ago and 3rd time cutting and using my own masks, which I am happy I started down this path as the results look much better to me I have Silhouette Portrait 4 and used Tamiya masking sheet for the Canopy and Wheel masks, and Oracal 810 for the Insignia and Numbers mask Thank you to the folks contributing to the site library of Insignia's I was able to use This is my first tri-color Hellcat and I had two goals for this build: 1) practice the tri-color (or more accurately 4 color) scheme using Vallejo USN Sea Blue for the top fuselage, Glossy Sea Blue for the wings and tail, Intermediate Blue and Insignia White 2) practice with the insignia and letters with masks With the exception of the canopy, pretty happy with this build overall1 point
-
1 point
-
1 pointI'm a retired comics, concept and storyboard artist living with my lovely wife and irascible dog on beautiful Whidbey Island, Washington. I build mostly 1/48 aircraft and vehicles, but also have a few subs, ships and military vehicles in my stash. I have a Silhouette Cameo 4 that I have yet to fire up. I wanted to learn how to use and make files for cutting both masks and plastic parts. You may know me for my build threads and sassy mascots- cheers!1 point
-
1 pointWelcome Jamie. Shrewd gift purchasing. It would be great to ride along on your journey of discovery if you feel like sharing your experiences. As a complete newby to the creation of masks I 'd enjoy learning more about how you approach things as a novice and whether you encounter any challenges. Good luck and enjoy the creative freedom your wife's new toy brings. (That doesn't sound right but you know what I mean 🤭) Cheers, Guy1 point
-
1 pointHello Jamie, and welcome. Buying your wife a Cricut is the way to go, “my” Silhouette machine was a present for my wife 11 years ago, bought to help her card making hobby. She still doesn’t know how to use it!1 point
-
1 pointAs far as I know, this is software for lasers, not plotters. Do you have a laser or a plotter?1 point
-
I can do that. I didn't know it was required. 😉 Harry1 point
-
 Hallo, 1/48 P-47D Thunderbolt - Francis Stanley „Gabby“ Gabreski Keine Abschussmarkierungen, da diese zu klein sind um sie vernüftig zu plotten. Leider ohne Camouflage, da ich noch keinen guten Weg gefunden habe, um diese spezielle Tarnung zu plotten. Gruß Harry1 point
 -
Hello everyone, there are now quite a lot of 3d printing accessories on the net. The Arma Hobby stuff looks very nice. Many things could maybe also be adapted quite easily to other aircraft types in a freeware CAD like Fusion360. I am also amazed at these display bases that some people offer for download very cheap:. https://www.armahobby.com/category/3d-files https://cults3d.com/en/3d-model/art/wwii-us-aircraft-carrier-diorama-and-display-base-1-48-scale-200mm https://cults3d.com/en/3d-model/art/nimitz-class-aircraft-carrier-diorama-and-display-base-1-48-scale-300mm Who has already gained experience with this and can report on slicer settings for such small parts etc.? I would be happy to bring this topic to life here! Very Best Regards Frederick alias Milo1 point
-
1 pointI had exactly the same problem with Cricut Designspace. The ubiquitous RAF TTF file loads nicely in Word, but not in Cricut. As described, I typed out what I need in Word, then screengrabbed it, and saved as PNG. I actually converted it to SVG before importing into Cricut, but I think I could probably have taken it straight in. You should be able to scale from there. I'm preparing a Border Lanc build, so I'll be using masks for the lettering, rather than decals. Now to do some roundels!1 point
-
1 pointI see Kevin. I do see folks who want custom decals masks but don't have the resources and there are no lists that I know of of people who would be happy to make masks for others but it's not really practical to advertise as an individual. For an example, Rob de Vie has a site re making your own decals and has a list of folks that will make them for you. Even if there were only a few folks who would be willing, at least it would be someplace we could send them. I fully understand your issue with real life eating up your time, it was just a suggestion, maybe in the future. Take care.1 point
-
0 pointsThanks guys. I'll be honest and confess that it's taken the wind out of my sails. All of the "help" videos make everything look so easy because the software does what it's supposed to. My PC won't recognize the laser at all so there's no current way of selecting it to move on. I am going to see if there's a way to simply save a file into the supplied TF card and use the laser stand alone. So far though I can't save a design as the correct file type....☹️ * Sigh *0 points