
Leaderboard


Popular Content
Showing content with the highest reputation on 01/03/2024 in all areas
-
Looking good so far, Paolo. If you can't drag the red nodes (dots) on top of one another to connect them, try this: Using the Select tool, highlight all the lines/objects at one time, then right click and press "Make Compound Path". After that, you can simply drag the red nodes onto one another to "connect the dots". (sorry, I don't speak Italian so have no idea of your program terminology) This is where you need to understand how to work with the nodes. Too long to cover here, but YouTube will explain if you'll search on "Silhouette point editing" as I suggested ... for example, here. You can start by clicking on a node to highlight it, and then you can delete it (Delete Key), or move it (Right press and hold) to smooth the trace. Ultimately, however, you'll have to learn about "node types" and how to use the node "handles" (Bezier curves). Sounds harder than it actually is!!! You're almost there so stick with it a little more. Gene K2 points
-
DC Gordon's Spitfire XIVe Markings in 1/32 Scale View File Note: I developed and used these markings for my 1/32 Spitfire XIVe build. For some reason the main squadron codes have a thin outline that I was not able to remove (probably something simple but I am definitely on a learning curve! However, I got them to work so hopefully you can as well. Cheers, Tom Submitter uncarina Submitted 01/03/2024 Category Aircraft - Military1 point
-
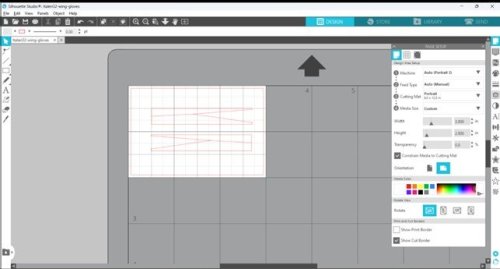
well, so to speak, I finally unpacked my Silhouette Portrait 3, downloaded and registered the device, searched for and watched several tutorials, but... to start with something simple, I would have decided to create my own masks for the spiral on the spinner and the individual number for the Yak-3 Special Hobby 1/32. I tried scanning the decal sheet and photographing it. I managed to import both files into the dedicated program, but apparently I can't detect the contours of the scanned copy. better with the one photographed, highlighting the contrasts. scanned one and .jpg I managed by trial and error to isolate the spiral and arrive at this point now I would like to join the main points of the curves, eliminating what is unnecessary and disturbing, but I can't find the right command (or sequence of commands). even getting just this far was quite frustrating, the tutorials I found didn't enlighten me, and the site manual doesn't go into detail, I think. Do you kindly have any more detailed tutorials or manuals? TIA, cheers, Paolo1 point
-
oookaaaay... Did someone say "frustration"? 🙄 I played a bit as suggested by Gene with the parameters of the editing function (I have the menu in Italian, I suspect that this also generates confusion, I have to change it to English) and obtained a clearer picture: the points of the image as they are are objectively many, around 400 so, always following the suggestions received, I tried to simplify with the dedicated command. better, definitely. then I watched some tutorials on how to join the separate lines of the design, finding two systems: select all the parts of the design and use the "weld" (salda, in Italian) function or zoom in and join the individual points two at a time. and here I am stuck: I can't connect the various parts of the drawing. furthermore, having done this, I would like to modify the lines trying to make the curves of the spiral more fluid: zooming in you can see that the curve is not homogeneous but full of jumps which I imagine create confusion for the plotter during the cutting phase. I continue to bombard the keyboard with commands that prove useless, waiting for help. I continue also to ask myself how it is possible that there is not (or that I cannot find) an exhaustive manual of this new to me discipline, since the last century I have been accustomed to reading a manual and applying its indications, not to trying things out... to say that It's frustrating, it's not much! TIA, Paolo1 point
-
Version 1.0.0
0 downloads
The 1/32 scale Italeri Tornado kits (at time of submission IDS, ECR and GR4 boxings) have a wing glove in a vinyl-like material to protect the slot the wings sweep back into. It occurred to me while building my GR4 that this would need masking for painting, so I knocked up these masks. The top one is for part 4J (port), under that 3J (starboard). NB: I have tested these against the wing glove parts, but have not tested them yet on the assembled model. When I have I'll update them if need be.1 point -
View File 441 Squadron Mustang This is my first attempt at making my own masks with a Cameo 4. I cut them onto Tamiya masking sheet, which seemed to work OK. In the photos which show the results on the 1/72 Academy Mustang, the insignia and squadron codes were painted using the masks that I'd made with the cutter. I'm fairly pleased with the result, however the roundels are a little wonky. The smaller serial numbers are decals, as the cutter couldn't cope with that small size with the Tamiya tape. I have some Artool Hobby Mask that I may try in the future for such small lettering. Submitter Tom Doolie Submitted 02/13/2021 Category Specific Aircraft1 point
-
Michael, Like Mozart, I like and use Silhouette Studio "directly" to scale, manually trace, and draw scanned decals. The trace feature included with Studio also works nicely, but is not as precise as manually tracing. Instead of suffering "access to a Cricut", you may want to consider this great deal at Walmart - a Silhouette Portrait 3 for only $150, including free shipping.👍 Gene K1 point
-
1 point
