Leaderboard


Popular Content
Showing content with the highest reputation since 04/20/2023 in all areas
-
Hello, fellas ! Here's how I create masks with my Silhouette Cameo for my example of W.Nr for 1/32 German aircraft. Of course, it also works for letters. I noticed that the masks featuring numbers with an inner recess (0, 4, 6, 8 and 9) were torn. The cause was that the Cameo's blade passed too close (the numbers are really very small) to both the outer contour and to cut the recesses. To solve this problem, here's what I do: 1-I select the "text" function in the left-hand column and on the right I choose the font and also the size of the text so that it's as large as possible while still fitting entirely within the Studio window : 2-I duplicate my text and position it below : 3-Use the "eraser" tool to remove all inner recesses from the top text : 4-And on the bottom text, I do the opposite and remove all the text outlines, leaving only the recesses : 5-I select the set, group it together and then cut it to the right size for my model : 6-For my FW 190 the W.Nr will have a size of 10.18mm : 7-I cut out the assembly, place the main mask on my model, carefully detach the 3 recesses and place them gently and precisely in position, apply a light coat of black paint with the airbrush and you're done : That's all folks! For today that is. I hope this little tutorial has been of interest to you. See you soon for new adventures with the Cameo! Denis.7 points
-
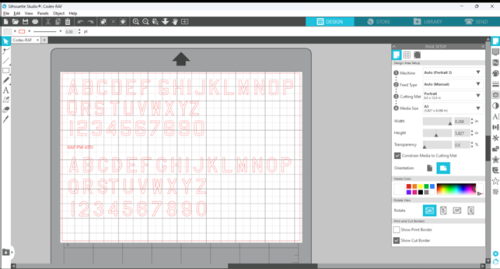
View File Codes-RAF I saw a thread on LSP recently, in which the OP described the difficulties with installing certain fonts, which are recognised by MS Word and other software, but not picked up by the Silhouette Studio software. The process the poster described was basically the one I used: Type up the lettering you want in MS Word, scan it in, and manipulate it until you have your codes in your studio 3 file. What a bother! But there is no way round it. However, the thread reminded me that I had created this file, but not uploaded it here. So better late than never, here it is. It contains all the letters and numerals in two of the most common font styles used by RAF aircraft. You can use them for squadron codes, serial numbers, or whatever you choose. Just copy and paste the characters you require into your own Studio 3 file, size them and arrange them to suit your subject, and off you go. Applicable to all scales - although the smallest I've managed to cut are the 4" characters that the RN use for serials in 1/32 scale. Hope this is useful. Submitter MikeC Submitted 11/24/2023 Category Aircraft - Military7 points
-
Good day everyone! I am a modeler from the city of Grand Rapids, USA. (We happen to be getting a blizzard right now.) I mostly build aircraft in 1/72 and 1/48 scale, and I have been considering getting into creating my own masks for a year or so. My initial interest here is painting aircraft graphics and lettering/numbering instead of using decals that are hard to find, expensive, or damaged. Yesterday, I came across a previously owned, well-maintained Silhouette Cameo 3 with some extras for $60. Seemed like a good entry point, so I jumped on it. I use Hyperscale Forums regularly, and saw this website posted by a member several months ago. I just joined this forum now that I have a cutting machine. Looking forward to learning from everyone here as I get into this new aspect of modeling. See you around! -Steve EJ6 points
-
Hi, Thought I would introduce myself, Im a 1/72 scale modeler from central Scotland, mainly aircraft and armour , but I've dabbled in some fantasy and naval stuff. I really really like building dioramas, maybe its I like to tell a story lol I have about 5 ideas in my head for dioramas and one on the bench lol. I enjoy building entropy stuff, you know wrecked ruined and abandoned stuff as you can see below. I picked up a Cricut Air 2 just before xmas second hand for £90, I guess am wanting to experiment a little and see what I can do with it, I like the idea of being able to create my own masks for things like aircraft code letters, I know the tiny serial ones are too small lol, I had the idea to get a cricut when I tried to 3D print masks for a USMC Corsair that I was building and couldnt find the decals. I love 3D printing and Ive also just picked up a 3D scanner am trying to get to grips with lol. What am hoping I might get from here, is not just the excellent masks that you folks have created but I guess am wanting to try and figure out how you do it so I can figure out my own workflows. The web is awash with Cricut videos but theres very few that shows how to achieve what I think we want to use Cricuts for. Thanks for the add Butch5 points
-
just landed. literally: the courier threw it over the gate of my property in my absence. I hope it hasn't been damaged... for the moment Cigolino (little squeaking) is sitting in his box waiting for me to get my hands on it.5 points
-
Dear all, I want to show you the result of the work that Max did ! The letters turned out a bit small, (my fault) but I can live with that! I needed to to some small touch ups, easy to do. A big thanks to, and a round of applause for Mozart for his work! With regards, Rob5 points
-
Hello there! I'm a French expat in beautiful Estonia and a 1/72 aircraft modeller. My Silouhette Portrait is on the way and I'm pretty excited about the opportunities for custom markings, canopy masks and other modelling purposes. I hope to be able to contribute to the library very soon 🙂 Thanks for having me!4 points
-
View File 1/32 Scale US stars and bars Made this file for stars and bars mask for a P-51. Scaled for the different sizes. Printed them on Tamiya sheet paper on a silhouette portrait 3, blade depth 1, force 6, speed 1, pass 1. There was very minimal lifting on a couple star points but using a rubber cuticle pusher, was able to return the points to their correct position. Submitter Dan_103 Submitted 09/10/2023 Category U.S. - WW24 points
-
I understand completely your problem Kev, had the same issue with swastikas with narrow white outlines in the past which is why I went for the two mask solution.4 points
-
Hmmm, that sounds strange. Are you sure? What kind of blade? I'm adding some photos here. Two of the photos point out something I did with my first attempts to cut masks which left the appearance of not cutting. 1. This is an AutoBlade and the little tool will loosen or tighten the bottom of the blade housing. It's useful to clean out little bits that might become stuck inside the blade. When you take the end off the AutoBlade housing, the blade is visible. 2. If you're not using an AutoBlade for Cameo 4, you will have to manually set the depth of the blade. 3. The 'handle' that I have hold of, is the latch for the blade. Note that looking in the small hole in the first picture it is black and in the second picture it is green. Green means it is latched. The first couple cut attempts, I didn't realize this is a latch and when the machine did it's thing for setting the blade depth, it just pushed the blade upward and the blade barely touched the mask material. 4. something else to point out, the AutoBlade movement in total is 1mm. That means each depth setting 1,2,3, etc. is adjusting the depth by 0.1mm or 0.004". Dave4 points
-
Hello mdb, You can create a new material and name it Oramask 810 or whatever. In the area where the settings are, click "MORE". At the bottom of the list are + and - signs, click +. You can make settings and then save them for future selection. I've used 810 and I'm also using Artool Ultramask. AutoBlade Depth 2 Force 6 Speed 5 Passes 1 Accel. 1 Dave4 points
-
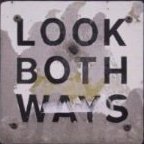
Just as a quick update on this model, it's now left my collection, and has a new home in the Bentwaters Cold War Museum. This is a small but excellent museum, run by what is clearly an enthusiastic and committed bunch of volunteers, who include a number of modellers who are also part of the local IPMS branch. Thoroughly recommended if you're ever in that part of England.3 points
-
Hi, folks! I´m sure that those cricut-machines etc. are the most comfortable way to do some masking. But in my case, i had already purchased a laser-module for my 3D-Printer because of other applications. So i wanted to figure out, if it is also useful for making some 1/48 masks. So if someone else here is interested in laser cutting: i can recommend the following settings for a 5W-Diode-Laser in combination with Lightburn and Tamiya masking paper: 150mm/min and 5% Power. If some of you guys already did some laser cutting, i would be happy to hear about your experience with different materials/parameters. Currently i am building the Tamiya P-38 (what a gem of a kit!). I think in 48-scale it looks better to use the provided decals for everything besides the larger insignia. I have tried to make a mask for the "Miss Virginia"-Lettering, but i think it´s just too small to handle and align the letters. Nevertheless interesting to see how accurate this setting performs.3 points
-
View File Rib tapes and stitching for biplanes etc This is my solution to replicate the rib tapes and stitching seen on biplanes with fabric-covered wings and also some monoplanes which still had fabric covered elevators, rudders etc such as the Hurricane shown in my photograph. Submitter Mozart Submitted 03/04/2024 Category Camouflage Patterns3 points
-
View File Airfix Avro Anson 1/48 scale copilot seat frame (folded) STL file This is my first attempt at constructing a 3D model in a CAD program (don't ask how long this took, lol) It's not perfect by any means and I had to "scale" it one millimetre or two narrower before I printed it out. (It is not permanently attached in this sample image - just placed) Also, I cut the copilot seat apart (seat and backrest) and will glue this to the inside of the frame after it's painted black. Lastly, I cut the copilot rudder bars, and re-attached them in the "stowed" position. The "spare" control column will be hung on the rigging. Submitter DBB Submitted 10/31/2023 Category Non-Mask Cutting Files Scale 1/48 Intended Kit Airfix3 points
-
View File Airfix Anson Gun Plate This gun plate was designed to cover the forward-facing .303 machine gun housing on the Airfix 1/48 scale Anson. I don't think the Anson trainers in Canada were armed, so here is my quick fix. (Of course, after I drafted, printed, and attached my plate, I found a photo that shows a better representation than I originally built. (as seen in my primed fuselage half.) The fix is easy though. Before printing, reduce the "X" and "Y" scale by 30%. Also - the thickness is very thin and fragile after curing, so do not reduce the "Z" scale at this time, rather, after it is printed, sand it as thin as you need. Submitter DBB Submitted 11/06/2023 Category Specific Aircraft3 points
-
The upgrade to the Designer Edition is currently on sale for $25. Good deal! https://www.silhouetteamerica.com/software/ss#upgrade Gene K3 points
-
Tom, Your "outlines" are a result of the method you used to trace. As it is, both sides of all lines were traced (except the two rectangles on the bottom left - you probably drew these two vice tracing them). If you zoom in on your roundels, for example, you'll see eight jagged concentric "circles" vice four. Your circles may appear smooth, but each jag requires the cutter to zig zag, so the cutter will seem to shudder as it negotiates all those turns. Youtube has explanations as to why the double lines happen - search "Silhouette Double Line Trace" - for example go to 9:47 in this old video. Also, your made your entire layout a compound path. You may have wanted to group them? To "fix": use the Select tool and right click on any part of your layout, and then press "Release Compound Path". That will allow you to select each individual line, so zoom in and select a path (outline) you don't want, and then hit Delete. Since you have many markings in your layout, this method will take some time. Important-- when done, be sure to group each individual marking, or group all, or Create Compound path. The Silhouette Studio trace feature is improving (slowly .. works "OK") but does not have a Centerline Trace. So if you can't download the required vector font or graphic, you could manually trace using the built in drawing tools. For example, all it takes for the roundels is drawing four circles and then aligning them. Alternately, you could use a program like Inkscape to do a Centerline Trace, save as as vector (like SVG or PNG) and import into Studio to have ready made cut lines. BUT ... much easier to manually trace in Studio!!! Gene K3 points
-
well, so to speak, I finally unpacked my Silhouette Portrait 3, downloaded and registered the device, searched for and watched several tutorials, but... to start with something simple, I would have decided to create my own masks for the spiral on the spinner and the individual number for the Yak-3 Special Hobby 1/32. I tried scanning the decal sheet and photographing it. I managed to import both files into the dedicated program, but apparently I can't detect the contours of the scanned copy. better with the one photographed, highlighting the contrasts. scanned one and .jpg I managed by trial and error to isolate the spiral and arrive at this point now I would like to join the main points of the curves, eliminating what is unnecessary and disturbing, but I can't find the right command (or sequence of commands). even getting just this far was quite frustrating, the tutorials I found didn't enlighten me, and the site manual doesn't go into detail, I think. Do you kindly have any more detailed tutorials or manuals? TIA, cheers, Paolo3 points
-
Hi all, considering buying a cutting plotter, which I then did, I'm waiting for it to arrive, I discovered this forum. some of my models with insignia painted via hand cut masks are already on LSP, but I think I've reached my limit with that technique: it's time to learn something new. see you soon, I hope, Paolo3 points
-
View File F4U4 1/48 OLATHE Masks for F4U4 1/48 Submitter airte974 Submitted 11/25/2023 Category Specific Aircraft3 points
-
Version 1.0.0
55 downloads
I saw a thread on LSP recently, in which the OP described the difficulties with installing certain fonts, which are recognised by MS WOrd and other software, but not picked up by the Silhouette Studio software. The process the poster described was basically the one I used: Type up the lettering you want in MS Word, scan it in, and manipulate it until you have your codes in your studio 3 file. What a bother! But there is no way round it. However, the thread reminded me that I had created this file, but not uploaded it here. SO better late than never, here it is. It contains all the letters and numerals in two of the most common font styles used by RAF aircraft. You can use them for squadron codes, serial numbers, or whatever you choose. Just copy and past the characters you require into your own Studio 3 file, size them and arrange them to suit your subject, and off you go. Applicable to all scales - although the smallest I've managed to cut are the 4" characters that the RN use for serials in 1/32 scale. Hope this is useful.3 points -
Hurricane Camouflage Scheme A 1/48 View File My first post so go gentle! This is the Arma Hobby Paint Scheme A which Arma Hobby kindly made available as a PDF on their website https://armahobbynews.pl/en/blog/2019/01/03/masks-for-hurricane-models-pattern-a-and-b/. I will post the Scheme B once I have converted and tidied up. Hope you find it useful. Submitter Mikeja Submitted 10/14/2023 Category Camouflage Patterns3 points
-
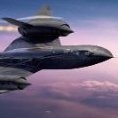
View File FineMolds 1/72 F-15 Single Seat svg File SVG file for folks using other other than Silhouette cutters, or who want to trace/cut manually. Silhouette Studio 3 file is here. Gene K Submitter GeneK Submitted 10/10/2023 Category Canopy Masks3 points
-
The forthcoming new Silhouette machines (Portrait 4, Curio 2, and Cameo 5 )will have an optional static Electricity Technology mat that MAY work with small lettering/numbers. BUT the additional $100 COST MAY BE A DEAL BREAKER to many. Good details here. Portrait 4 and ET mat may work for me - total cost still high at $300. Gene K BTW, the latest version of Silhouette Studio has a much improved trace function. Edit: It appears that the ES mat for the Portrait will be/is appropriately smaller for the Portrait than the other ES compatible Silhouette cutters. I will get one for the new Portrait 4 I just acquired. No details or price available yet.3 points
-
View File p-38_miss_virginia.dxf Exportet as .dxf from Lightburn. I hope it´s usable for maybe other machines like plotters. Just ignore the wavy outline of the "Miss Virginia"-Lettering, it comes out just fine, because of the small size. Submitter MiloMinder Submitted 10/01/2023 Category Specific Aircraft3 points
-
I only build military jets in 1/32 scale. I've been making my paint masks with a Silhouette cameo 1 for a while now. My dream is to find a cutting technique similar to the PAINT masks from 1manarmy.be, but I have my own idea of how it's done, I'm thinking of laser cutting, let's see... All the best. Scan17013 points
-
Good morning, John from Greece (a.k.a zaxos345 as an LSP member) I dont have a cutting machine yet but i am thinking of buying one seriously! Very nice to find you here, a very good starting point to get an idea of how to create some masks!! John3 points
-
I can’t see myself buying anything new with added “tricks and gizmos” unless my trusty Cameo 2, now nearing its tenth year of service, goes irreparably wrong….perish the thought!3 points
-
Thanks for all the tips and tricks. Today i recievd my new cuttertool and put it to the test Its Perfect Mdb3 points
-
This is from the WiP Gene, cut with my ancient but trusty Cameo 2:3 points
-
Kotare Spitfire Mk. Ia Masks View File Kotare Spitfire Mk. Ia Insignia Masks ... these have been drawn based on the kit's decal sheet (ie nothing has been traced). Obviously these haven't been tested (yet) but should hopefully give you guys a basis to move forward with and save you a bit of time Working on the canopy masks, but that could take a bit more time Submitter CB_357 Submitted 03/18/2023 Category Specific Aircraft3 points
-
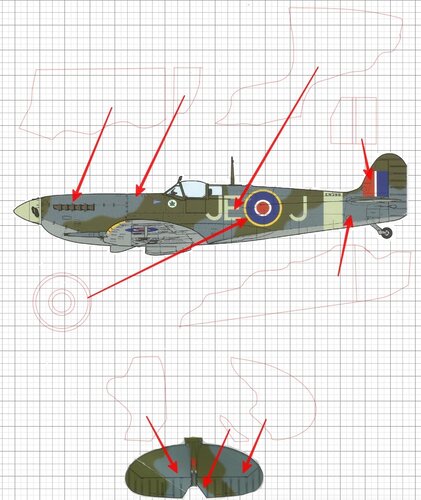
Version 1.0.0
248 downloads
These masks were drawn from the Tamiya instructions for their Mk IX Spitfire but are probably useable on many types as a generic scheme. Please note, I drew these for my own use, they are not perfect and not professionally produced so will probably need "tweaking" if you decide to use them. The screenshots show location of the camouflage sections, it presumes that a base coat of Ocean Grey has been applied so these allow for Dark Green only. UPDATE 26/3/21 I've amended the file for the fuselage; on fitting the masks to my model I found that I had omitted to provide a mask for the port side above the tailplane, this is now included and positioned on the sheet in the bottom right hand corner. Also amended are the engine panels, the original versions were too high. UPDATE 27/3/21 Another amendment, the fin flashes were slightly too large but have been altered to fit. I've also added the mask for the upper engine panel, shown on the sheet as "Nose". Max3 points -
Thanks Kev. When I weeded out all the unnecessary bits, I realized there's a mistake there. This is the final after a recut. First mask piece in place. Paint on. Masks off. I like it. Just 4 more mask pieces to go.2 points
-
Hi Denis, you should be good to go now. Kev2 points
-
View File Airfix Me 410A-1/U2 & U4 kit #A04066 Canopy masking for the two versions of the Me 410 by Airfix. Extra clear parts are on the clear parts tree but not designated in the instructions. Feedback always appreciated. Craig Submitter craig b Submitted 01/07/2024 Category Canopy Masks2 points
-
Thank you Mike! Cheers, Tom2 points
-
Hi again. This test was done with ALTENEW brand masking paper. Got it from a place in Tasmania... That's where my wife comes from too, incidentally. Anyway... The first cut was far from promising. I made 8 examples and decided to push through and see if I could make a decent representation of the text I needed. After weeding, my mask looked like this: was I didn't do a perfect job of weeding, and I think my my blade setting of (1) might have been better at (1.5)... if you can set it there. Now... I have never messed with the cutting settings of my silhouette portrait. Everything is still the way it came out of the box. Here is it painted on a very new paint mule. My poor weeding shows, but you can see that my hasty job isn't too different from the decal below. The main difference between the paper stencil used here and the Oramask 810 I use for everything else, is the superior tackiness of the paper mask. When I cut the 8 examples in Oramask, every triangle from the number Four ended up in the little cylinder holding the knife blade. And they weren't tacky enough to hold on in the face of airbrushing. Whereas the center of the numbers and letters of the paper masks were tacky enough to be attached to the model after the main body of the mask, and stand up to airbrushing. I've included the ruler for scale... But I think I can count this as a minor victory. If anyone can give me some ideas about messing with the cutting settings... I'm all ears.2 points
-
Interesting discussion going on over at LSP https://forum.largescaleplanes.com/index.php?/topic/97944-oramask-810-gone-bad-update/#comment-14256632 points
-
What size are these letters Kev? 3mm is just about the threshold I reckon for successful stencils with Silhouette. I agree with Gene, I’d do them as two separate masks. Sounds like you’ve increased your blade depth rather than reducing it, I’d go with Wuger’s settings but with a Force of 6. Max2 points
-
Hello For this type of material (Oramask 810), use Depth 1, Force 10, Speed 5. As a reminder, each depth of the graduation corresponds to 0.1 mm. The Oramask 810 has a thickness of 0.08 mm.2 points
-
Same problem here and I've come to the conclusion that it's the nature of the beast. The adhesive appears to stick to the blade and pulls the film up. Once this starts it leaves some adhesive residue on the blade exasperating the issue. Every time I try to cut a mask, it's another problem that has to be resolved, what worked yesterday isn't necessarily going to work today. My only suggestion would be to inspect the blade for even the tiniest hint of adhesive residue to worse, bits of the mask, or try a new blade. The other suggestion would be to reduce the depth of the cut. Do you see evidence that the blade has cut into the backing paper? if so, how much? If it appears distinct, try reducing the depth. It should be faint. But none of this addresses the issue of the inconsistency of the adhesive, which has been an ongoing frustration and discussed many times. My last batch of 810's adhesive was very aggressive and left residue on the model. Then I tried 810S and its adhesive was so weak it would hardly stick to the model. There's just so many variables that seemingly change for no logical reason, it's enough to drive a man to drink. Plan B (decals) is a less frustrating alternative. Good luck.2 points
-
Glad you found us John, you won’t regret buying a cutting machine, it opens up so many possibilities. Max2 points
-
I've just joined and this post does a great job explaining the process. Thank you.2 points
-
Welcome mdb, getting your settings right is important so ask if your problems continue. Max2 points
-
View File F-89J Scorpion 1/48 Revell F-89J Scorpion 1/48 Revell Submitter Scan1701 Submitted 08/08/2023 Category Specific Aircraft2 points
-
Hi, i am practicing this hobby since 50 years and still in the learning curve… own a silhouette pointer for other purpose than modeling. Favorite scales are : 1/35 and 1/32 for vehicules and military planes, 1/144 for civilian planes. Benoit2 points
-
"Is it possible to use one mask, apply to the model, then weed while it's on the model and replace the little bits of mask?" Yes, absolutely it is. Like all things it takes practice but it's what I do with all of mine, even complex masks like this: What is important for all masking processes is to think carefully about the order of painting and masking so that you have the minimum of mask removal and replacement. With the serial number for instance it was not necessary to replace the numbers, a simple piece of tape over the whole thing was used as can be seen in the middle picture. Max2 points
-
Rob, If you can't find anyone in Europe, I may be able to help. I am away from home for the next few weeks, but PM me with details ... like the font, size, etc. After I get back home, I can cut the masks for you and send them your way. No charge, but postage would be appreciated. Gene K2 points
-
It's worth a try, and probably what I'd try first. If you've got a spare panel to test it on before 'going live', I'd certainly recommend that. The problems will be twofold: getting exact size matches for the recesses, and keeping any glue smears out of the equation. But any kind of water-soluble glue that dries clear would be your best bet. My preferred method for constructing instrument panels is the 'sandwich method', where a clear acetate layer is sandwiched between a backing piece and the front part containing the dial holes. To me this not only produces the most realistic result, but also obviates all the difficulties with trying to produce an effective glass look for the dials. Here's one I scratch-built for the Matchbox Tiger Moth: Of course, a lot of kit and even aftermarket panels don't lend themselves to this approach, and it also has nothing to do with cutting masks, either! Though I could imagine designing and cutting out the front part of the panel from thin styrene. Kev2 points