
Leaderboard


Popular Content
Showing content with the highest reputation on 09/09/2021 in all areas
-
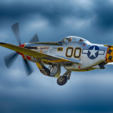
Here are a few recent completions using my Cameo4. Eduard's rebox of Hasegwa 1/72 B-26. All marking done on Cameo except for nose art. Eduard's 1/48th P-51D as June Nite.3 points
-
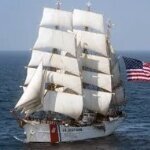
Scratchbuilt RC model, 42” LOA. I bought my Cameo4 for projects like this. I used it to make the masks for the flight deck, including the elevators and numbers. A little OT for this group, but I also cut a lot of little parts with the Cameo, out of .010 and .020 sheet styrene. The Cameo is a great tool when you need about 50 little triangular brackets, all the exact same size!1 point
-
My recently completed 1/48 Hasegawa Typhone Mk Ib with Montex Masks. Only decal was the pilots kill board. First time using masks successfully. The issue I see for me it transferring and getting the right things to stick. Did a little test before with Stars/Bars and that was entertaining. Maybe I'll just stick to Japanese aircraft! 🤣1 point
-
What a contrast between the two incarnations. Great work.1 point
-
The idea behind this was to create something for the Spruce goose. What if Howard Hughes had finally got his beloved "Hercules" into service, maybe in time for Korea? Why not? https://u.cubeupload.com/SAEvans/HK13.jpg This was my very first use of the Silhouette 3 for creating a full set of markings. So basically I needed something fairly simple, not too intricate for me to get to grips with using the programme and the machine. I practised on a number of types of vynil and transfer tapes...lessons learned for future projects of a more daring nature.1 point
-
This is my second attempt at using the Silhouette Portrait 3 for paint masks. A little more involved this time and I have to say it seems like a pretty good result for the markings. ALL of which were sprayed on, so no pesky decalling to fight with. I've uploaded the Silhouette image into the downloads section if anyone wants to try them out in the future. They are a straight replacement for the Tamiya decals, with a few tweaks to get a more accurate set of markings. (eg. Size of the upper wing crosses and style of the tail numbers)1 point
-
Looks pretty impressive to me Steve! You’re right to start off gently! The more work I do on the Silhouette the more I realise it’s all about method, especially finding shortcuts that not only save time but ensure accuracy. An example from yesterday: I was drawing an “S”, it was a squarish one (WW2 RAF style) so there was a horizontal line of symmetry on it. I drew the top half, grouped the lines, copied it, went to “object” on the top bar, flipped it vertically then horizontally then joined the two halves together and grouped them as one. Easy.....and so much easier than drawing the whole thing! Max1 point
-
Welcome aboard, Steve! Glad to see you here, mate. Kev1 point
-
1 point
-
1 point
-
these are monex masks or hand cut sorry for the link for some reason won't let my paste them into the insert image tool1 point
-
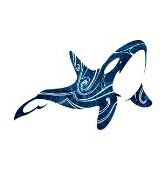
I knocked this one out for a bit of fun in-between more indepth projects. Knife blade for scale. I later painted in the details on the dragon by hand. Just a bit of fun to practice some airbrushing! Denzil1 point
-
Created masks for the airbase and commander codes ("SP" and "52FW") to replace the included decals. Everything else is decal. Things that worked well: scanning the original decals and using them to align replacement text in Inkscape. Also scanned the painting/decal guide from the kit, scaled it to fit, and cut the mask to align with edges of the stab and panels. Love that the color matches the body color perfectly, unlike the original decal, for example the "AF91-352" bit. Things I need to work on. I must have laid the paint on too thick, as I ended up with fairly obvious ridges. I either need to use less paint or figure out how to feather it into the layer below. I also made some simple masks for wheels, the formation lights below the stab atop the fuselage, and the air-refueling door. Loved being able to quickly and accurately create these with the Silhouette. Overall, pretty happy with how this kit turned out, and looking forward to being more creative with masks in the future.1 point
-
Hallo to all! Here one of my last work.... canopy/wheels masks and numbers realized by Silhoutte Portrait. Hope you enjoy... ciao! Valerio. MB.326-115 by Valerio, su Flickr MB.326-116 by Valerio, su Flickr MB.326-130 by Valerio, su Flickr MB.326 end-7 by Valerio, su Flickr MB.326 end-4 by Valerio, su Flickr MB.326 end-20 by Valerio, su Flickr 11998908_442586189260246_7379382820028146589_n by Valerio, su Flickr1 point
-
To apply the Alclad metallic finish I preferred to spray a black primer on the model... so I already had a base black coat for the numbers... this is the main reason. Of secondary importance, I always choice, when I can, to apply the smallest possibile number of masks over Alclad lacquer. 😉 Moreover, the shape and dimension of the MB.326 nose are very small... to align the numbers correctly, IMHO, is better to use the reverse mask method.1 point
-
ICM's excellent 1/32 scale Gladiator I shown in 56 squadron colours. K8000 was definitely a 56 Squadron aeroplane, whether it had the famous red and white chequers has yet to be proven! All markings including the firebird on the tail fin designed and cut using the Cameo. The firebird was the limit of the cameo's capabilities I think and was tidied up afterwards with a fine brush.1 point


.jpg.c5cb30f08408b2d1a8772e75071e8091.thumb.jpg.b269d3f88cea21c3dc4bc025ac115108.jpg)
